Before printing, you should thoroughly check the 3D printer and filament (see 6.2 Before You Print).
4.1 3D Printing Workflow
⇩
⇩
⇩
⇩
⇩
⇩
4.2 Level the Heated Bed
Leveling Mode
There are four leveling modes to calibrate the Heated Bed—Auto Leveling, Manual Leveling, Heated Auto Leveling, and Heated Manual Leveling. Normally, Auto Leveling or Manual Leveling is the go-to choice. If the first layer cannot stick to the Heated Bed, try the Heated Auto Leveling mode or Heated Manual Leveling mode to improve the first layer adhesion.
To switch the mode on the Touchscreen, tap Settings > 3D Printing > Auto Leveling or Heated Leveling.
![]() Do not the touch the Heated Bed with bare hands while using the Heated Leveling mode.
Do not the touch the Heated Bed with bare hands while using the Heated Leveling mode.
Auto Leveling
(1) Turn on the 3D printer.
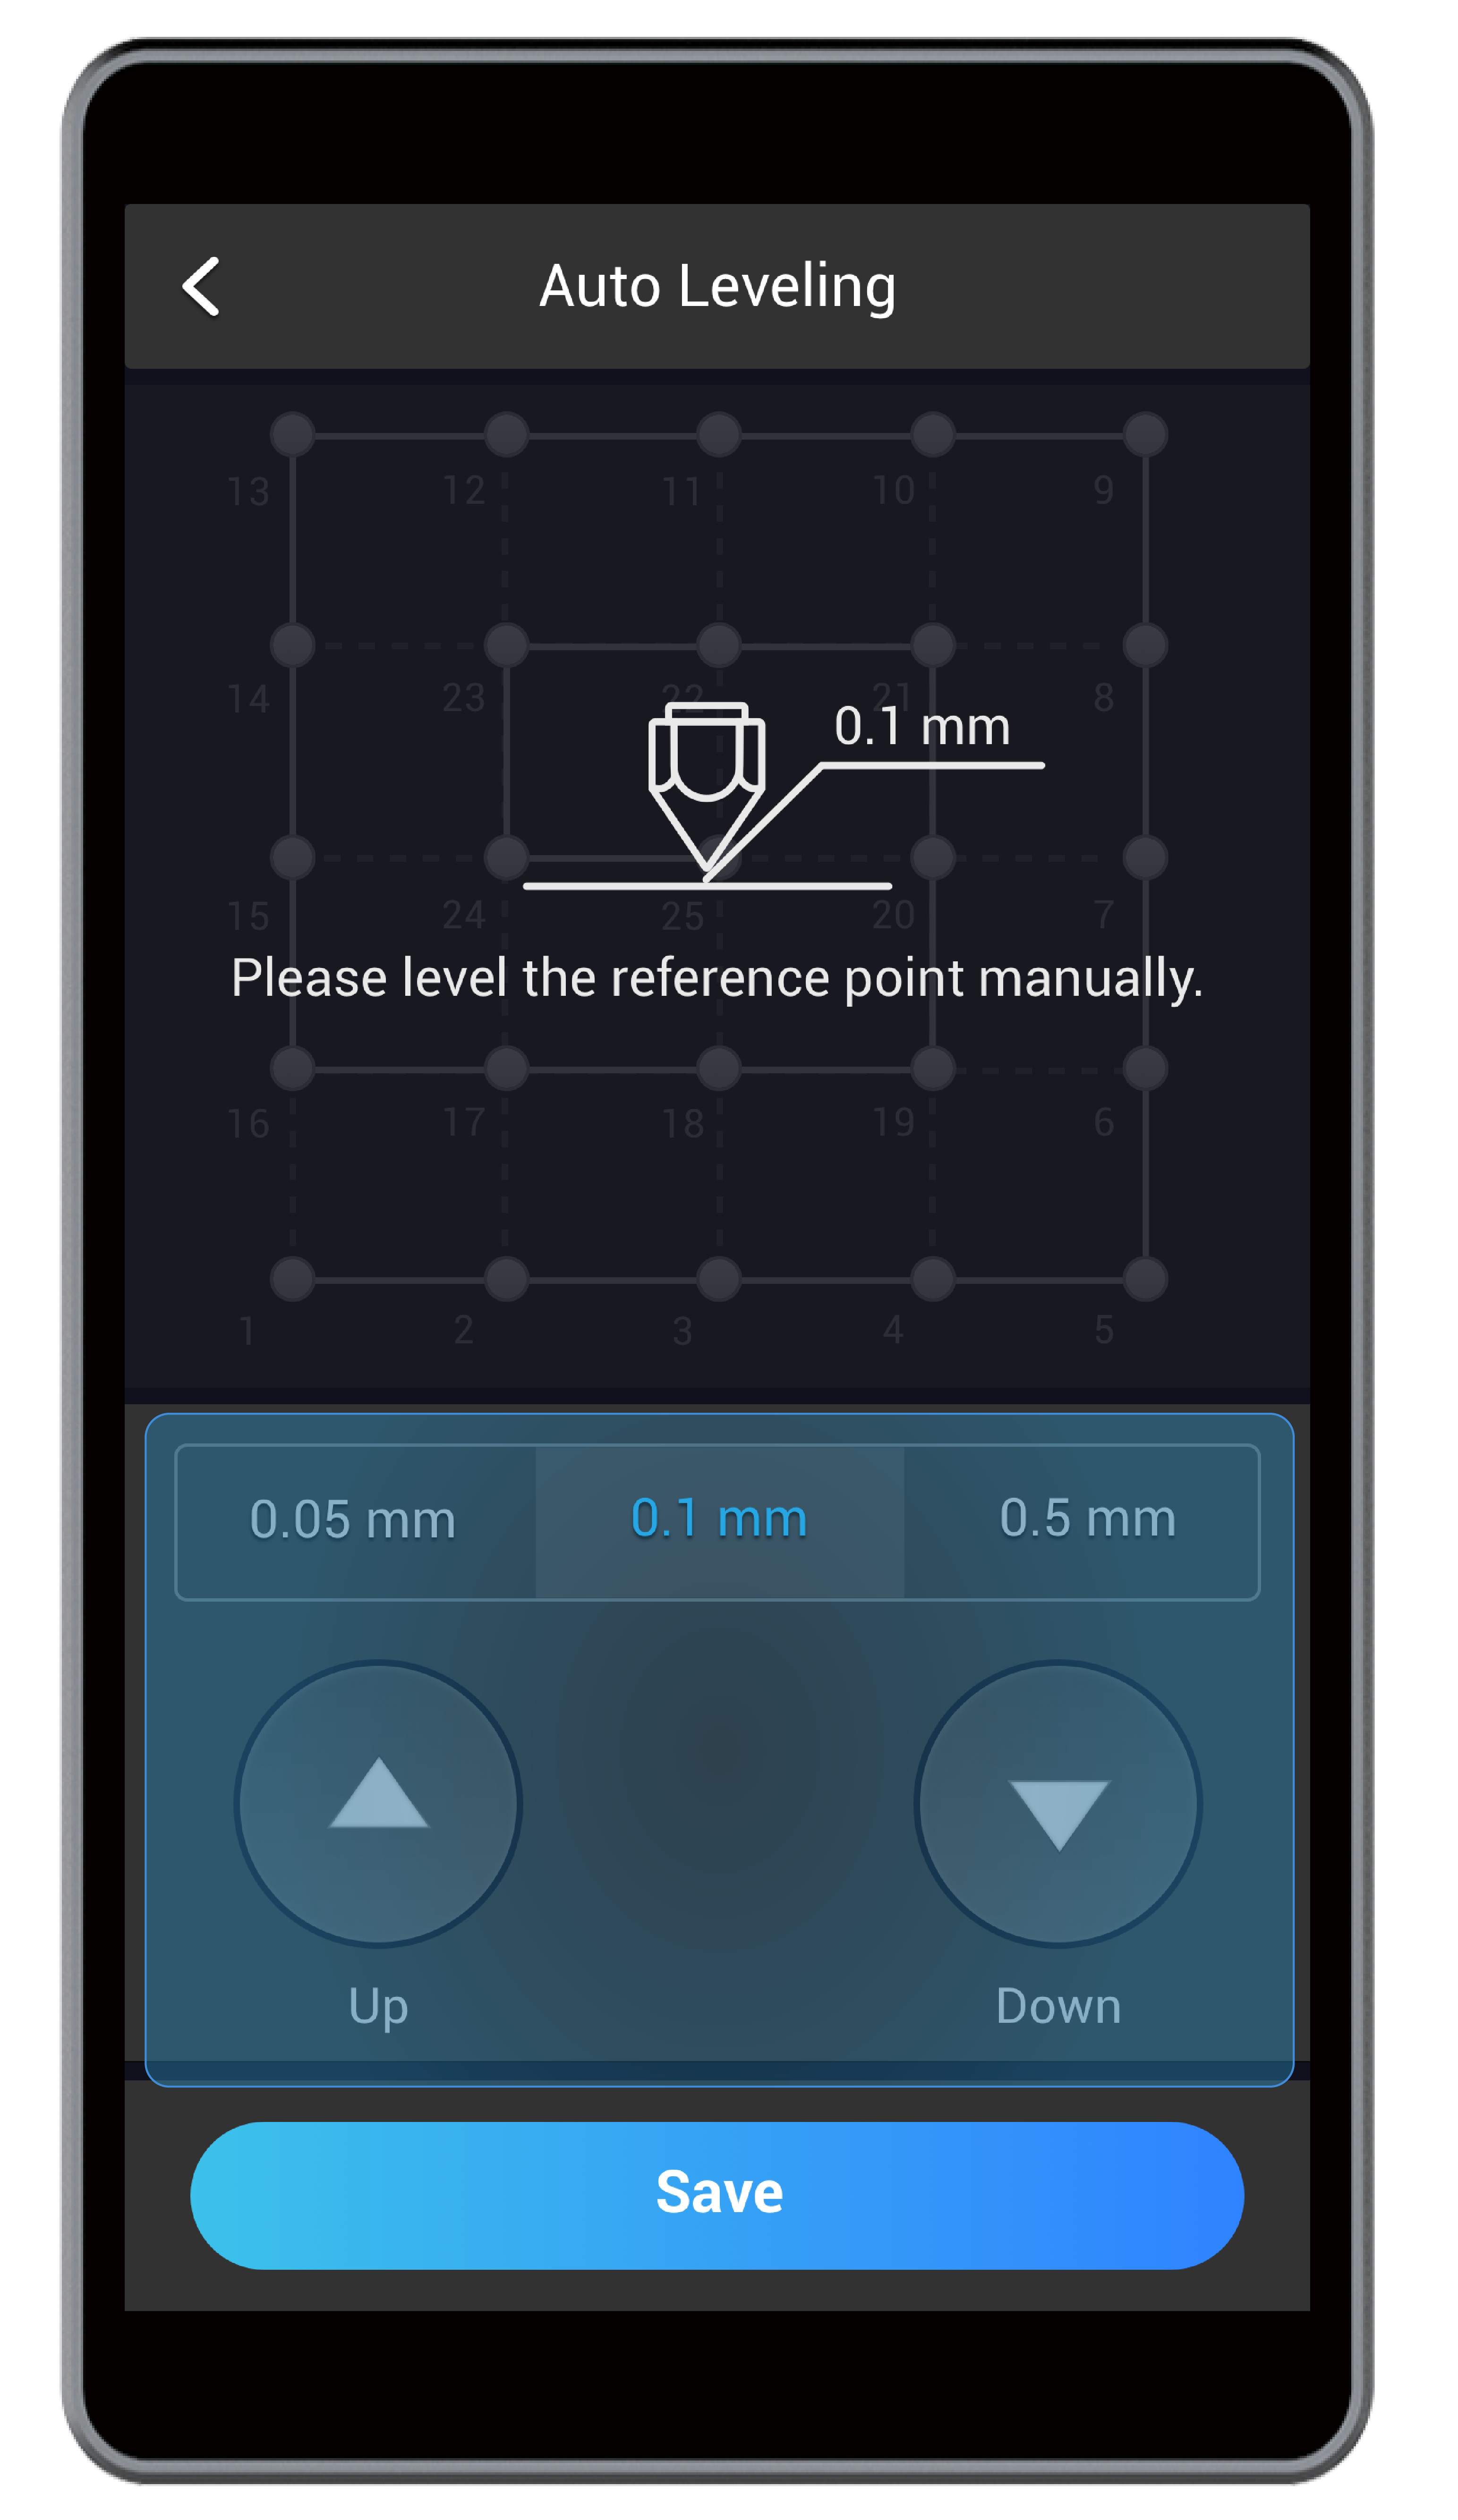
(2) Read instructions. On the Touchscreen, swipe left to tap Calibration. Read on-screen instructions on how to level the bed and tap Start to run Auto Leveling.
(3) Start calibrating. The 3D Printing Module has a built-in distance sensor measuring the distance between the nozzle and Print Sheet at specific points. If the Print Sheet is not flat, the 3D Printing Module will automatically adjust its movement to keep the nozzle and Print Sheet at an optimum distance during printing.
All you need to do is to manually calibrate the last point:
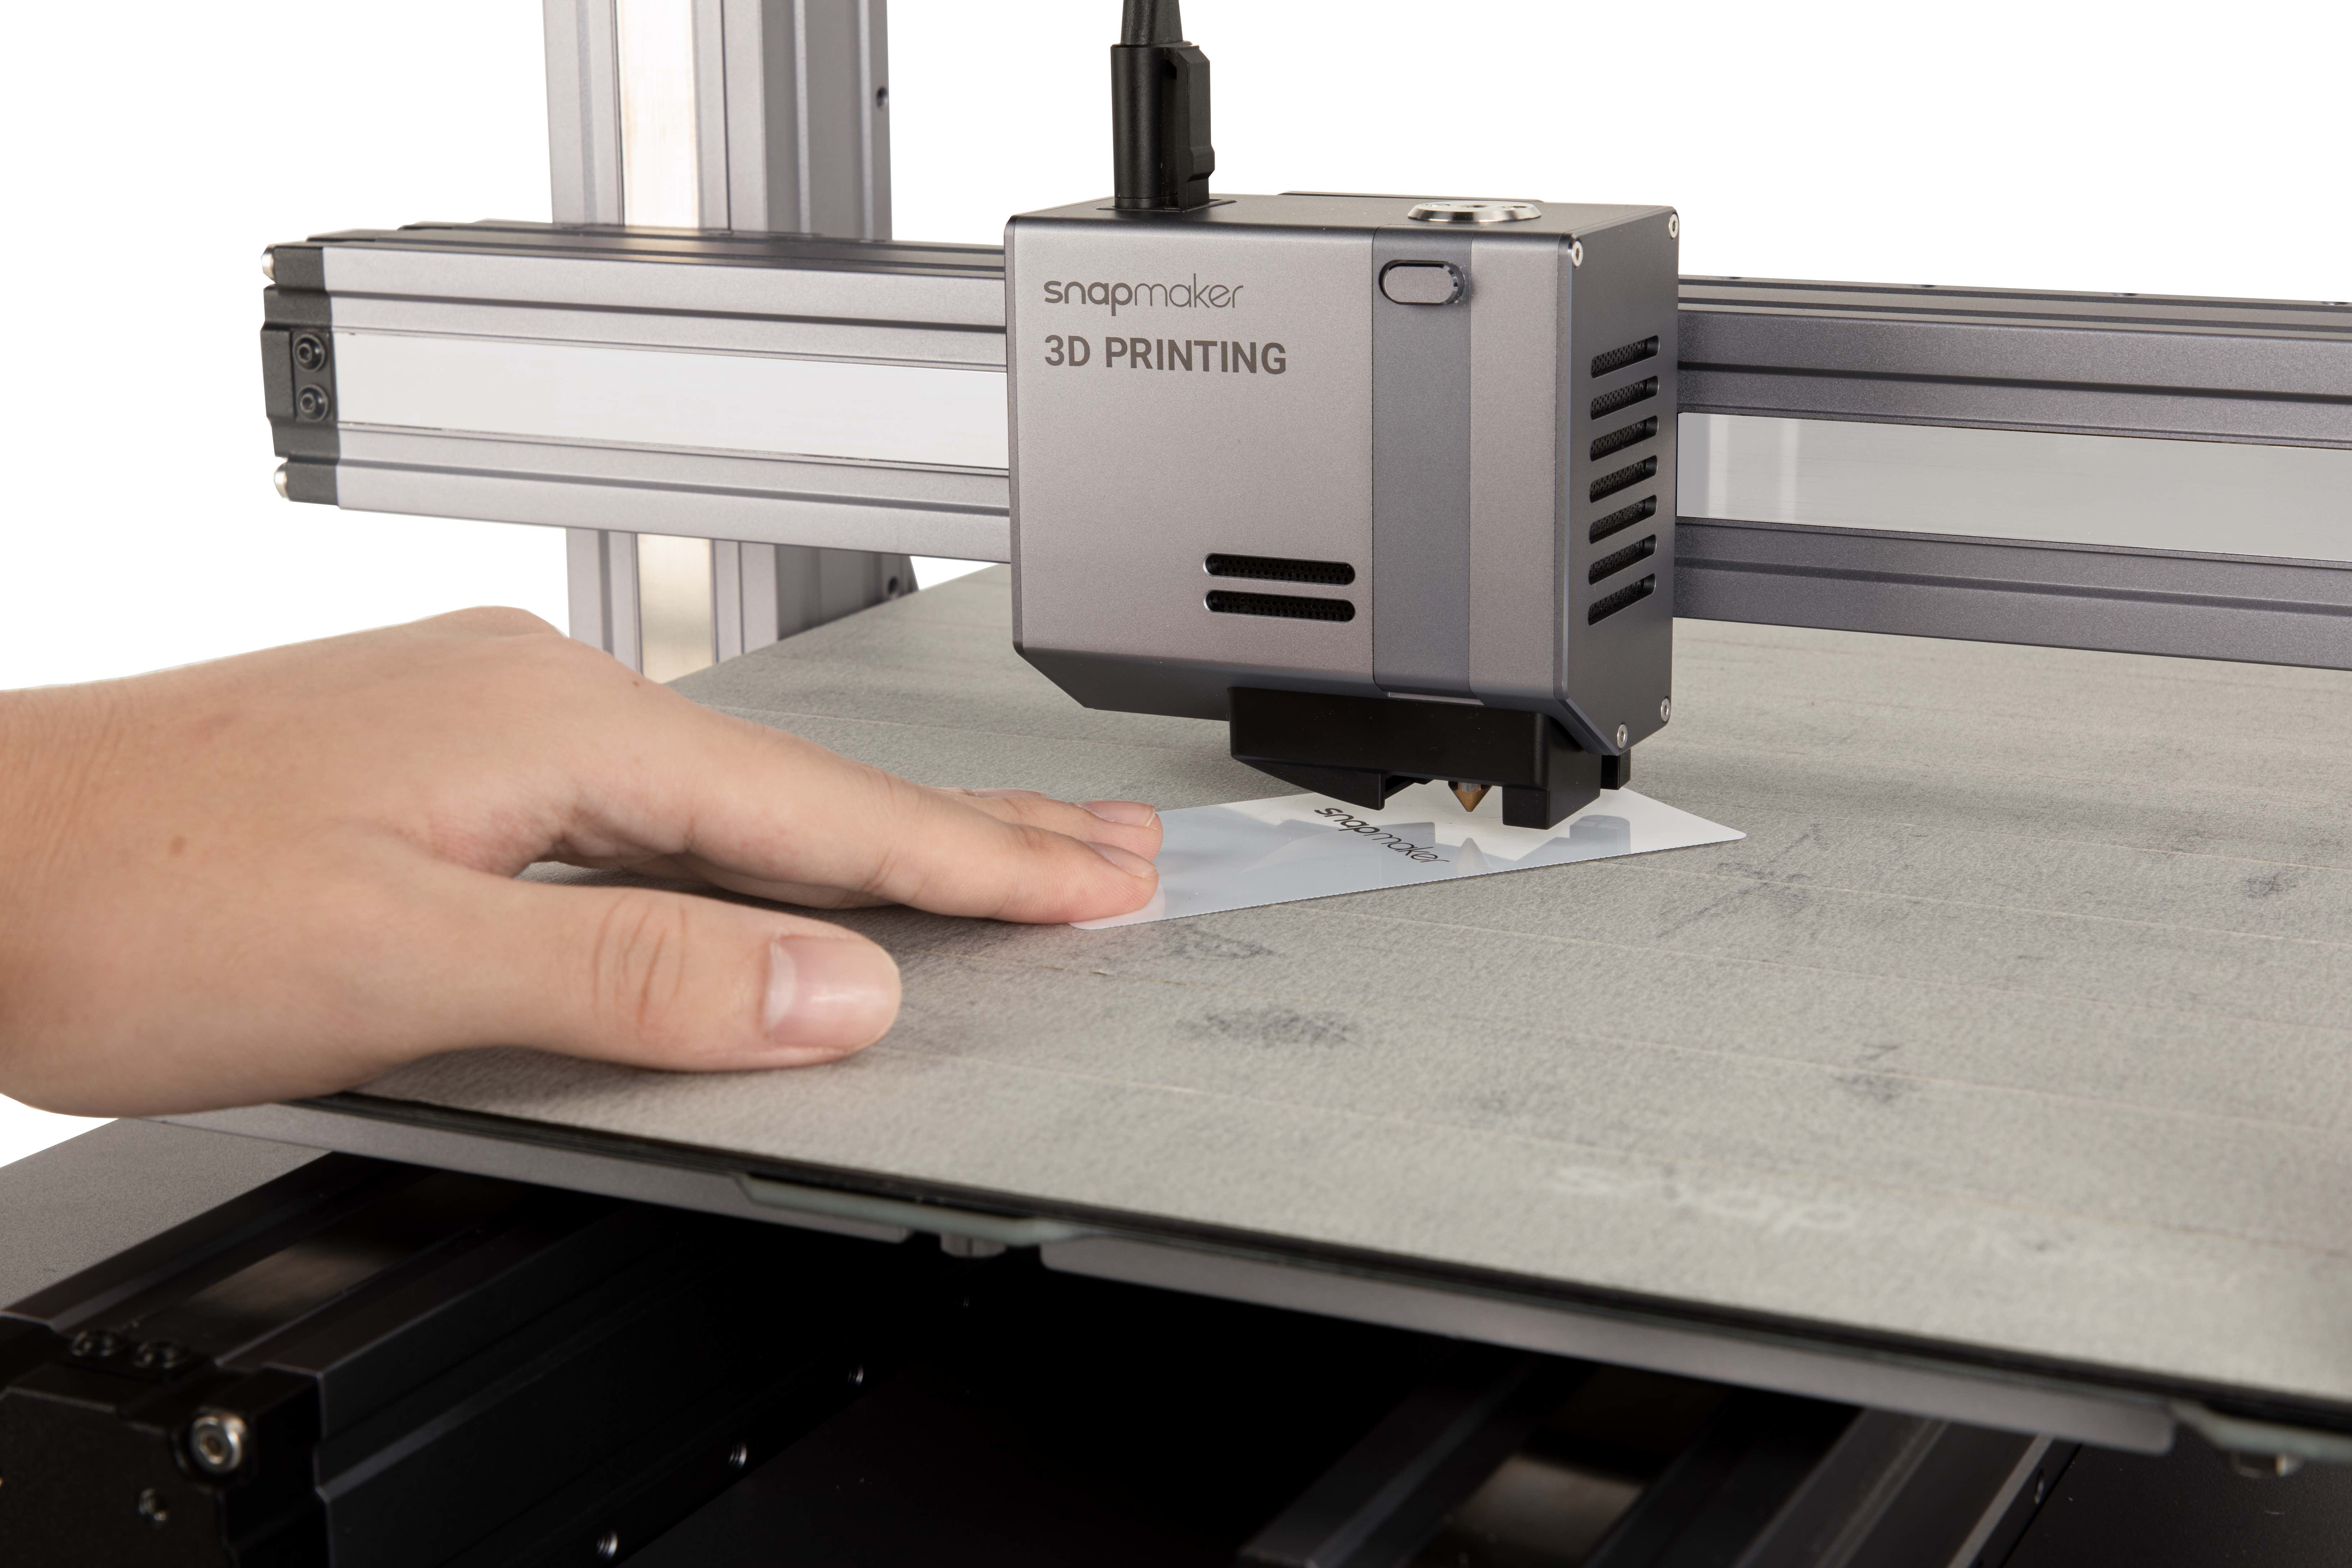
a. Place the Calibration Card or a piece of paper between the nozzle and Print Sheet.
b. Fine-tune the last point. Select the offset per travel (0.05 mm, 0.1 mm, or 0.5 mm). Keep adjusting the height of the nozzle tapping Up and Down, until you feel slight resistance when you pull out the Calibration Card and it should be wrinkled when you push it forward. Tap Save to save the calibration settings.
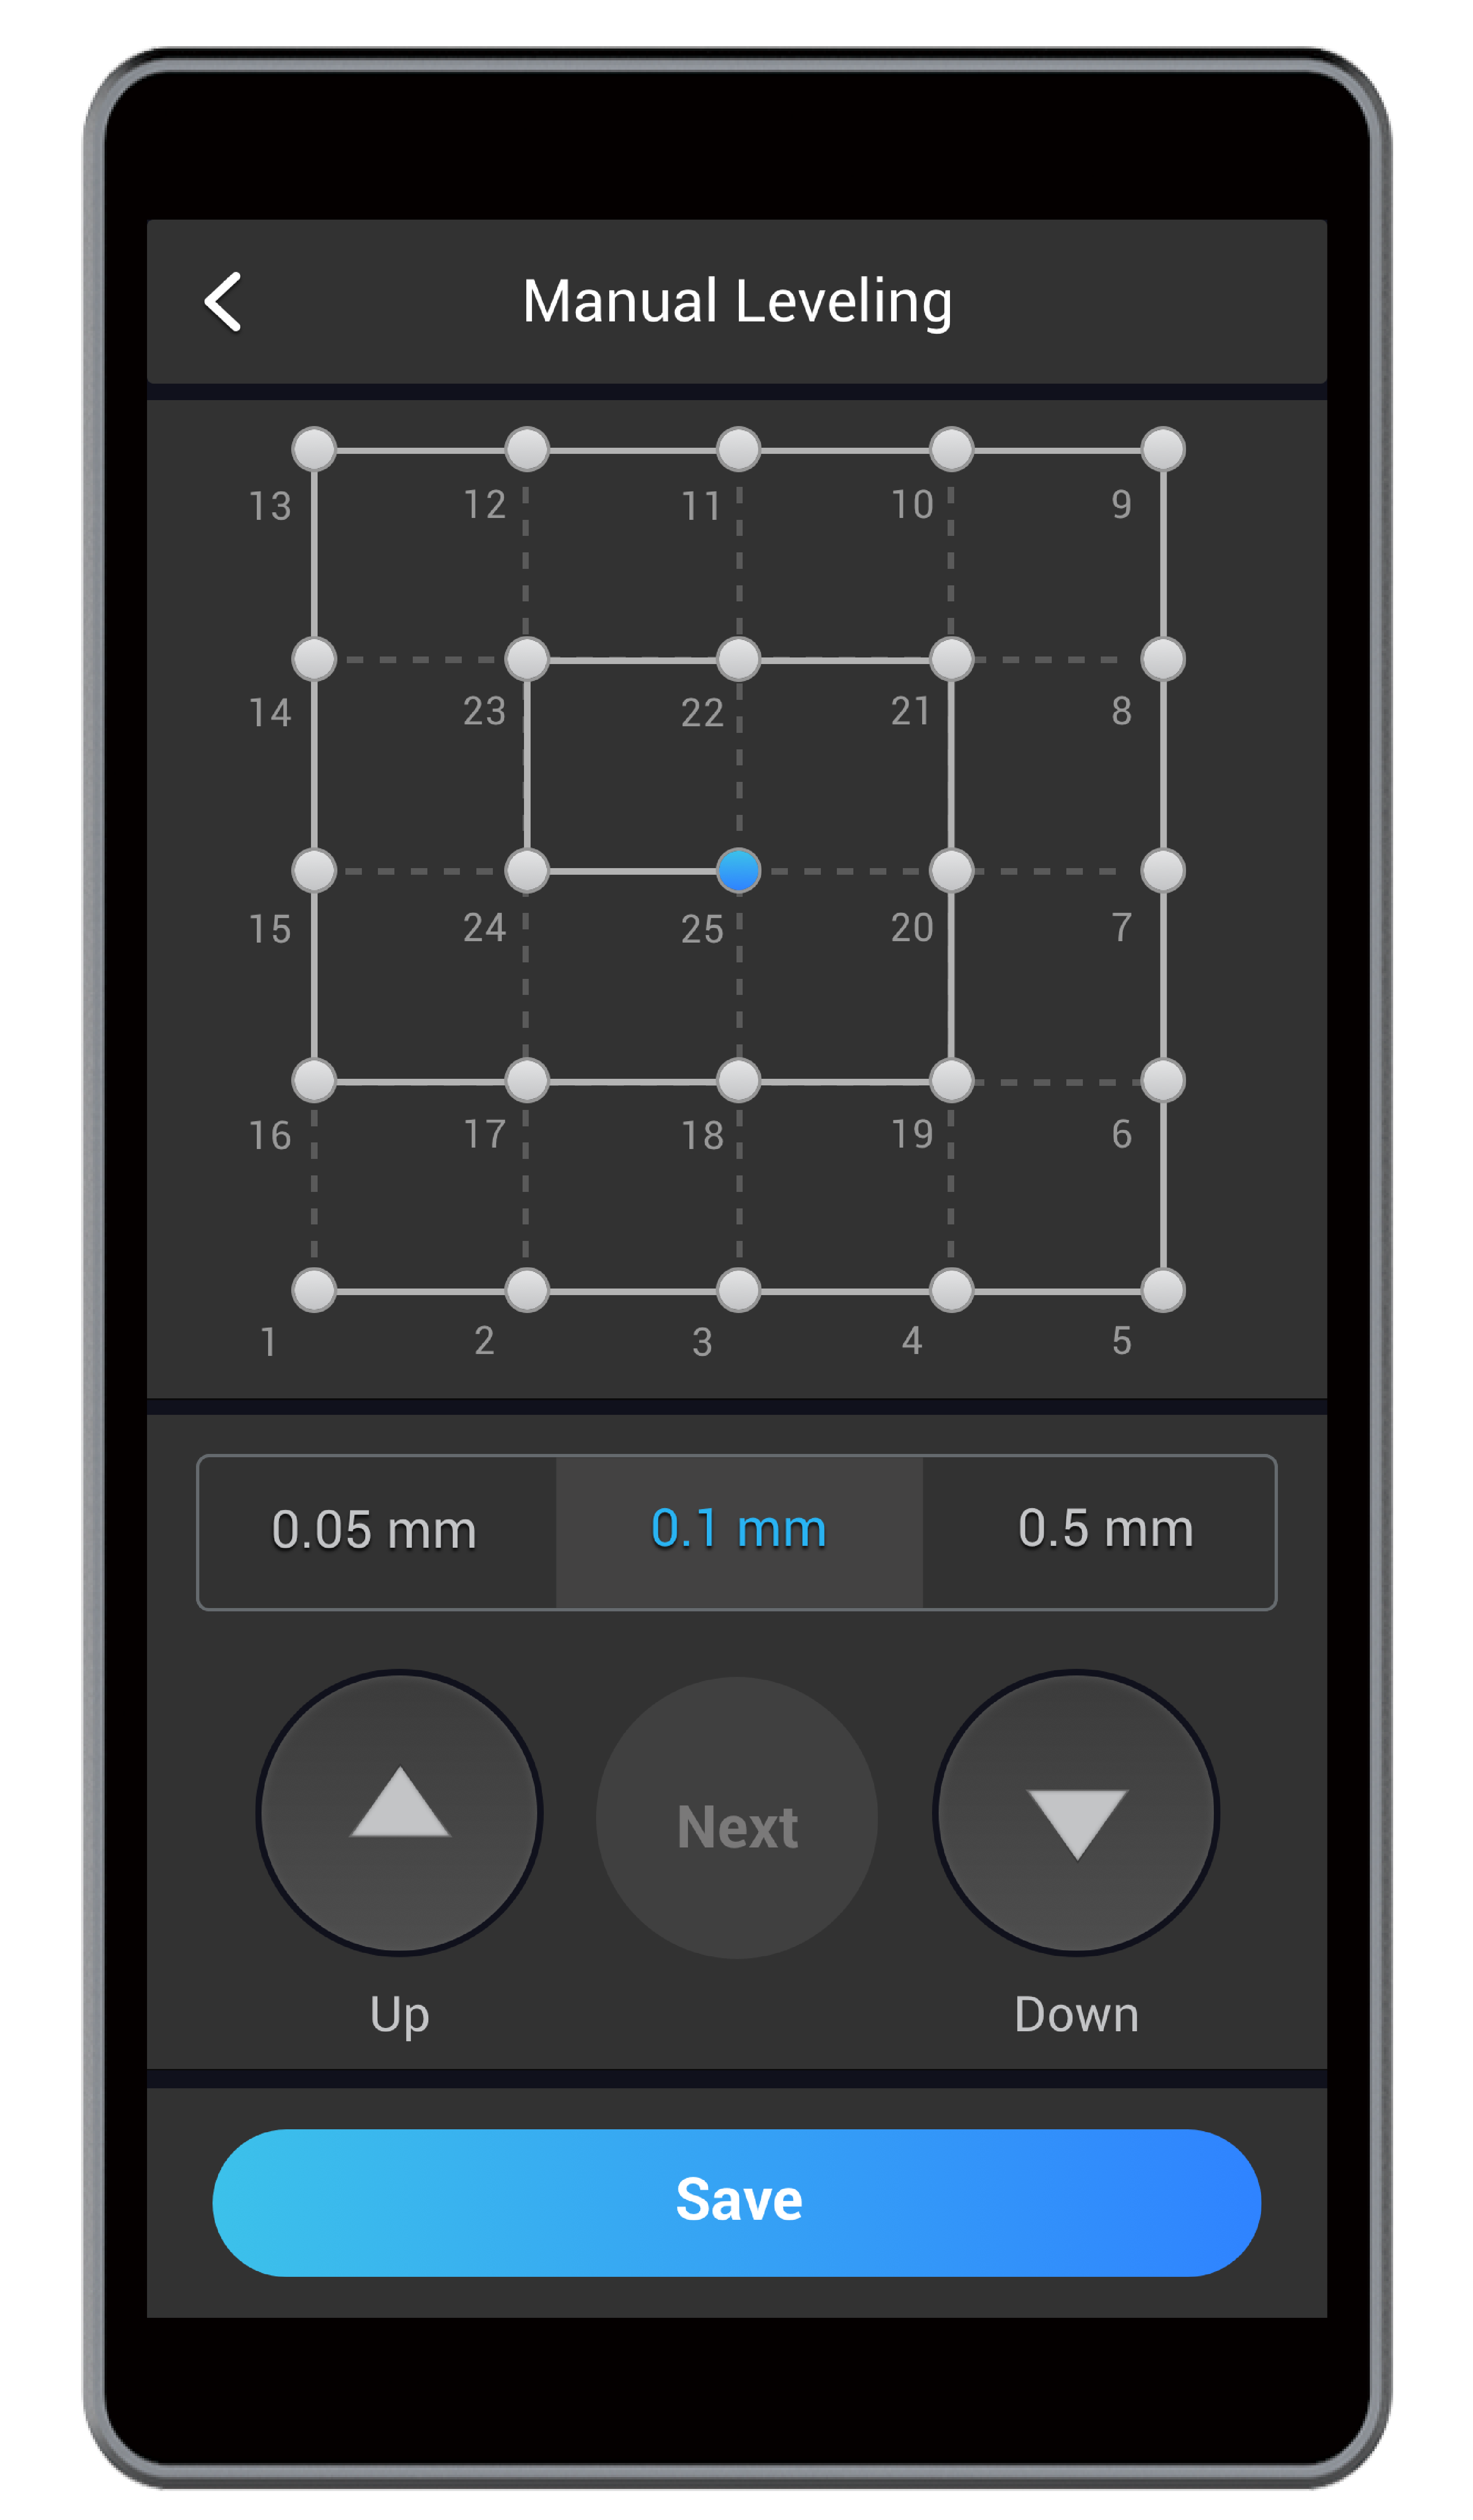
Manual Leveling
(1) Turn on the 3D printer.
(2) Read instructions. On the Touchscreen, swipe left to tap Calibration. Read on-screen instructions on how to level the bed and tap Start to run Manual Leveling.
(3) Calibrate the first point. Place the Calibration Card or a piece of paper between the nozzle and Print Sheet.
(4) Fine-tune the first point. Select the offset per travel (0.05 mm, 0.1 mm, or 0.5 mm). Keep adjusting the height of the nozzle tapping Up and Down, until you feel slight resistance when you pull out the Calibration Card and it should be wrinkled when you push it forward. Tap Next to calibrate the next point.
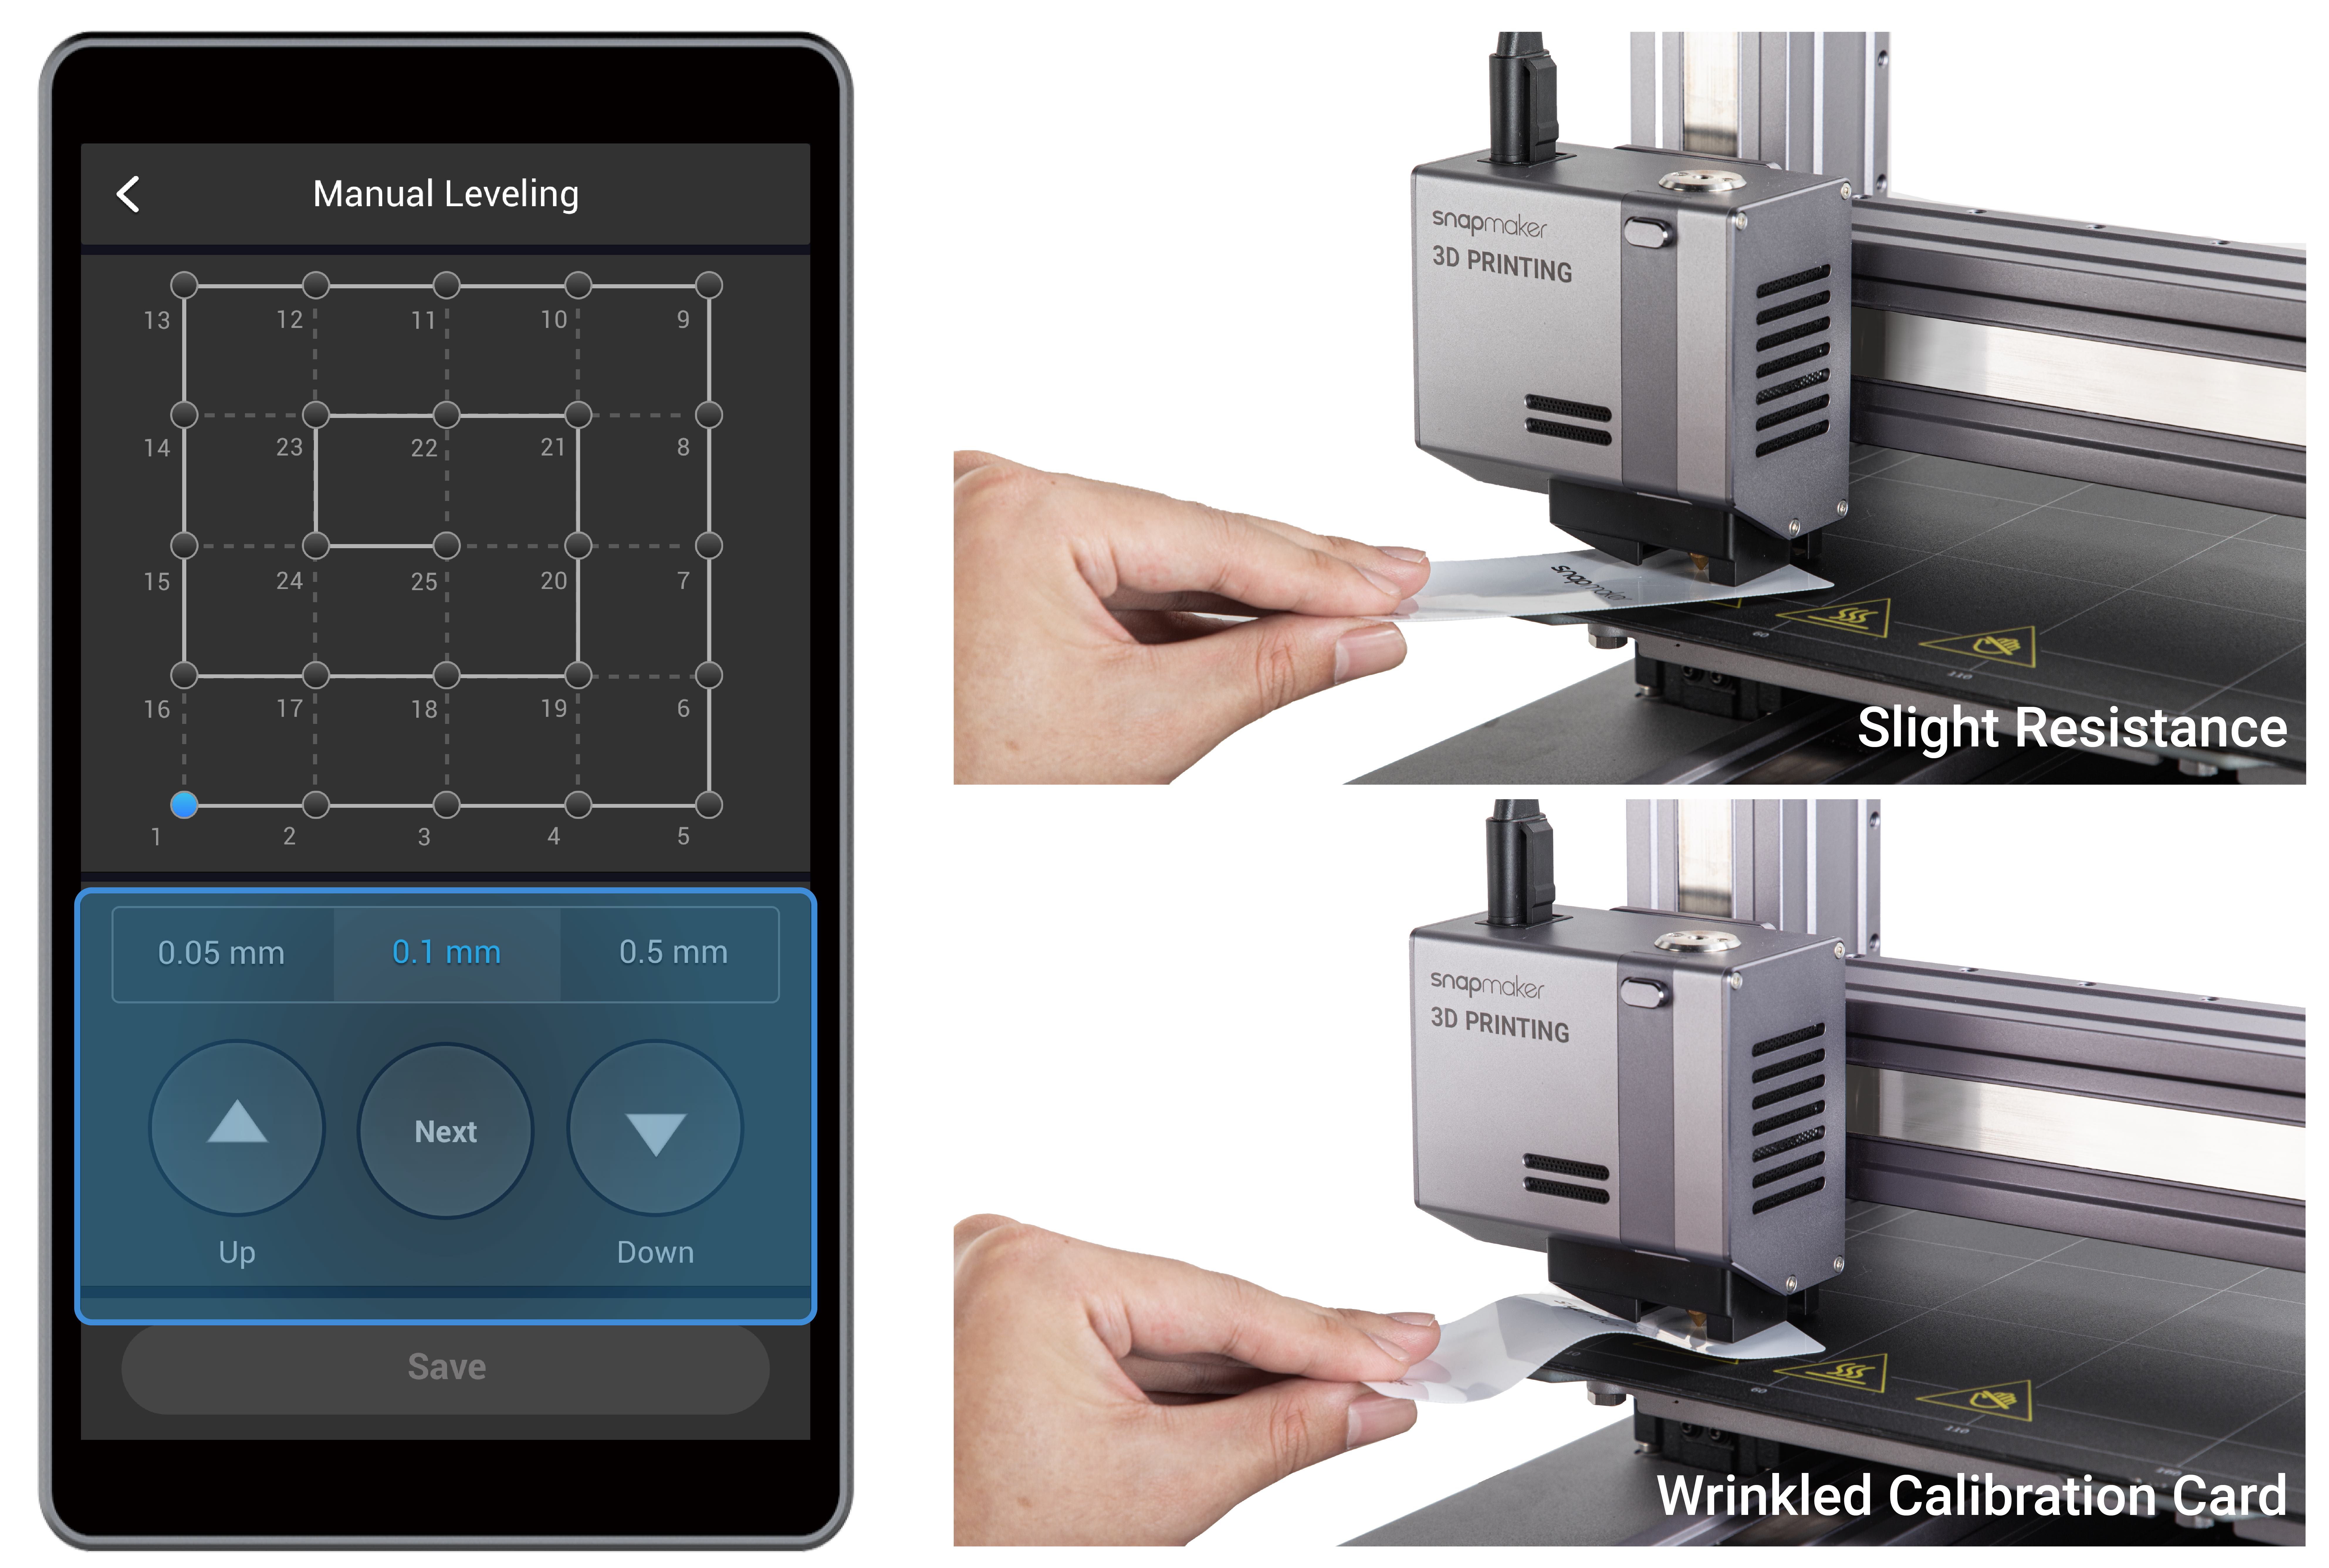
(5) Calibrate the rest of the points. One by one, repeat the previous two steps till the last point. Tap Save to save the calibration settings.
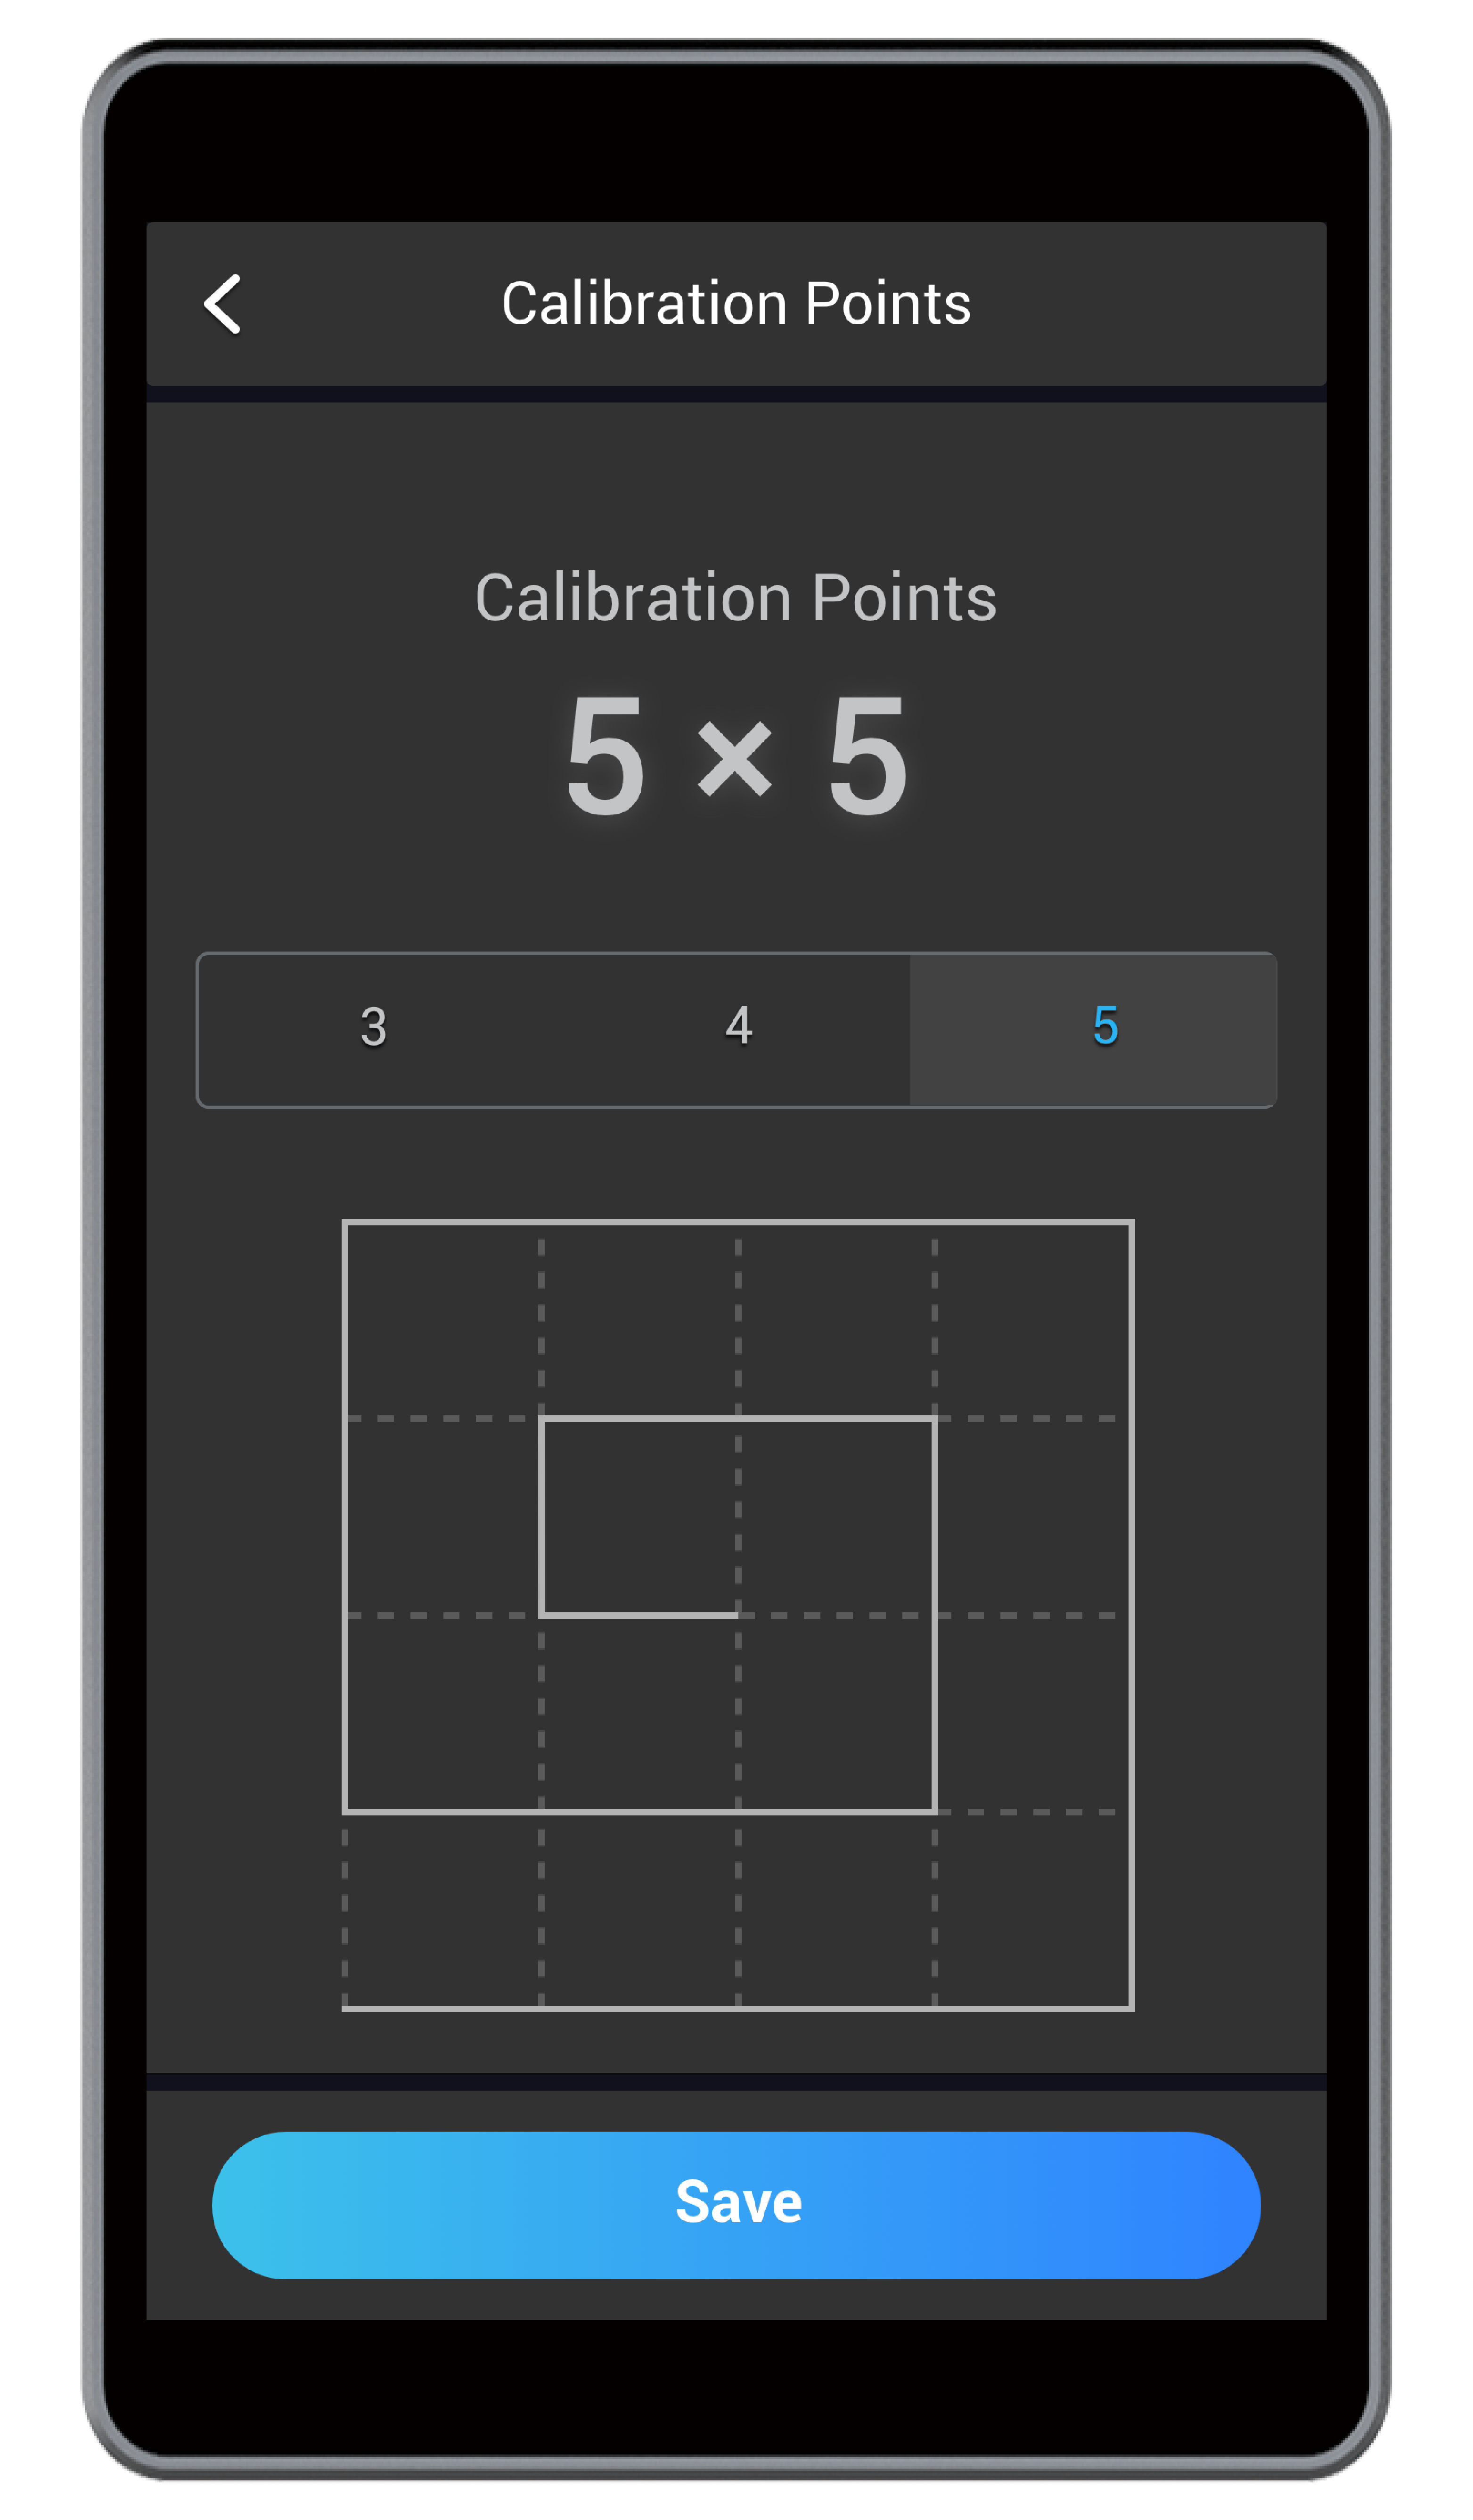
Calibration Grid
Your 3D printer has three types of calibration grids, made up respectively of 9, 16, or 25 points. At each point, the distance sensor probes the height of the Heated Bed, and then the 3D printer records the data. During printing, the 3D printer will automatically adjust its movement, based on the measured data, to keep the nozzle and Print Sheet at an optimum distance. The more points your 3D printer probes, the more precise data your 3D printer gets, and the more likely the first layer is to adhere to the Heated Bed.
To switch the calibration grids, tap Settings > 3D Printing > Calibration Grid on the Touchscreen.
9-Point Grid
This grid is 2 × 2, with 9 points. To apply it, tap 3 and Save.
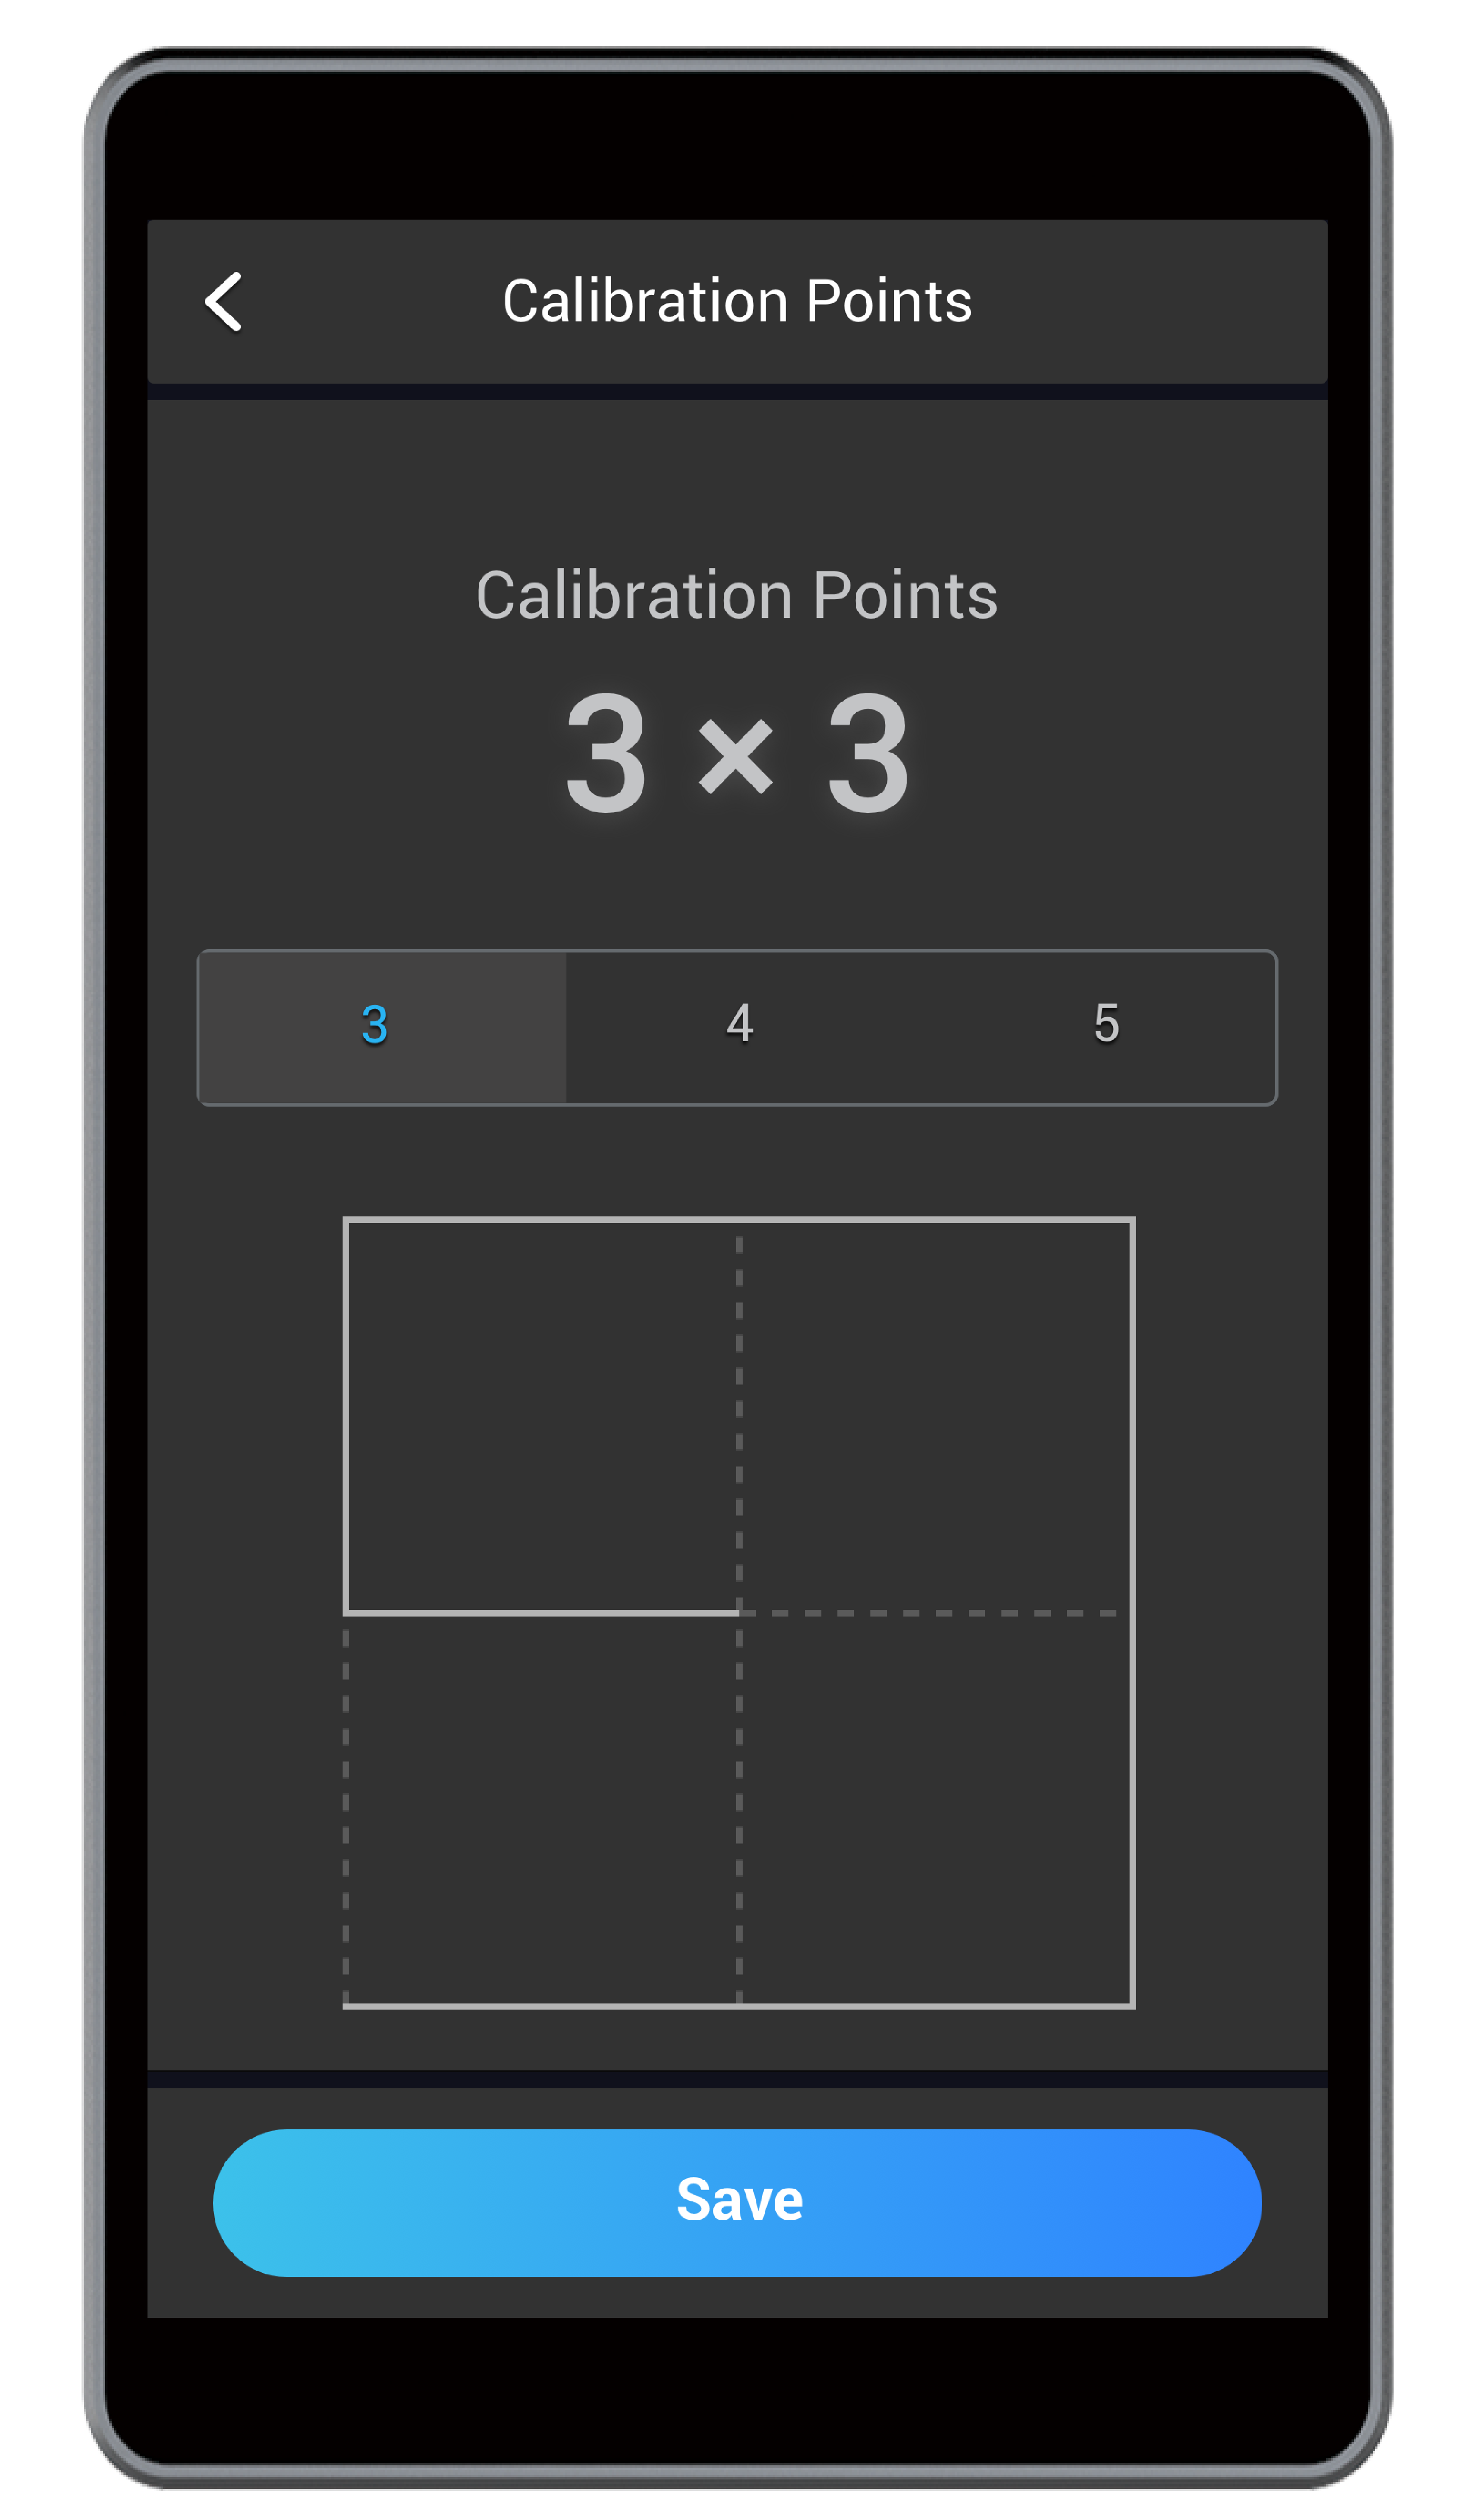
16-Point Grid
This grid is 3 × 3, with 16 points. To apply it, tap 4 and Save.
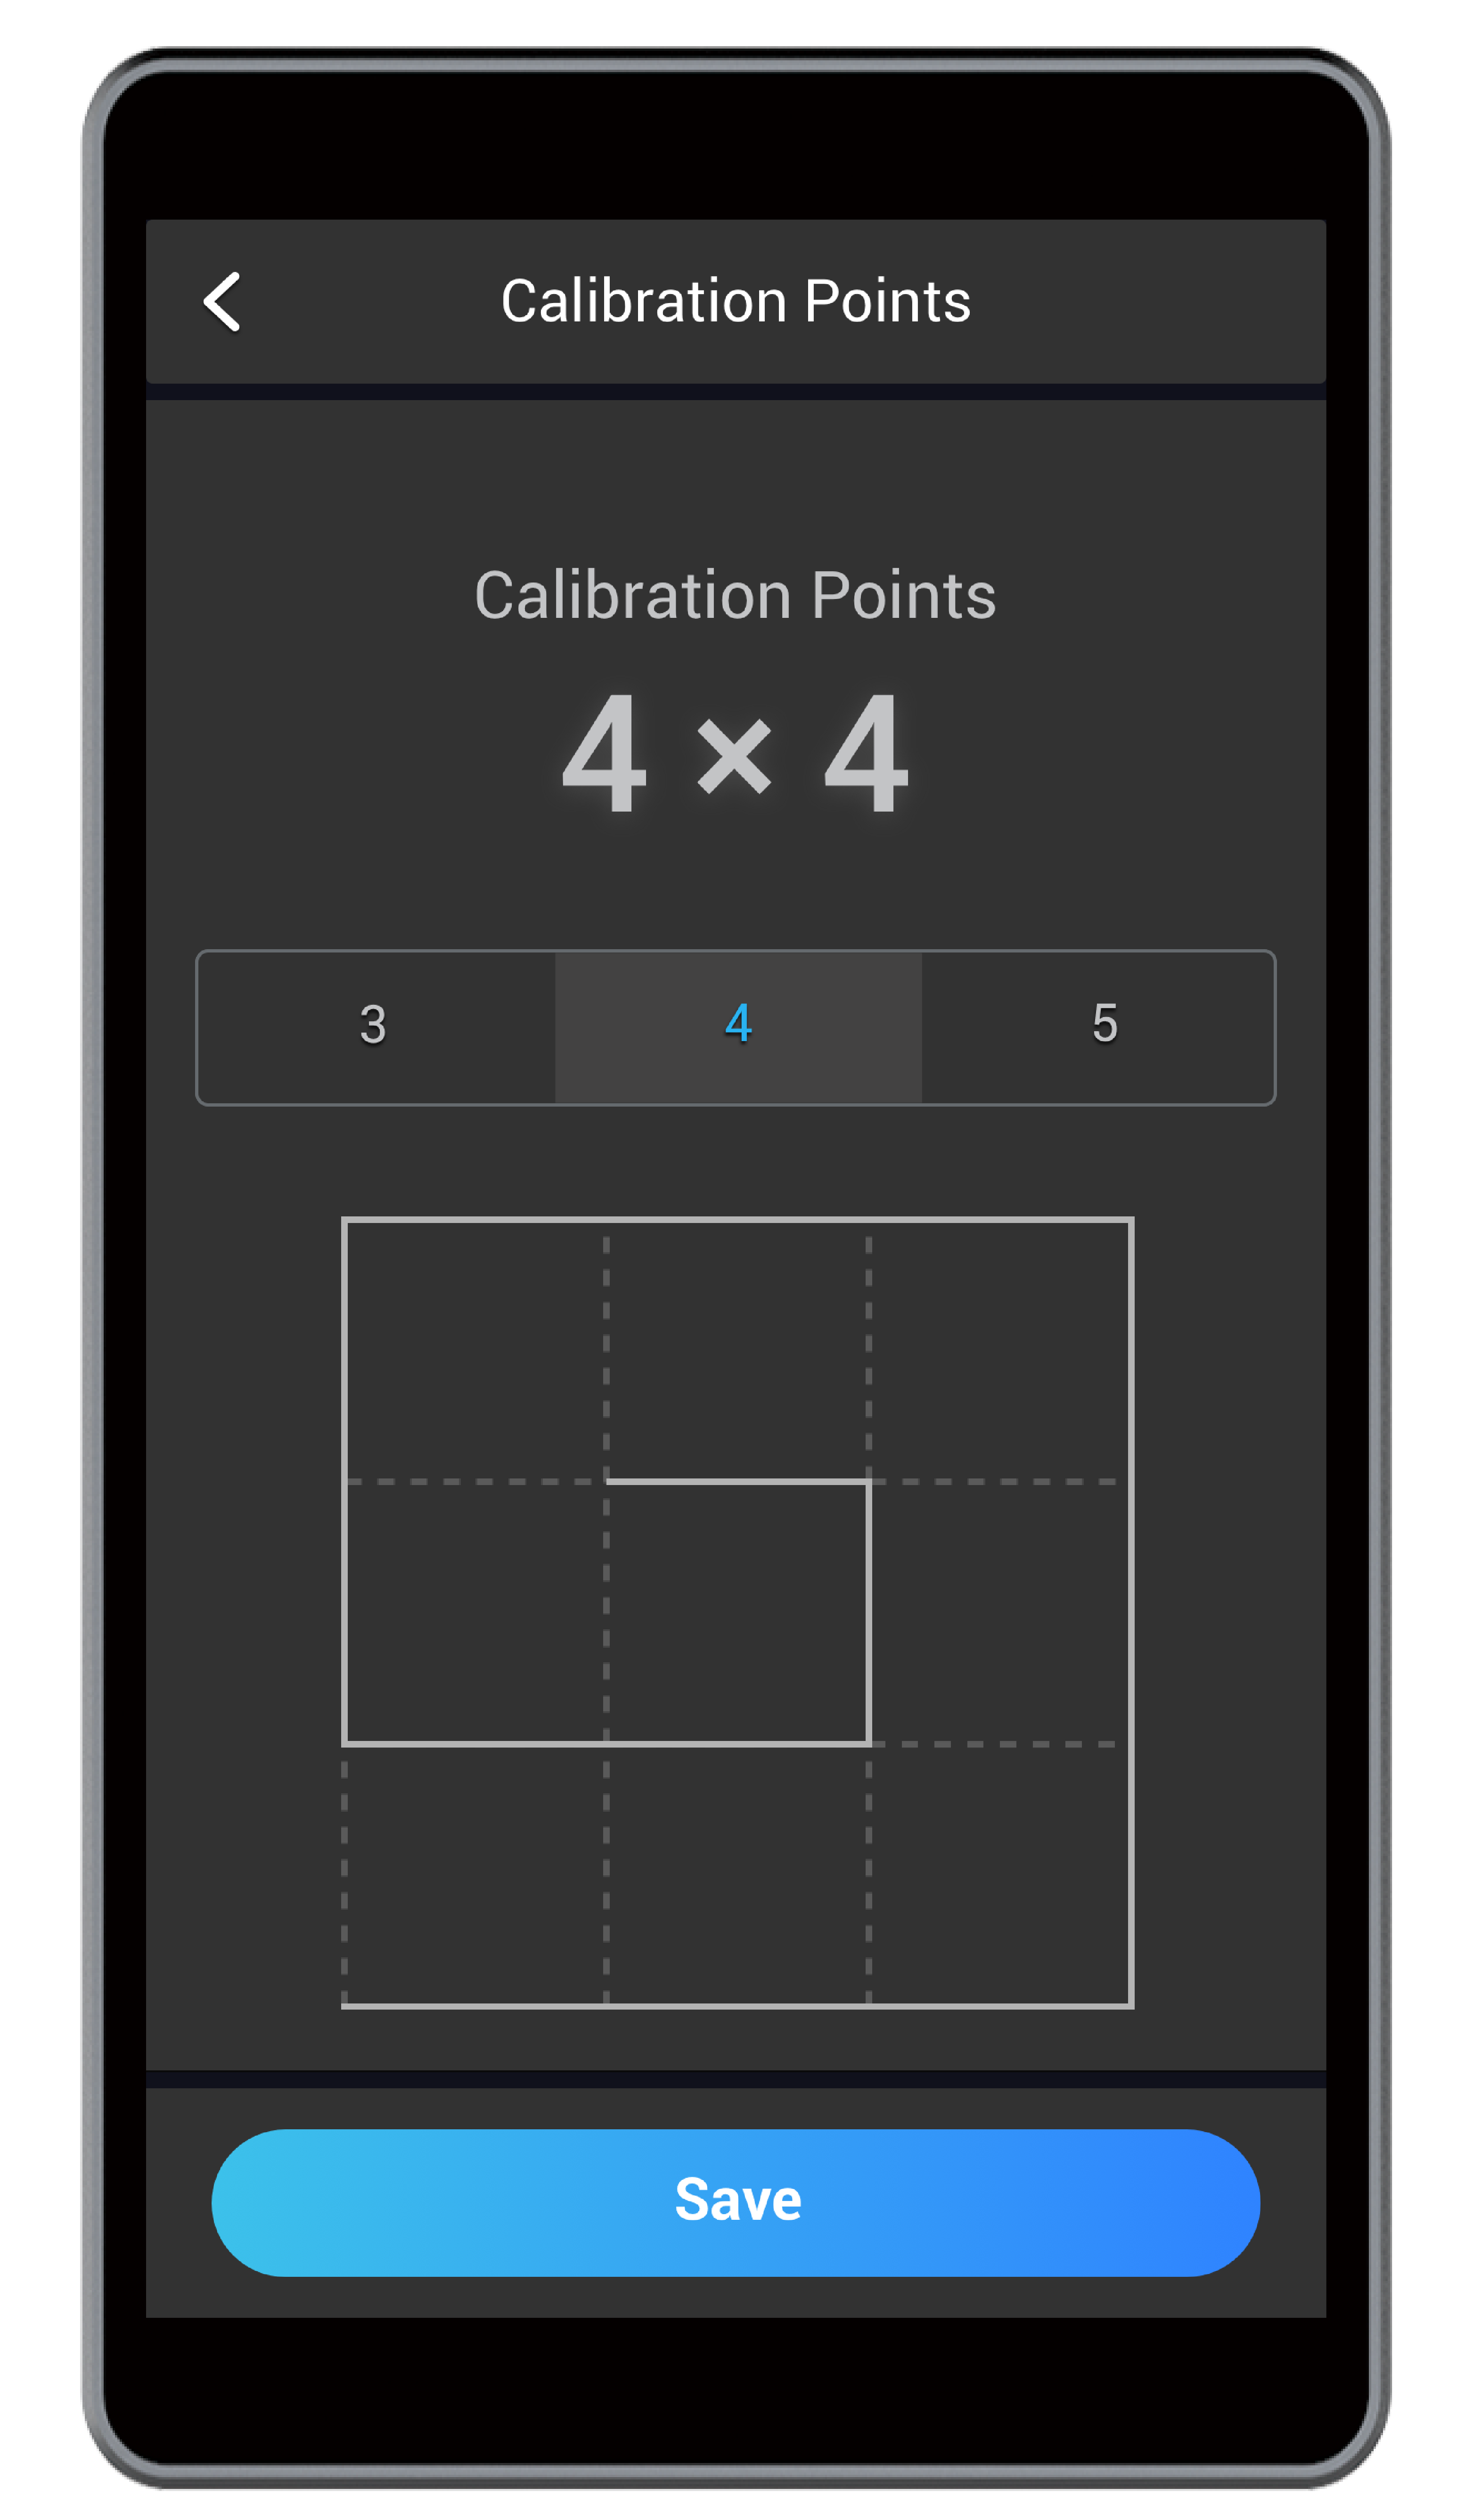
25-Point Grid
This grid is 4 × 4, with 25 points. To apply it, tap 5 and Save.
4.3 Load the Filament
Your 3D printer supports two filament loading modes——Auto Loading and Manual Loading, as is the case with filament unloading. To automatically load the filament, heat up the nozzle and tap Load on the Touchscreen. To manually load the filament, heat the nozzle and extrude the filament by hand.
Automatically Load the Filament
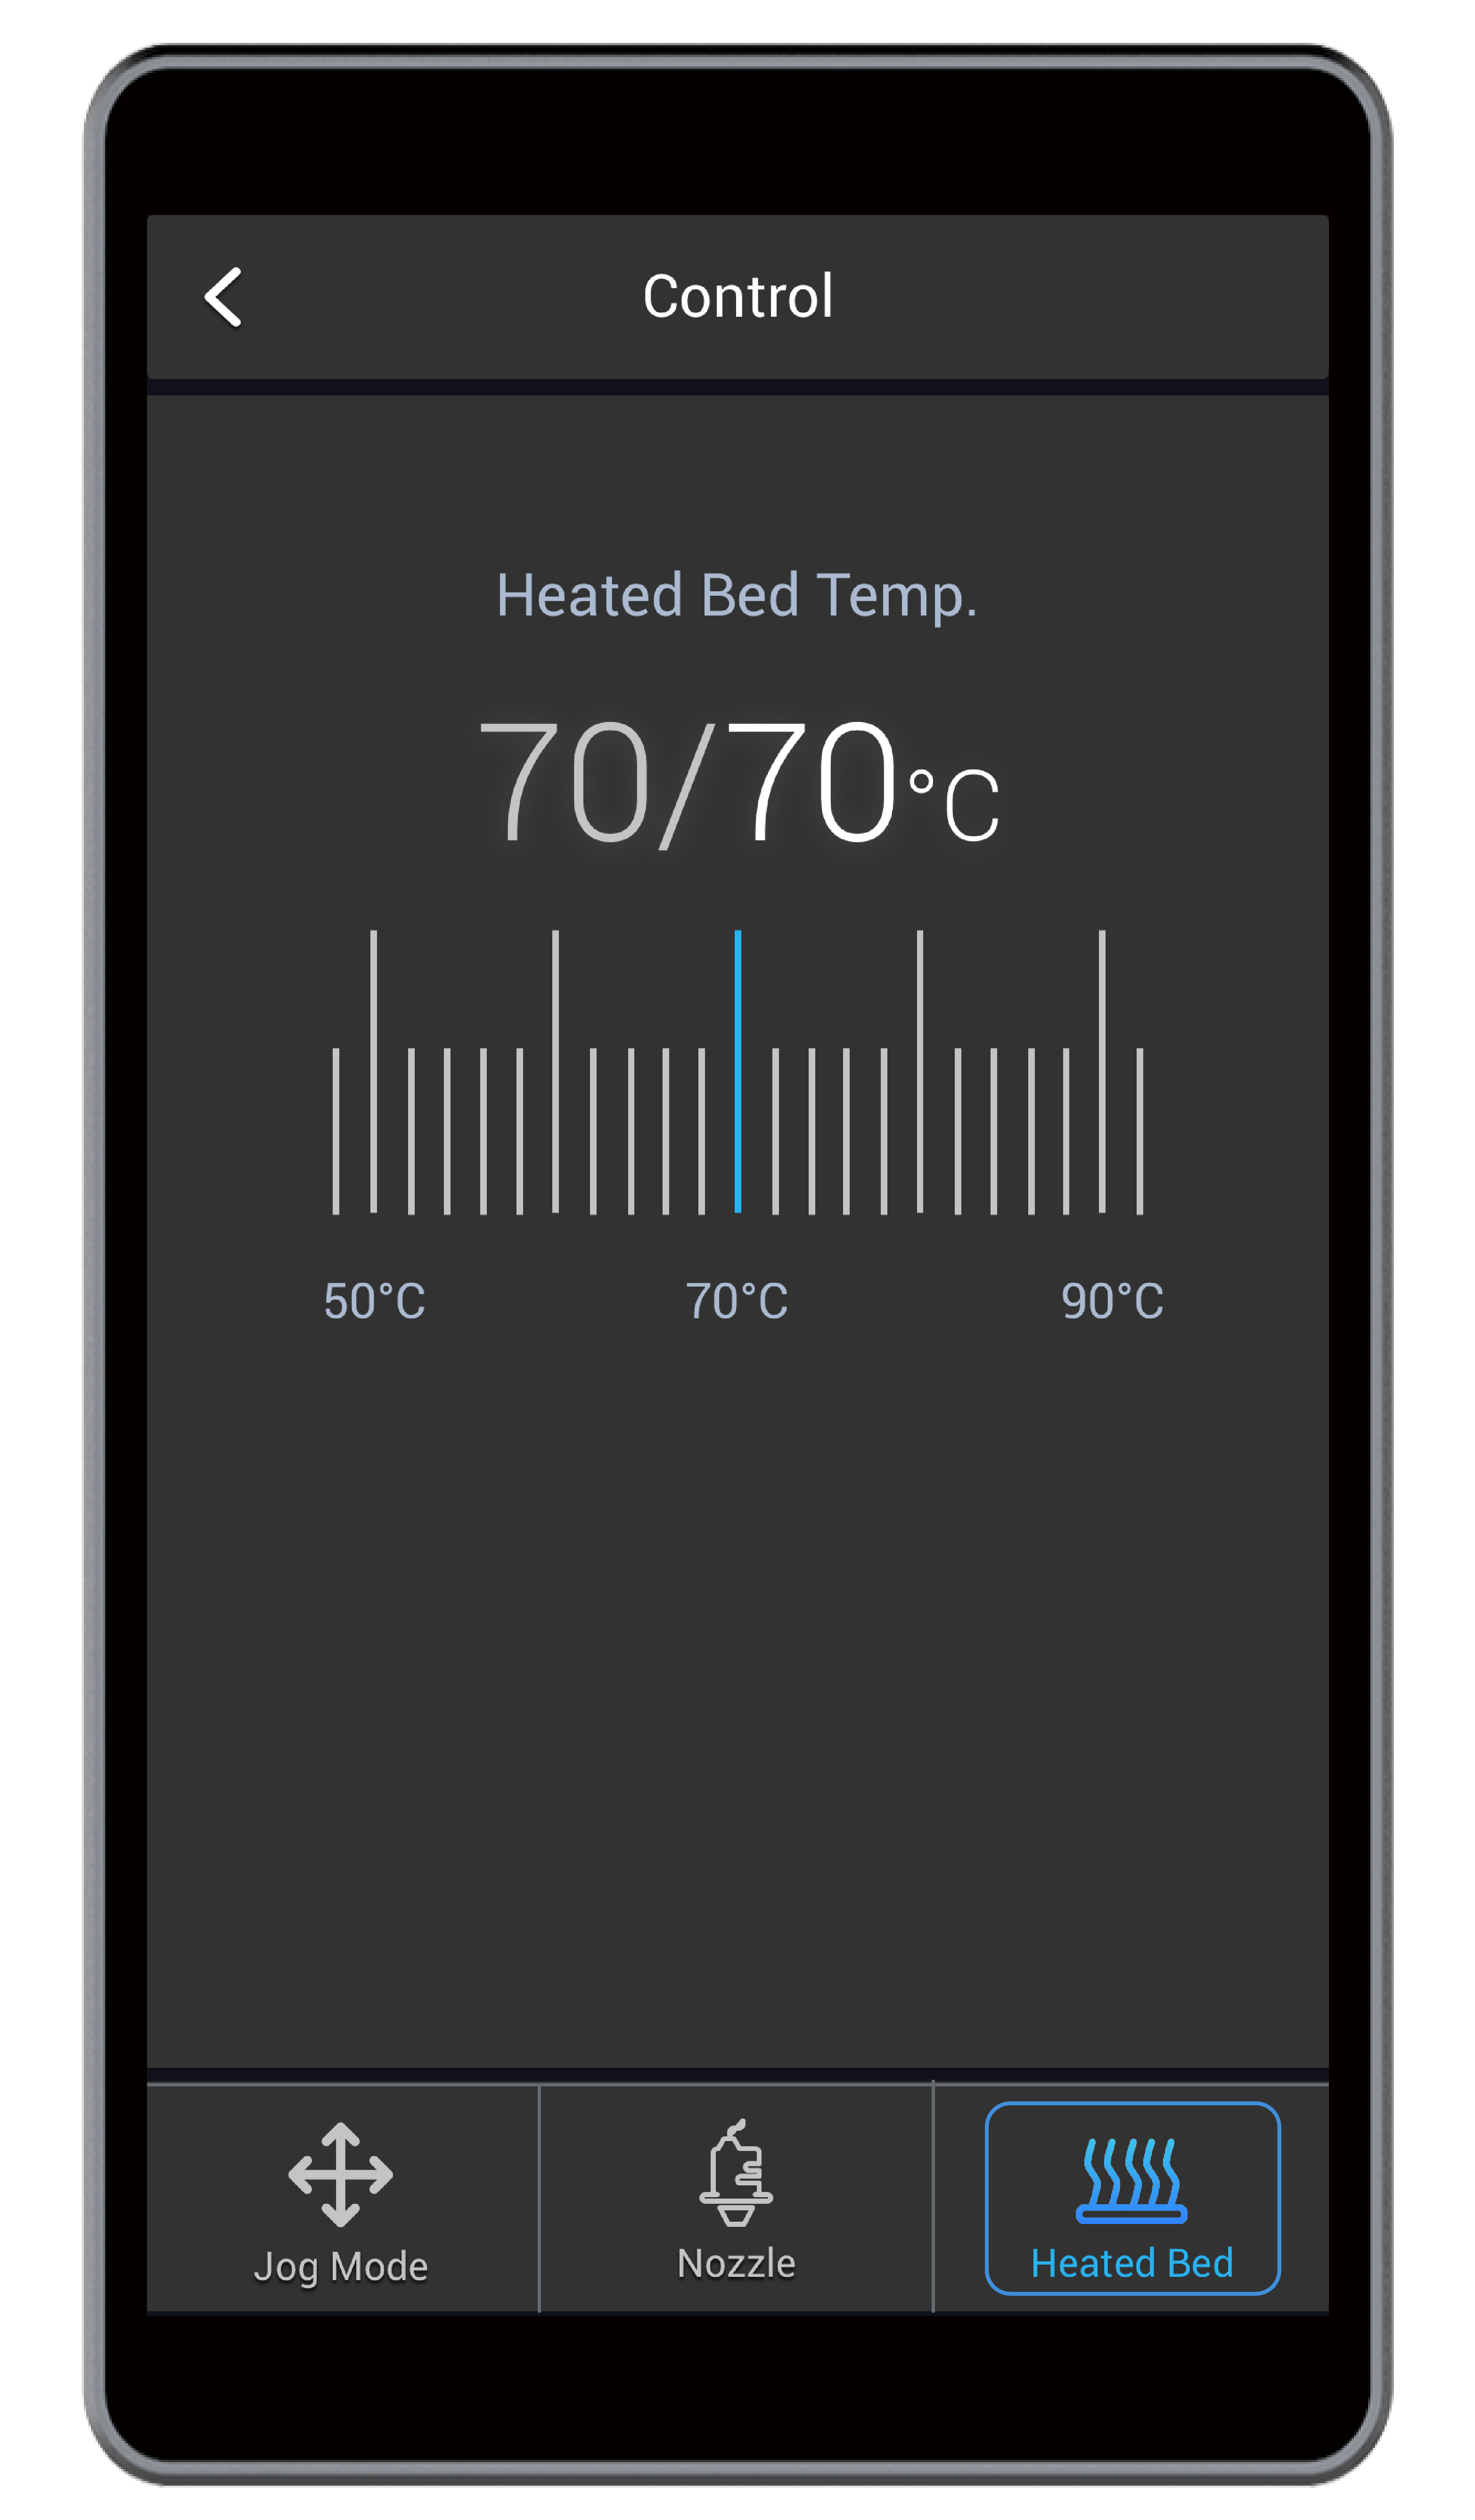
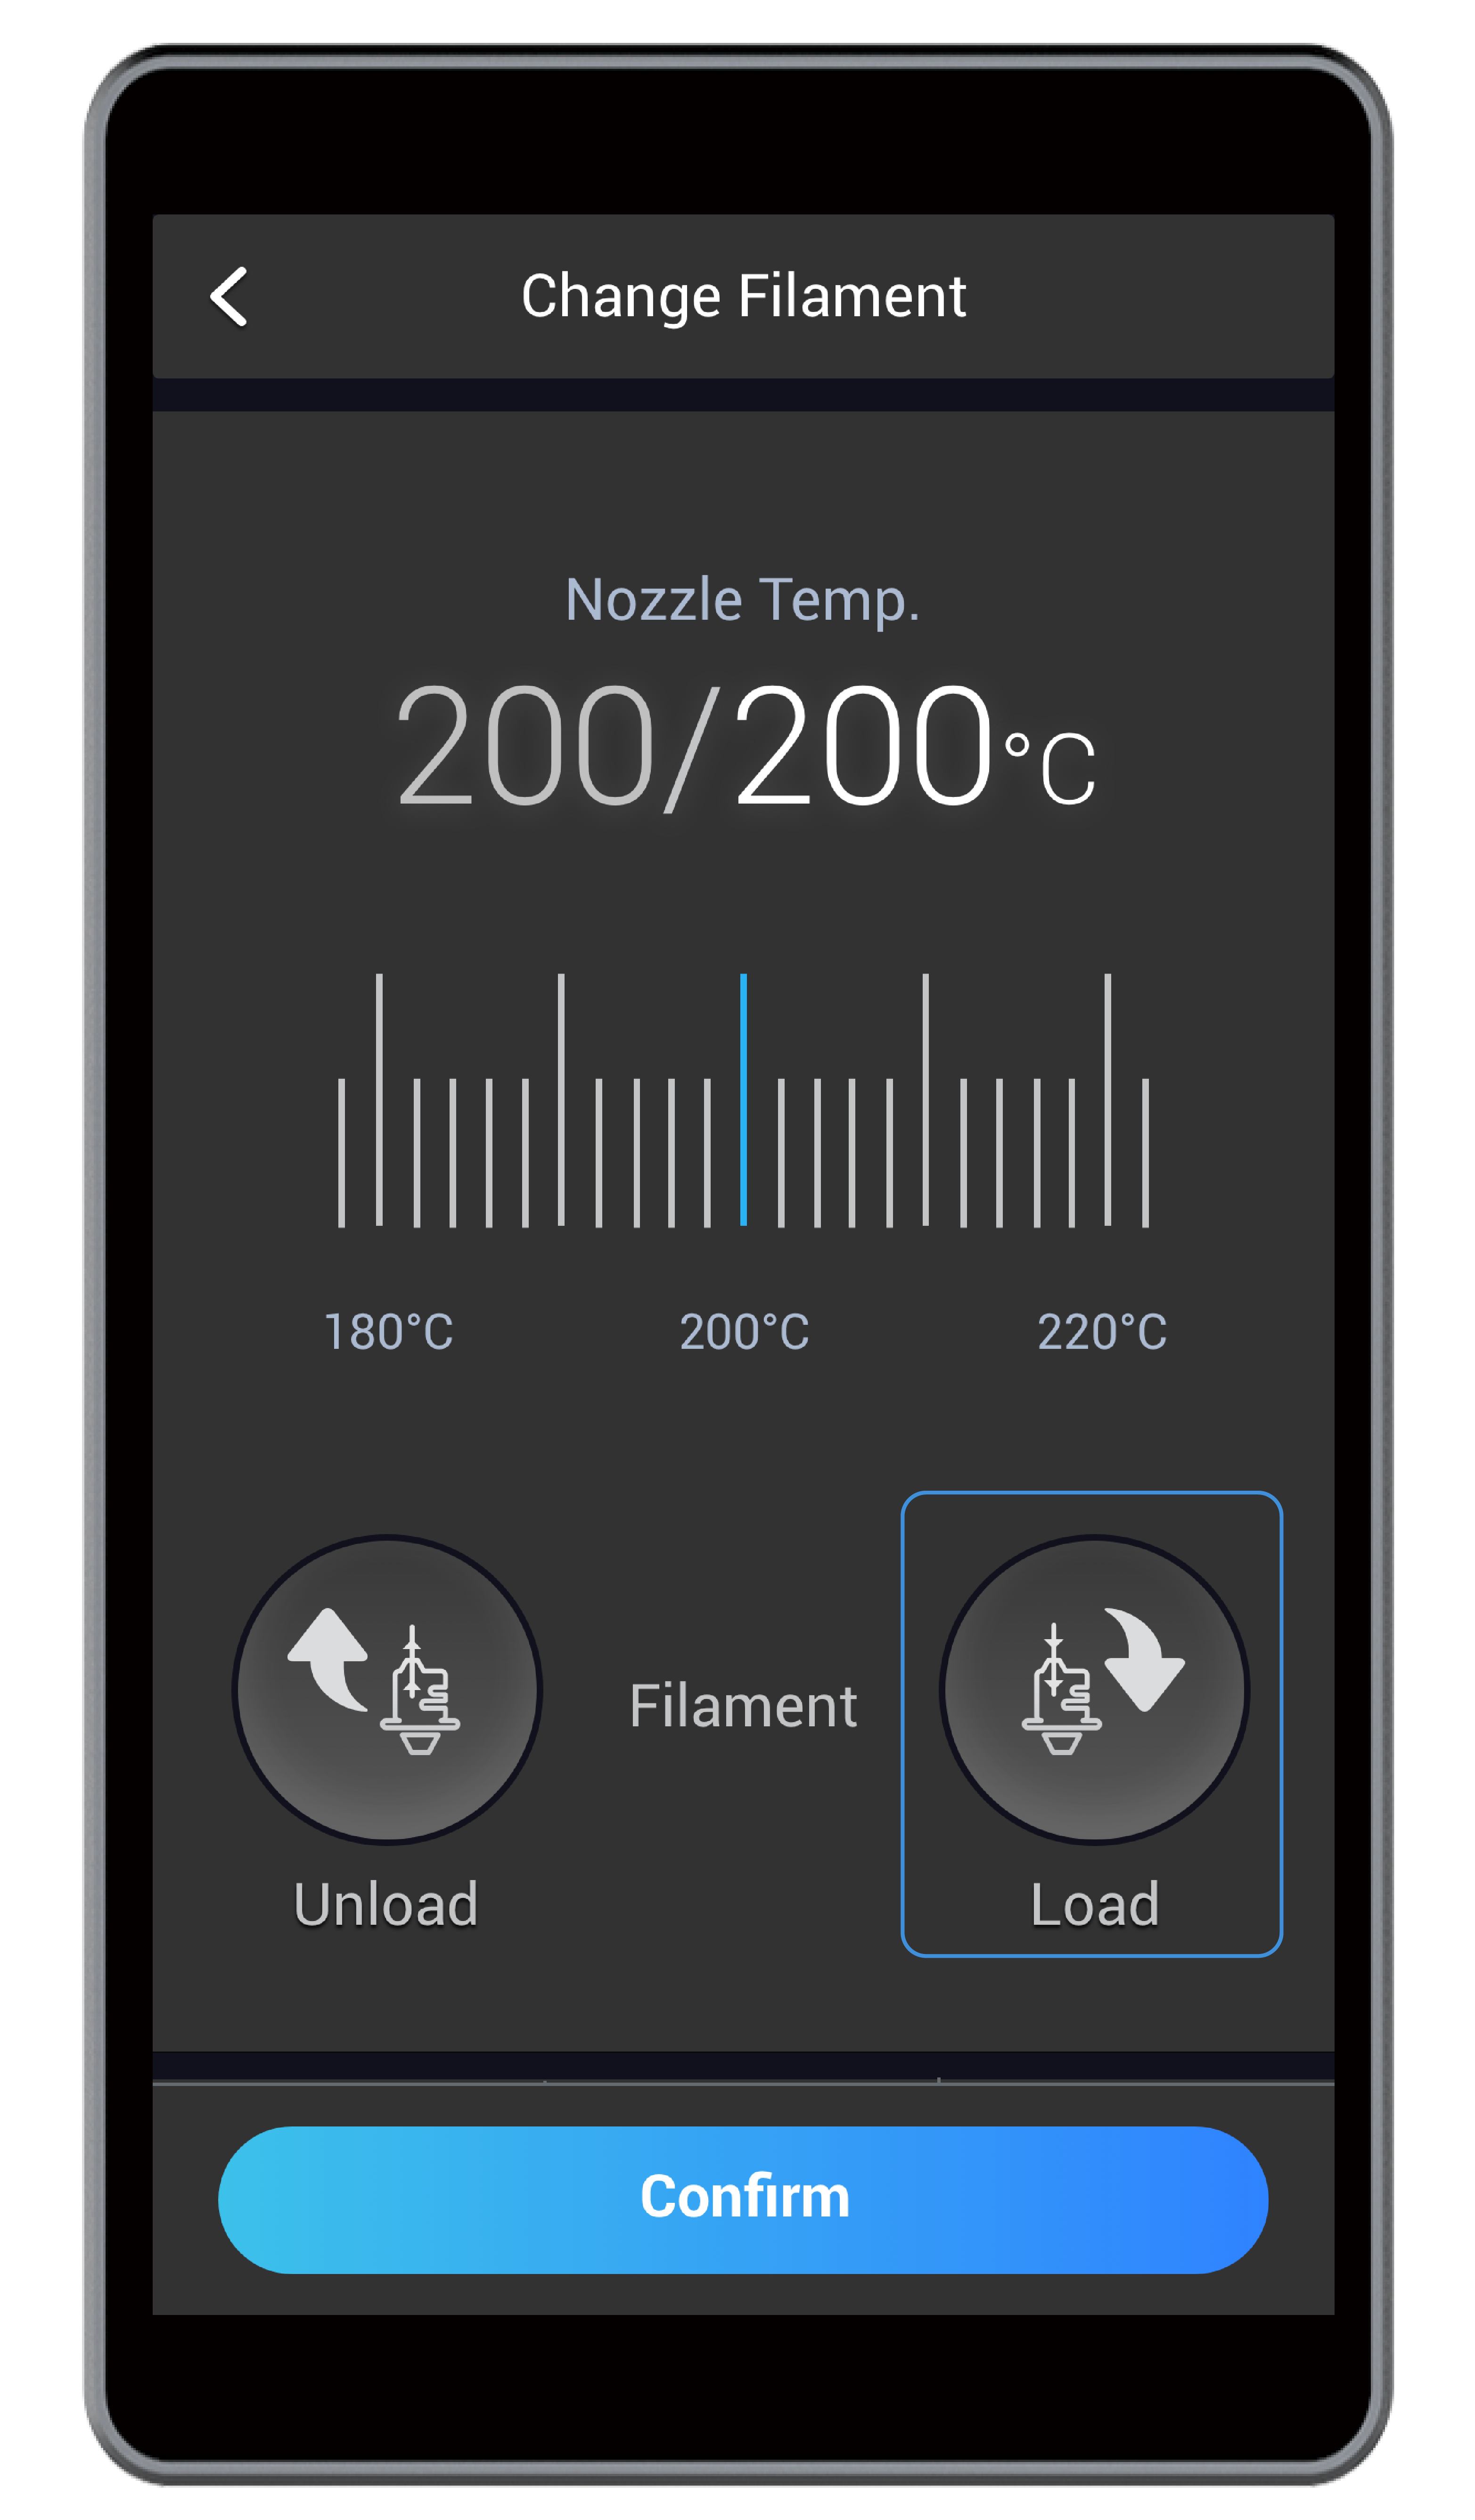
(1) Heat the nozzle. On the APP List Screen, tap Control > Nozzle. Slide the scale bar left or right to set the target Nozzle Temp. so that the heated block can melt the filament.
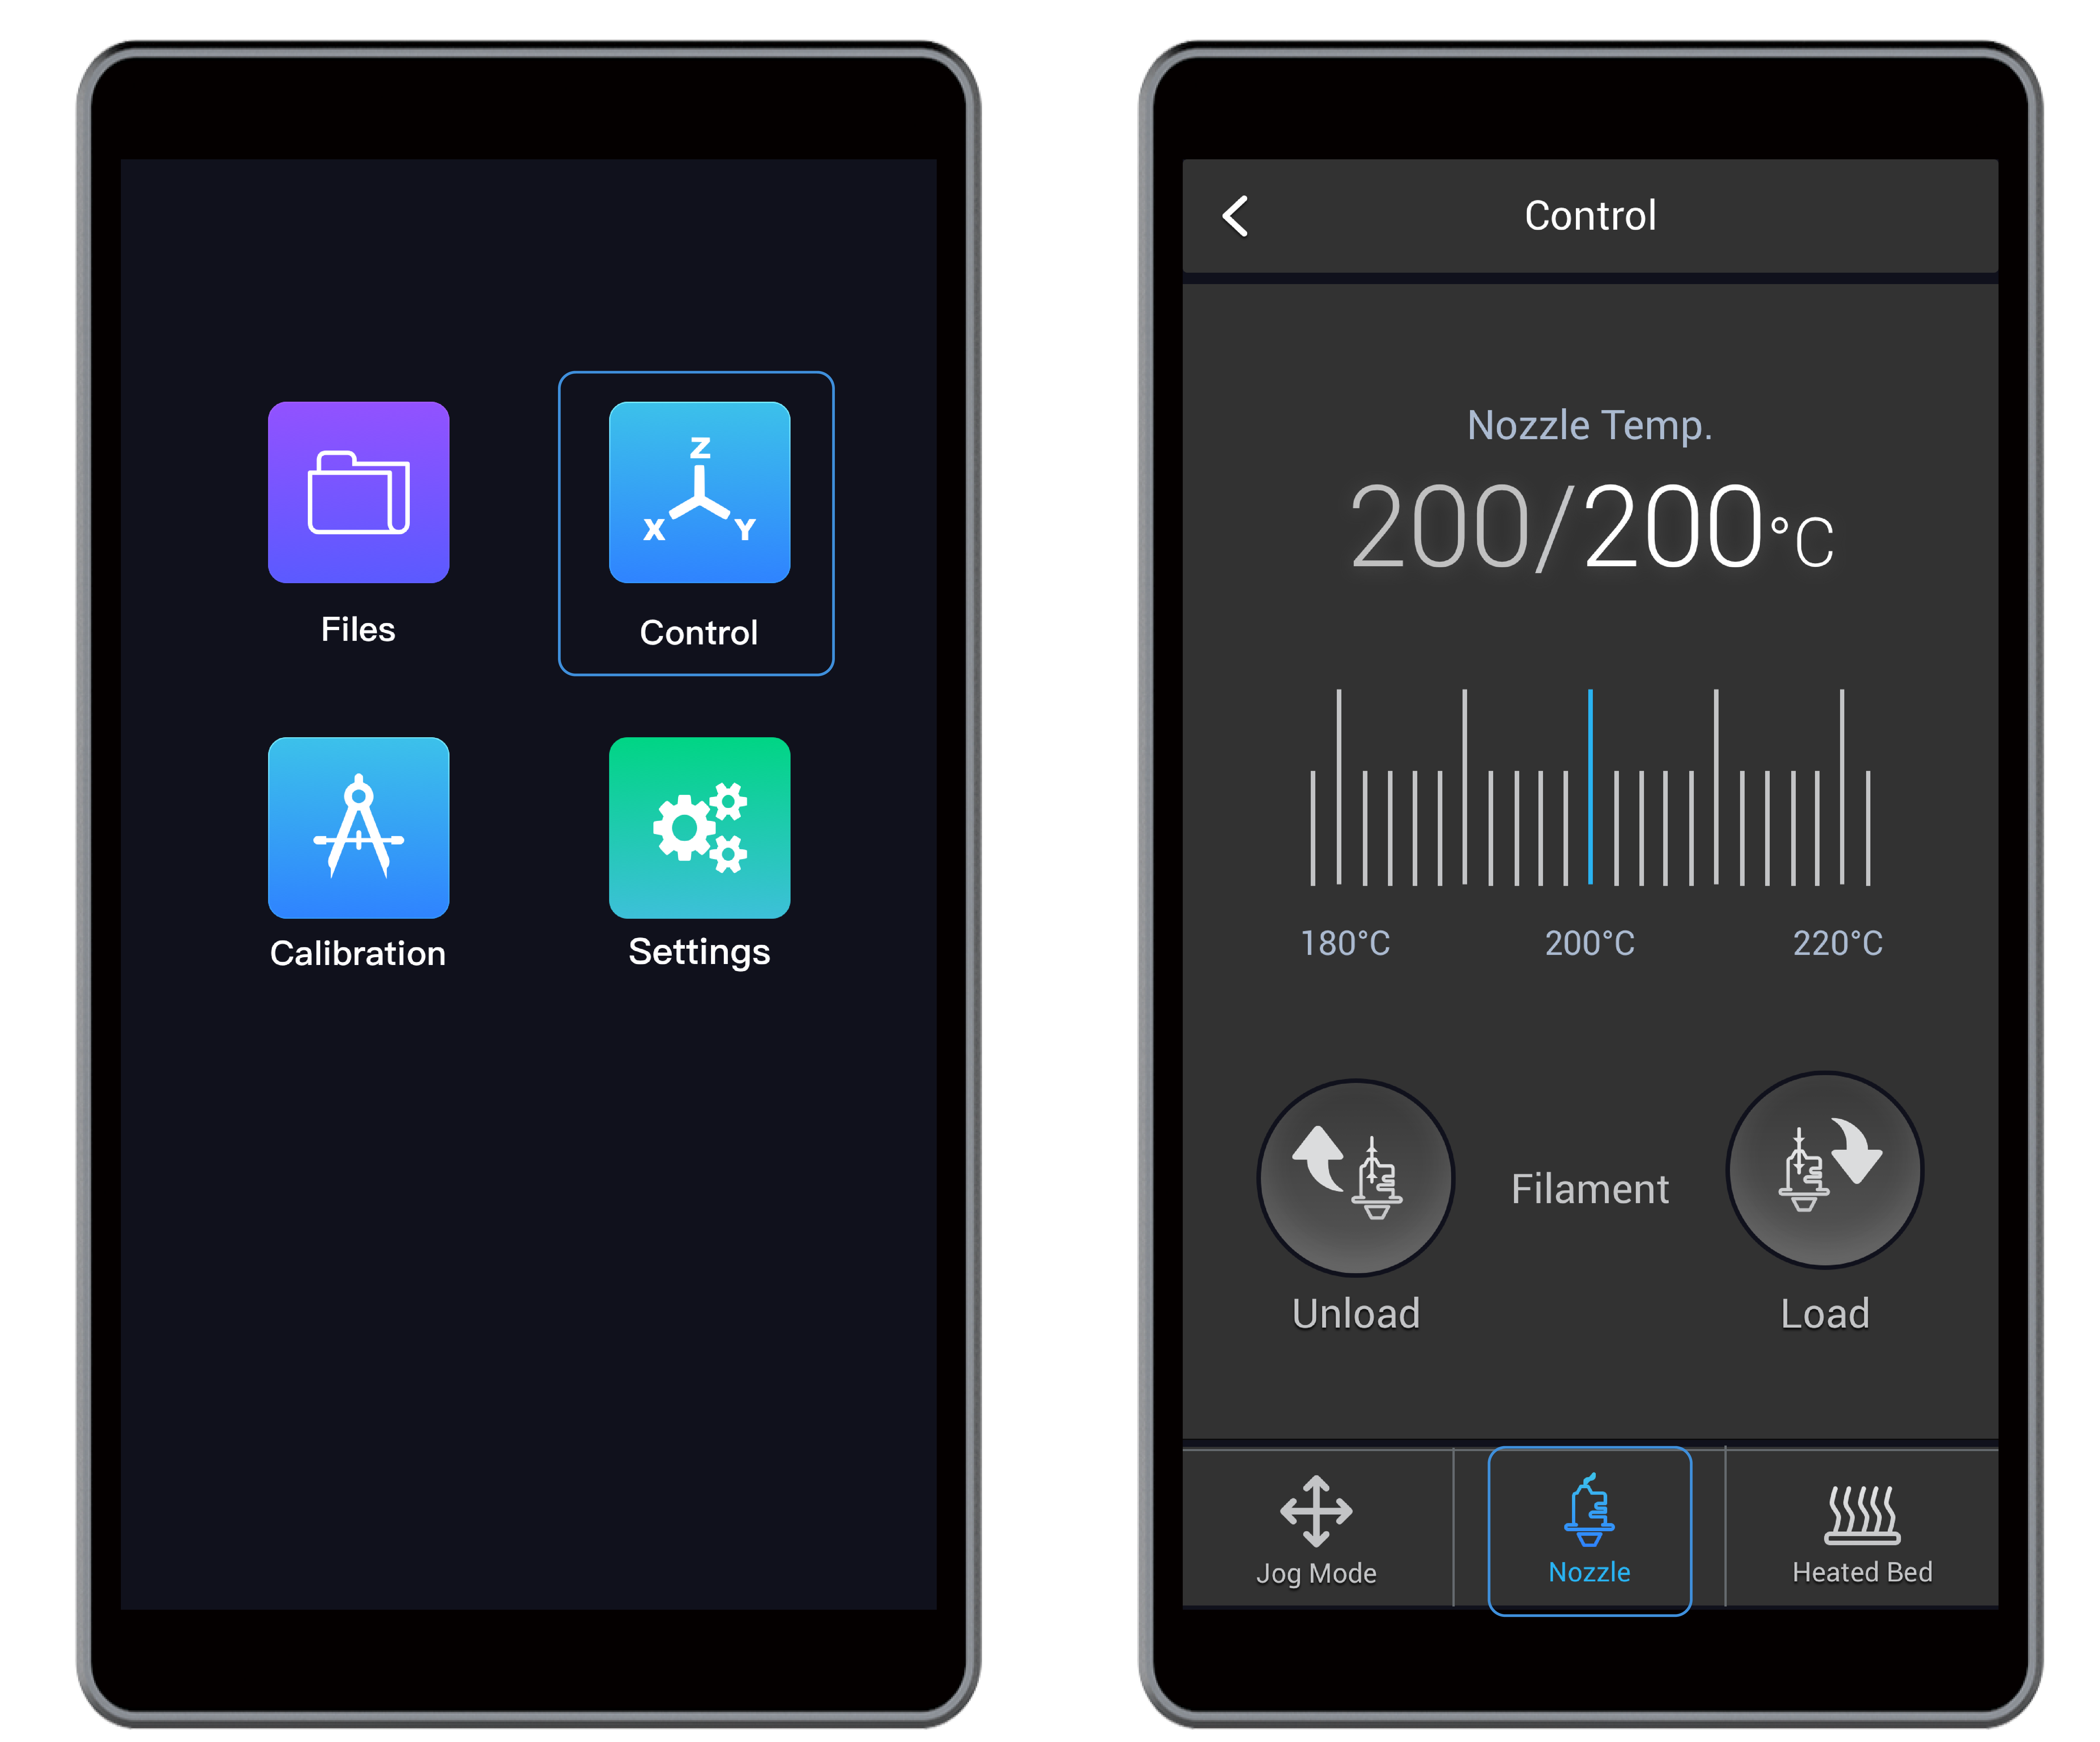
![]() By default, the nozzle will be heated to 200°C (392°F). The Load or Unload button is available only when the nozzle is heated to around the preset temperature which should be 175°C (347°F) or higher.
By default, the nozzle will be heated to 200°C (392°F). The Load or Unload button is available only when the nozzle is heated to around the preset temperature which should be 175°C (347°F) or higher.
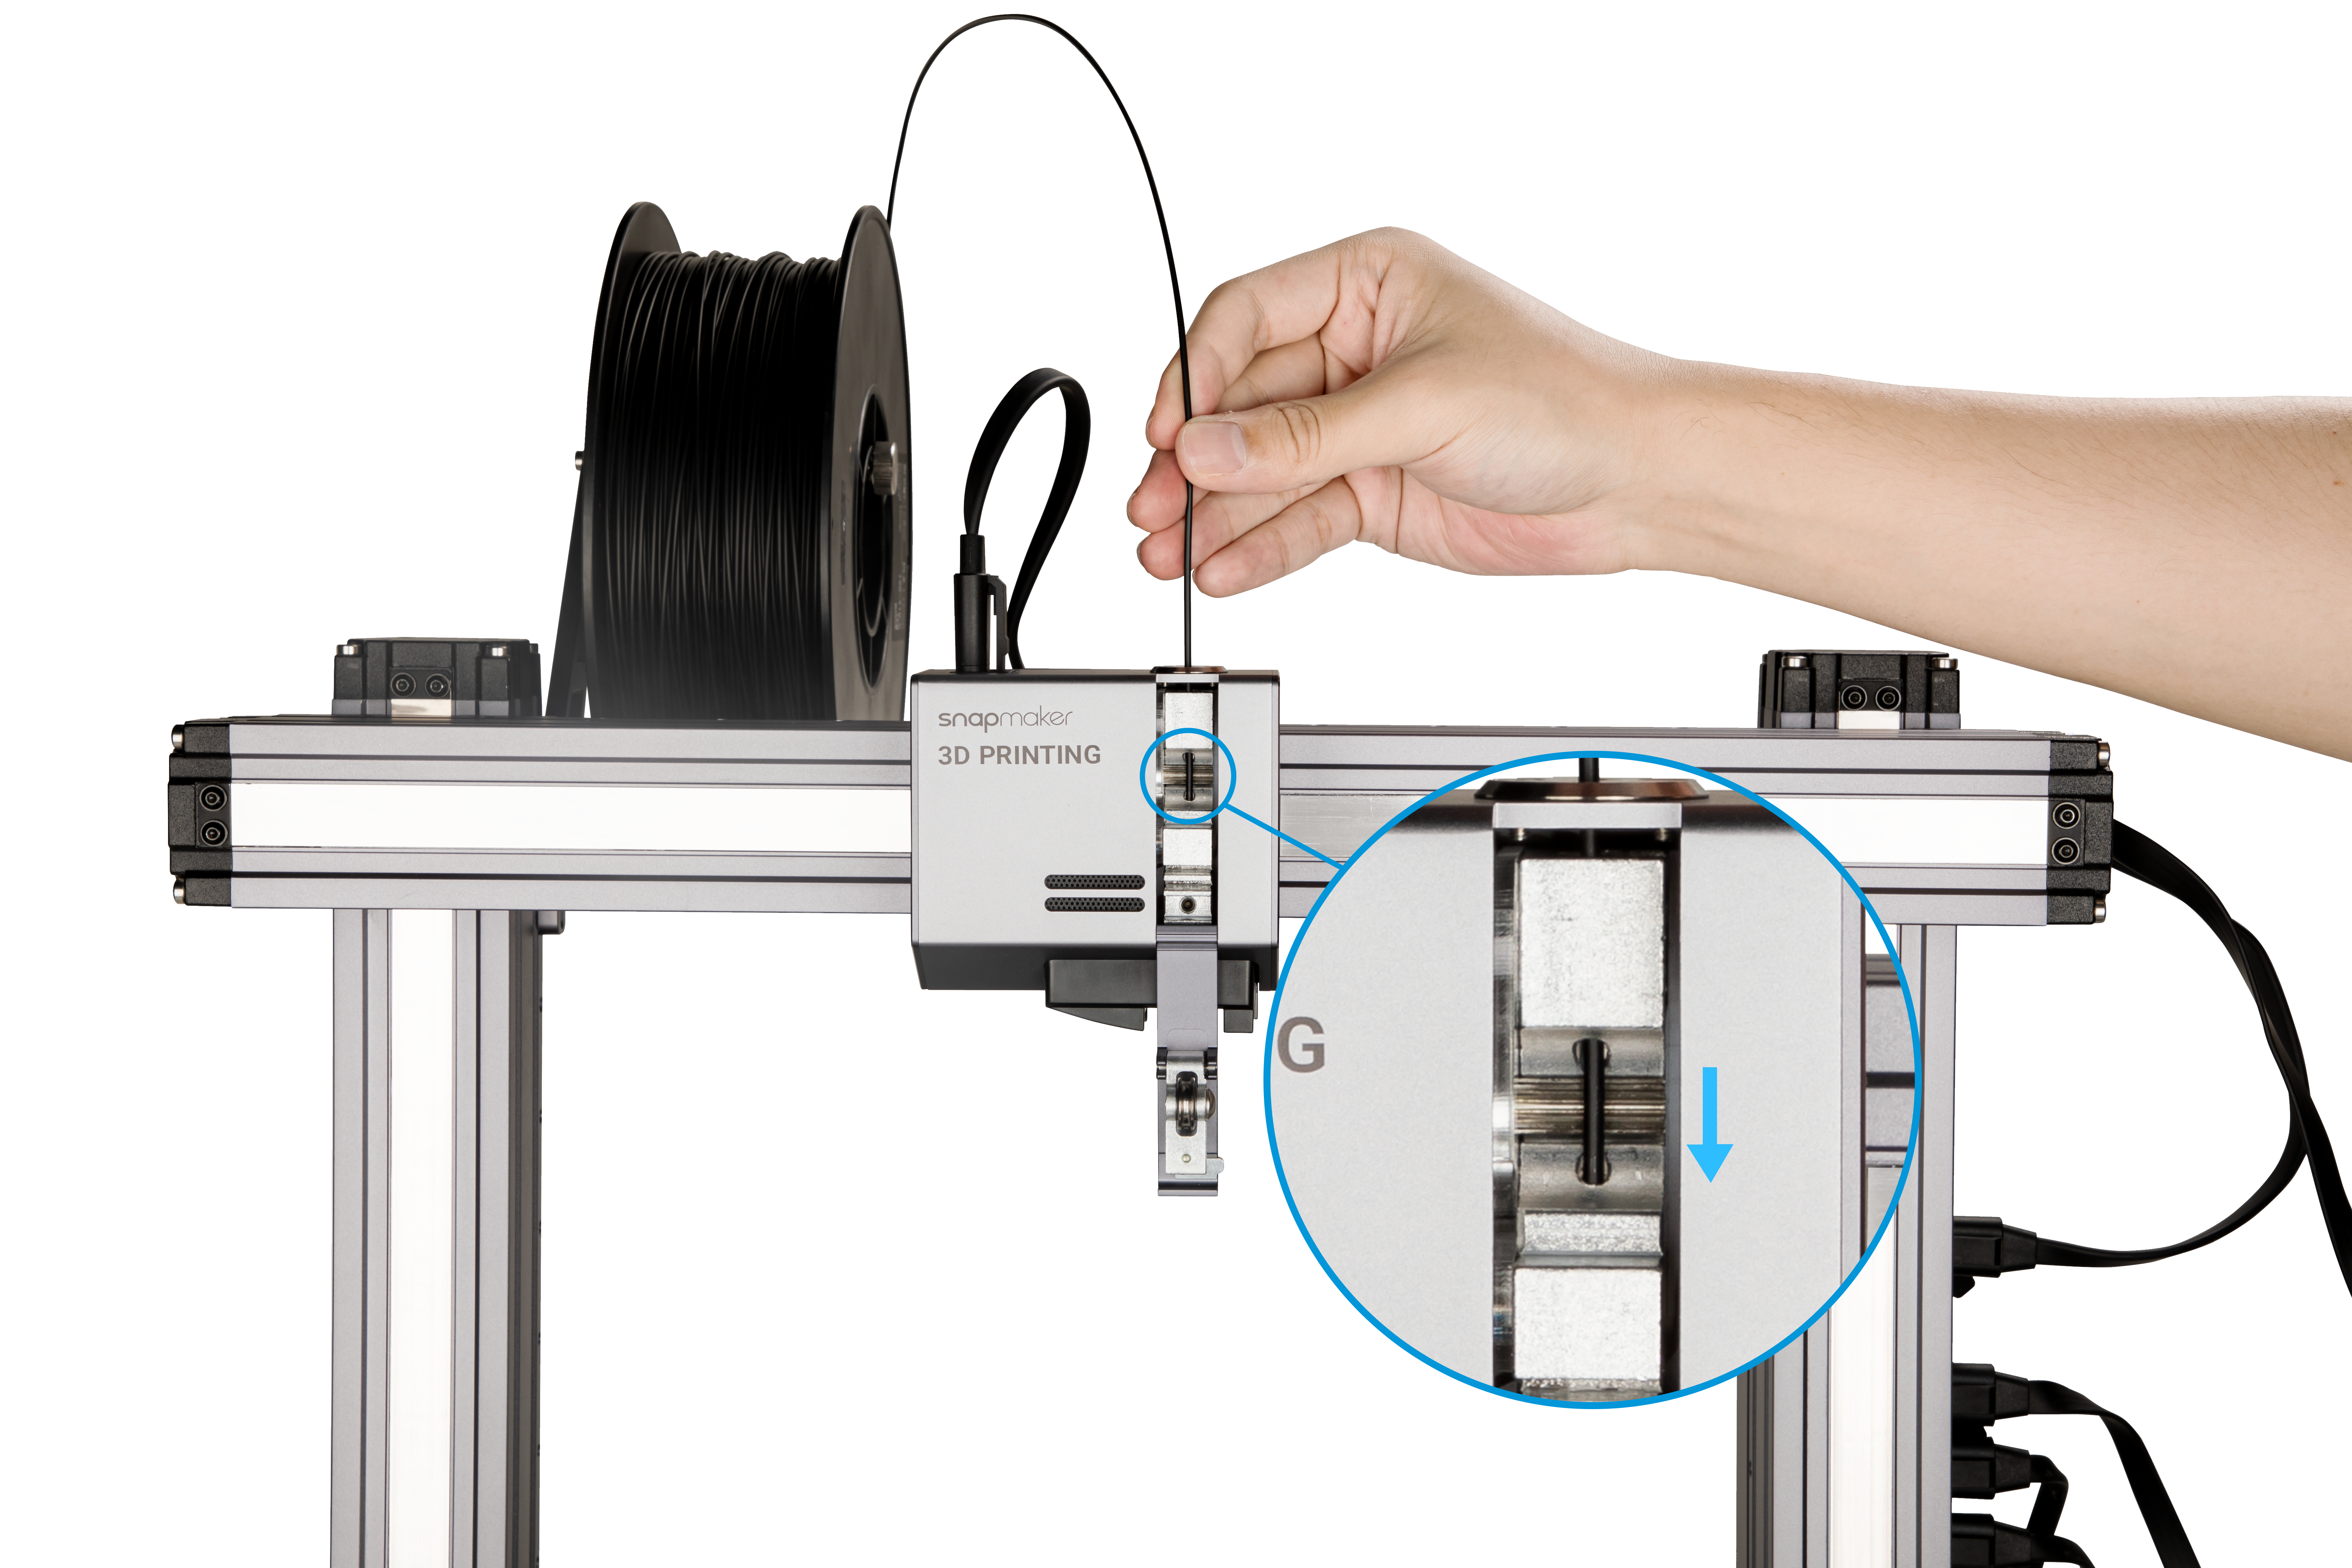
(2) Insert the filament. During heating, hang the filament onto the Filament Holder. Cut the bent end of the filament using the diagonal pliers, and insert it into the 3D Printing Module.
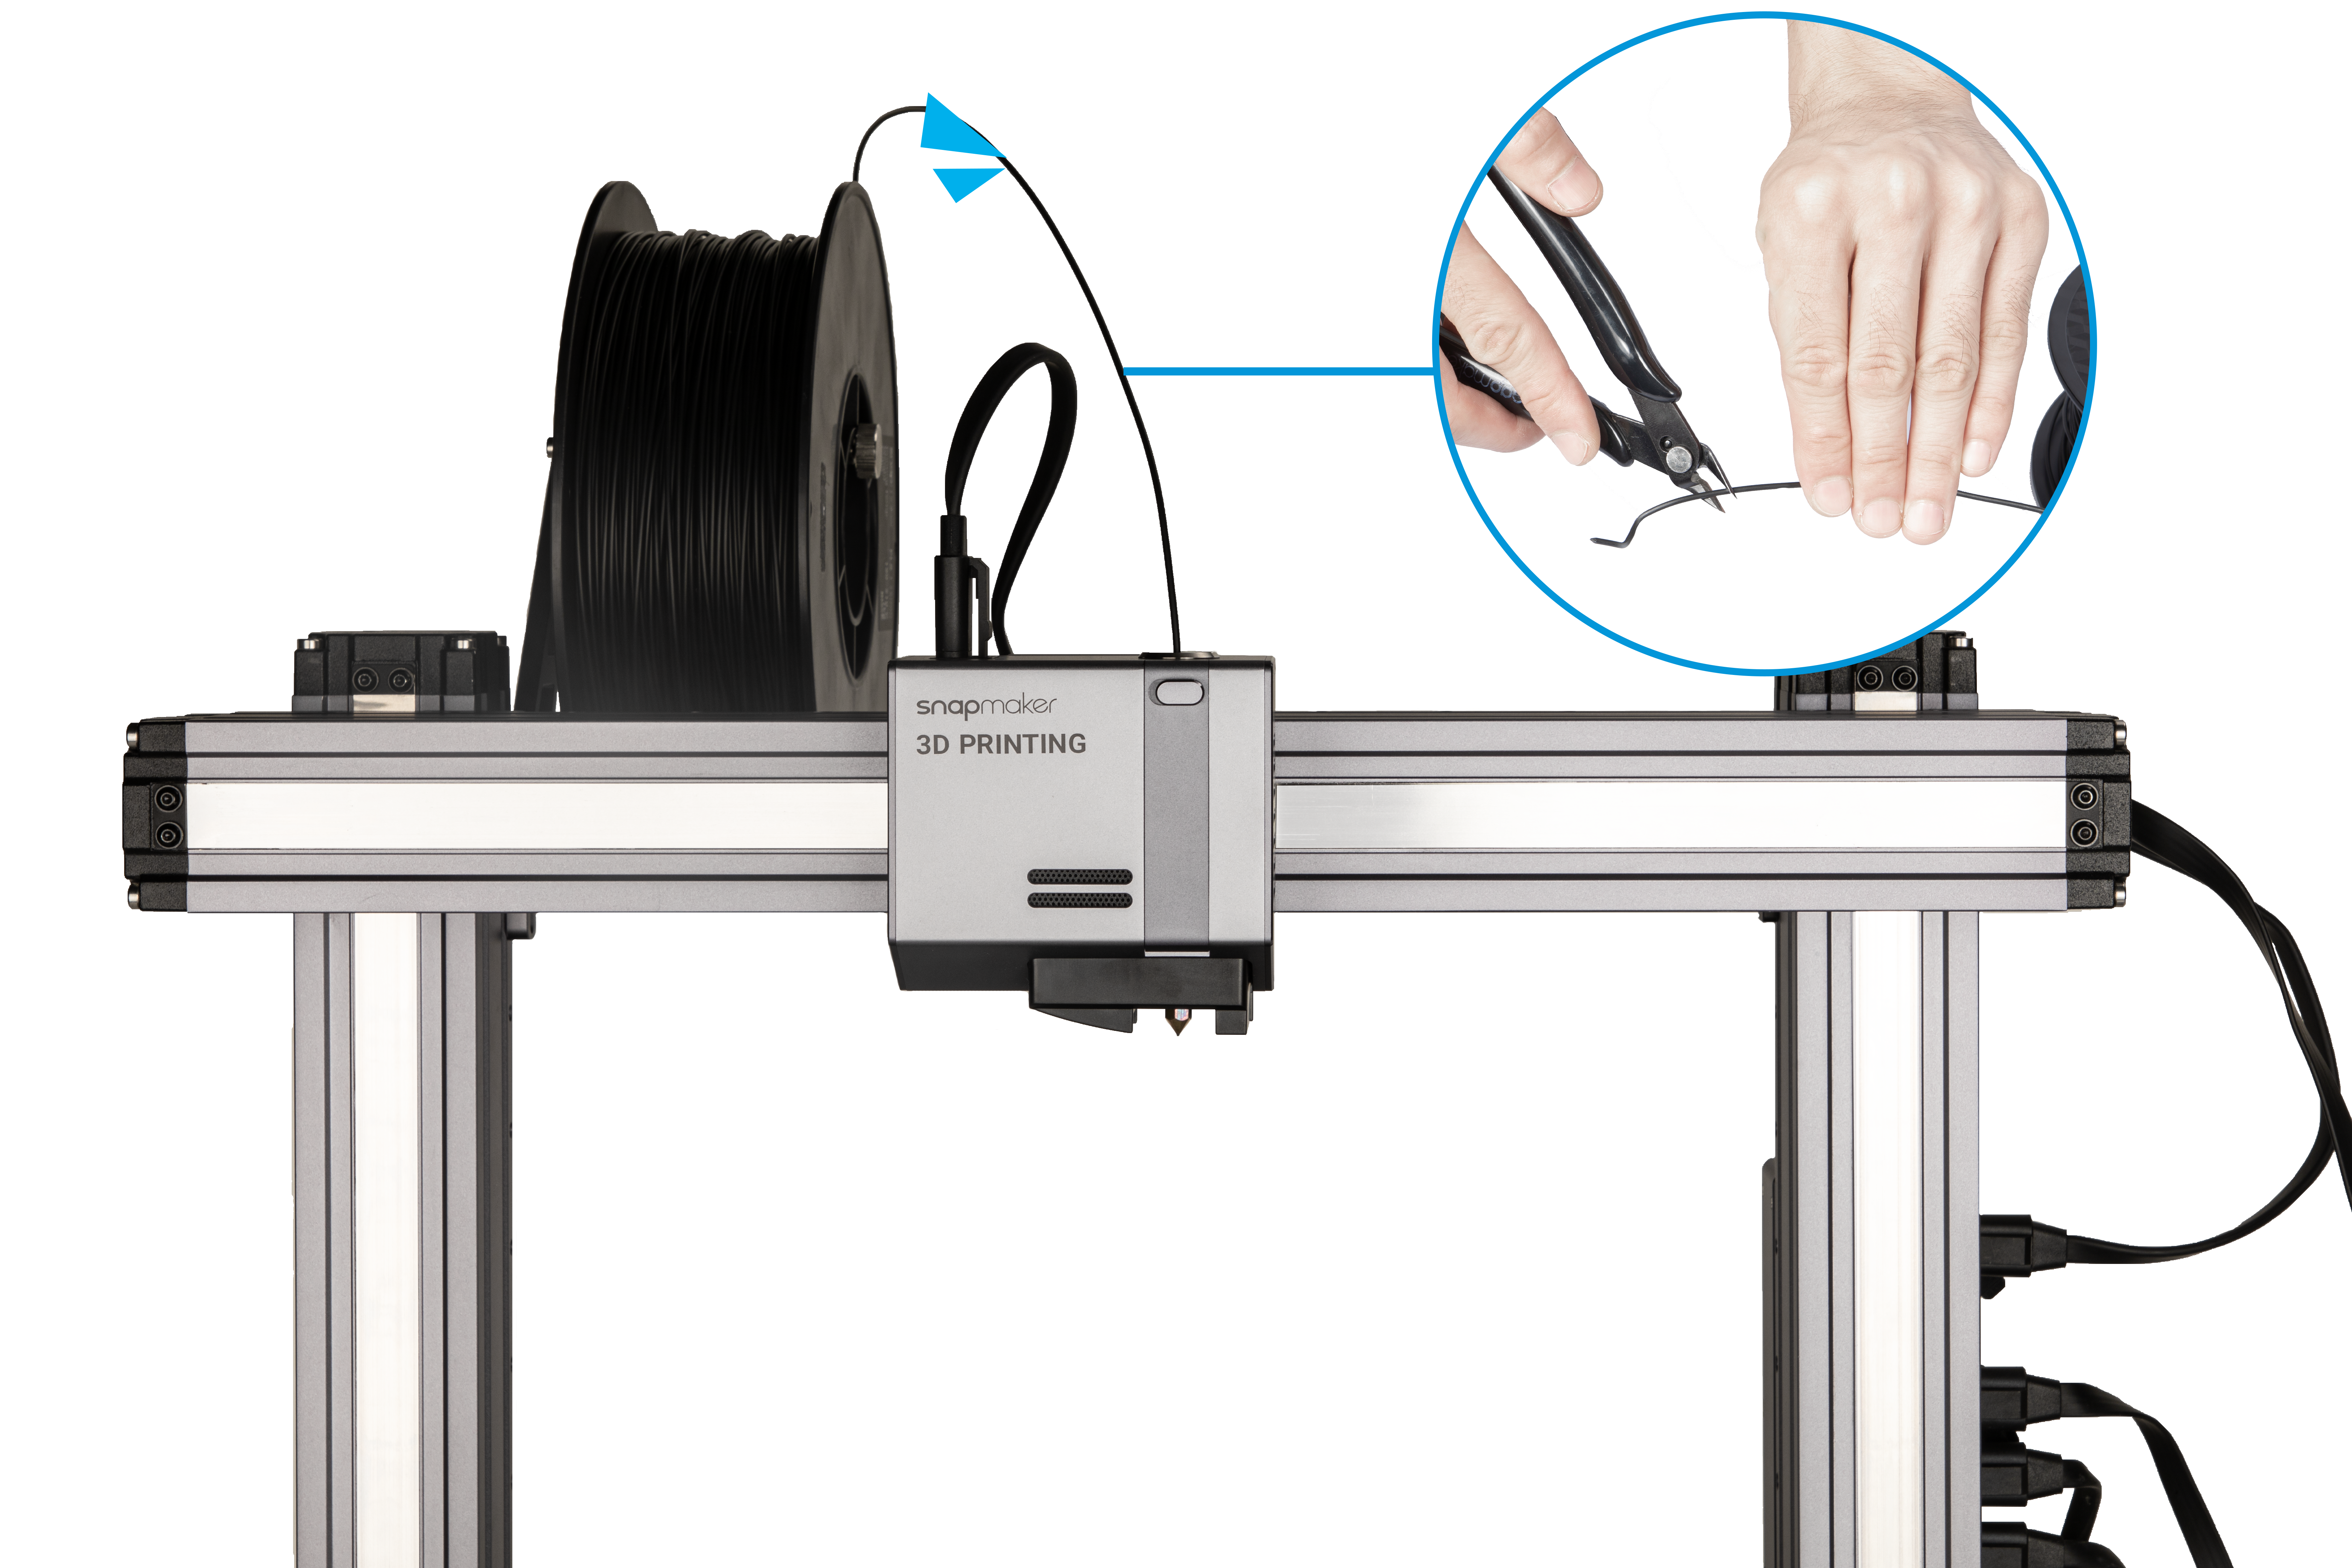
![]() Should the 3D Printing Module have filament inserted, heat the nozzle up to 200°C (392°F) and then tap Unload to pull out the old filament before inserting a new one.
Should the 3D Printing Module have filament inserted, heat the nozzle up to 200°C (392°F) and then tap Unload to pull out the old filament before inserting a new one.
(3)Load the filament. After the nozzle reaches the target temperature, tap Load and gently thread the filament until you feel the gear driving the filament in.

(4) Clean the nozzle using the tweezers.
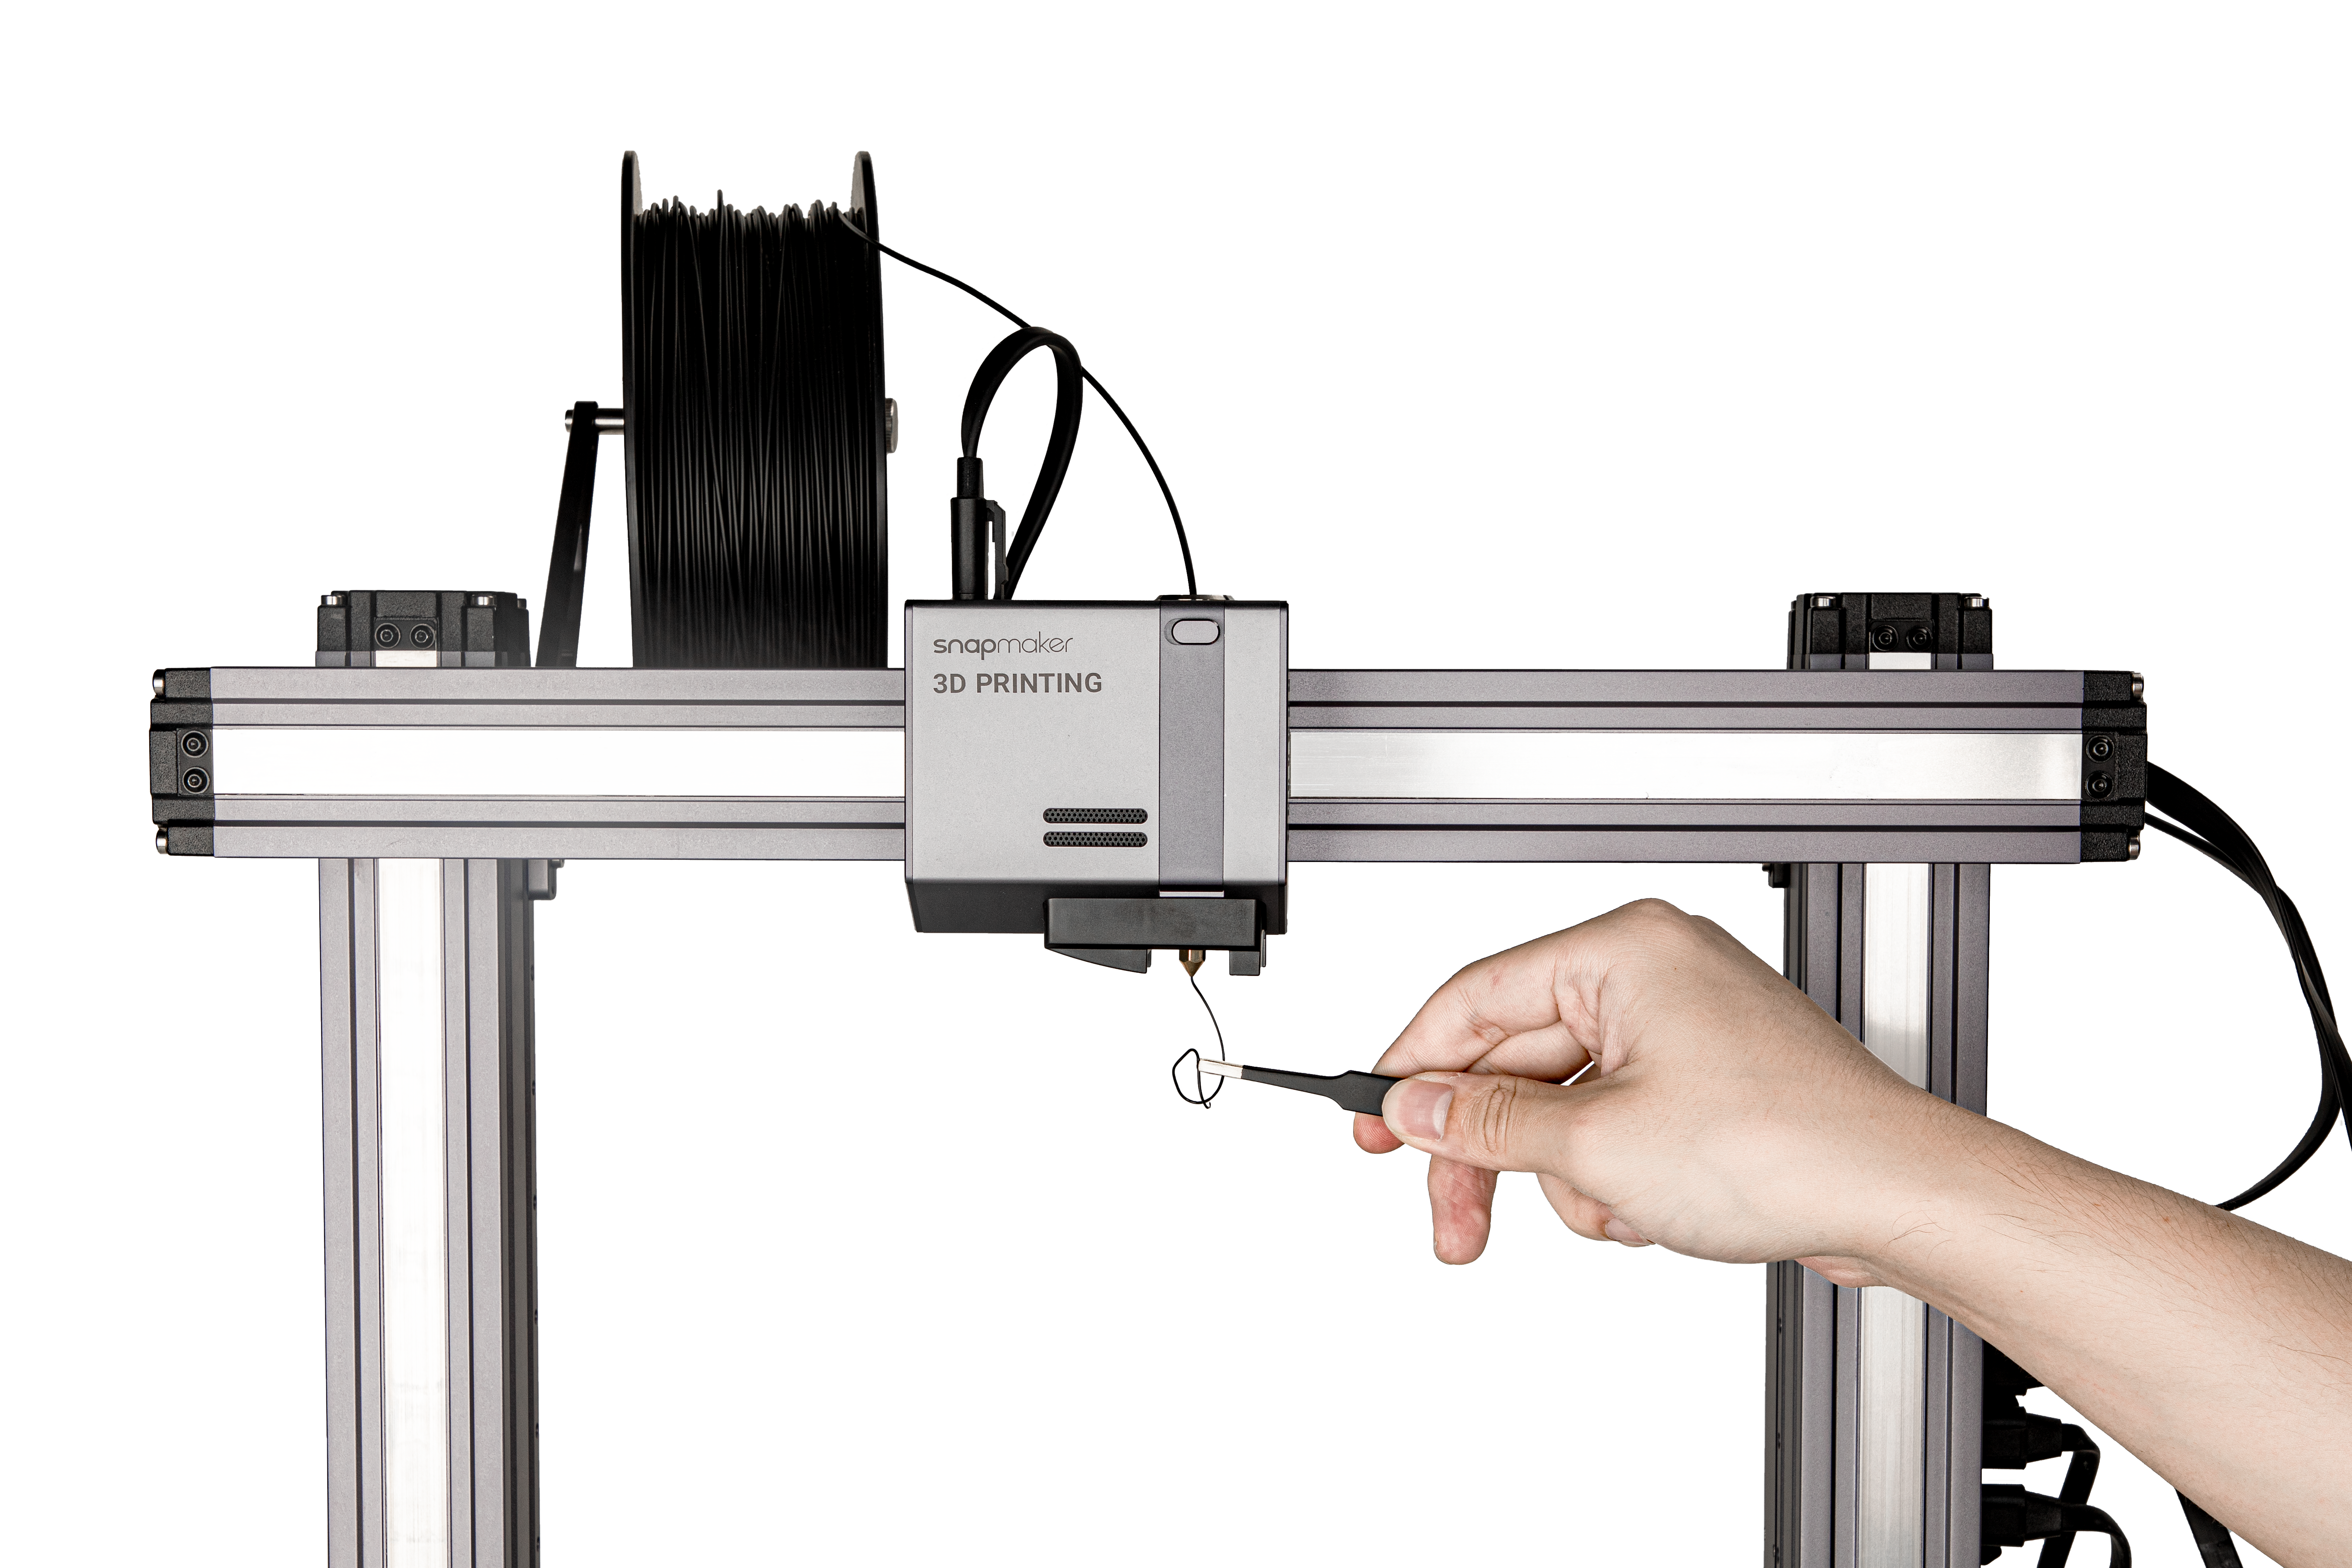
![]() Do not touch the hot nozzle with bare hands.
Do not touch the hot nozzle with bare hands.
Manually Load the Filament
(1) Heat the nozzle. On the APP List Screen, tap Control > Nozzle. Slide the scale bar left or right to set the target Nozzle Temp. so that the heated block can melt the filament.
(2) Insert the filament. During heating, hang the filament to the Filament Holder. Cut the bent end of the filament using the diagonal pliers, and insert it into the 3D Printing Module.
![]() Should the 3D Printing Module have filament inserted, heat the nozzle up to 200°C (392°F) and then tap Unload to pull out the old filament before inserting a new one.
Should the 3D Printing Module have filament inserted, heat the nozzle up to 200°C (392°F) and then tap Unload to pull out the old filament before inserting a new one.
(3) Open the 3D Printing Module. Press the slide knob inward and then push it left to open the 3D Printing Module.
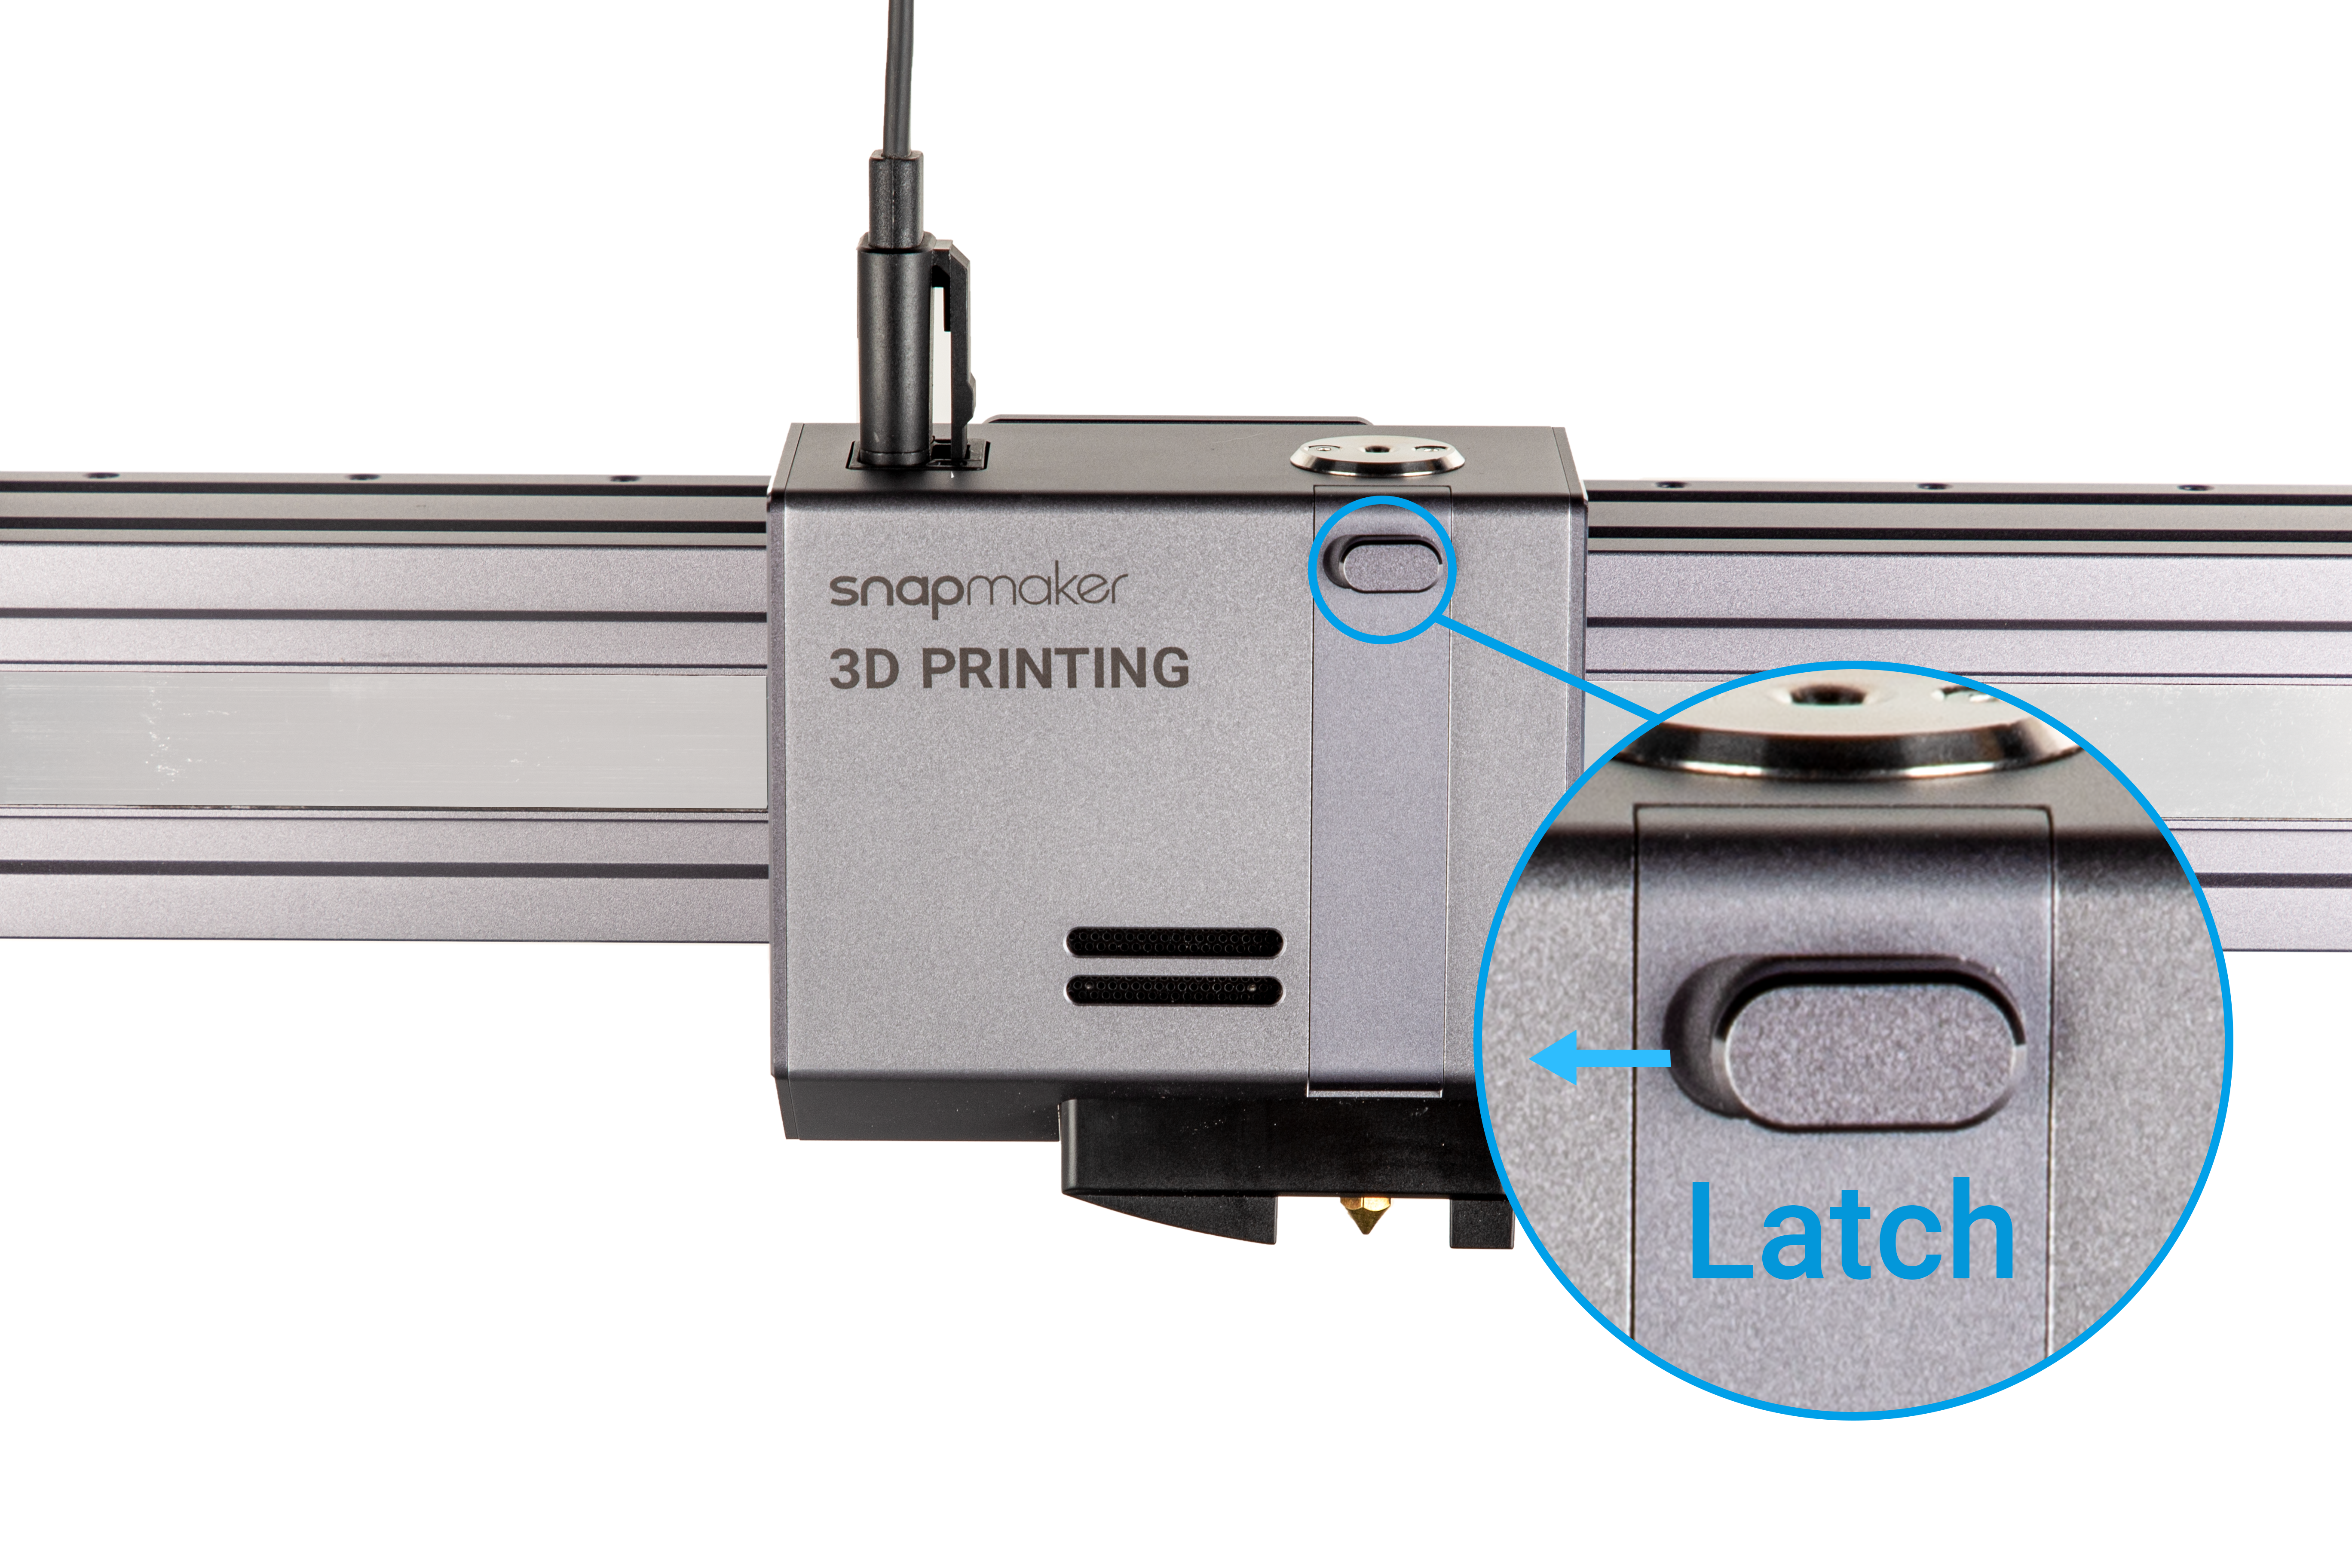
![]() Do not touch the hot nozzle with bare hands while operating the slide knob.
Do not touch the hot nozzle with bare hands while operating the slide knob.
(4) Manually extrude the filament. After the nozzle reaches the target temperature, squeeze the filament down the feed hole until the uncured filament is extruded from the nozzle. Press the slide knob inward and then push it right to close the 3D Printing Module.
(5) Clean the nozzle using the tweezers.
4.4 Prepare the G-code File
4.4.1 Prepare the Model File
Before generating the G-code file on Luban, you should prepare a model file. Here are a few options for preparing the model file:
- Use provided models in the Case Library of Luban.
- Design 3D models using the 3D modeling software, like SketchUp and Fusion 360.
- Download free and high-quality 3D models online, like thingiverse.com and myminifactory.com.
- 3D scan models of various physical objects using a 3D scanner.
Currently, Luban supports the following file formats for 3D printing:
- .stl
- .obj
4.4.2 Generate the G-code File
Open Luban and follow the Snapmaker 2.0 Quick Start Guide to generate the G-code file.
4.5 Transfer the File and Start Printing
You can transfer the G-code file and start printing in the following four ways.
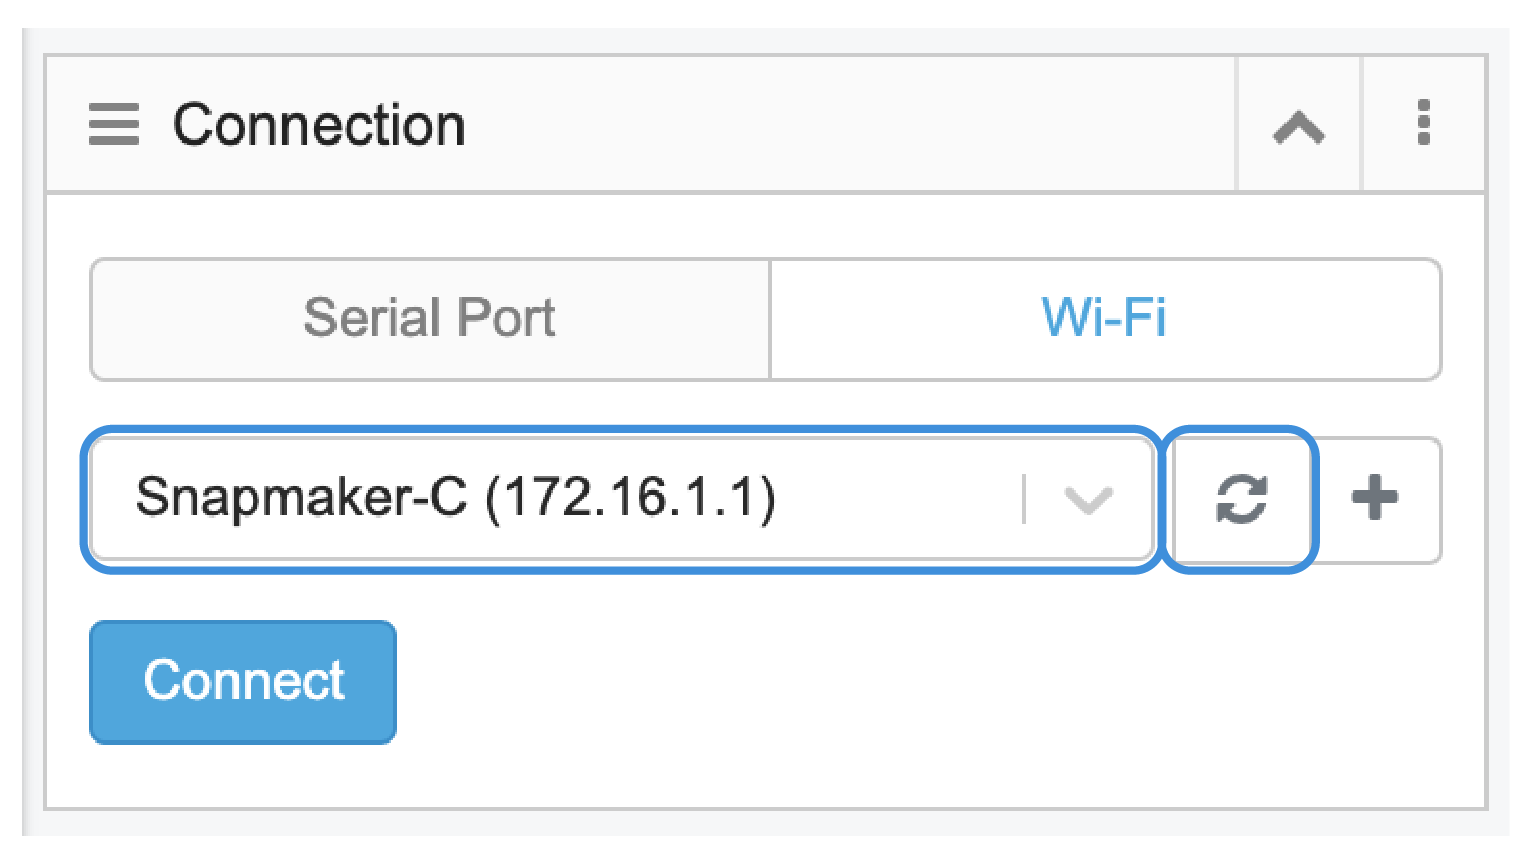
Start Printing on the Touchscreen via Wi-Fi
(1) On Luban, click Workspace. In the Connection panel, click Connect Wi-Fi > Refresh ![]() > Select your 3D printer in the drop-down list > Connect Luban to your 3D printer.
> Select your 3D printer in the drop-down list > Connect Luban to your 3D printer.
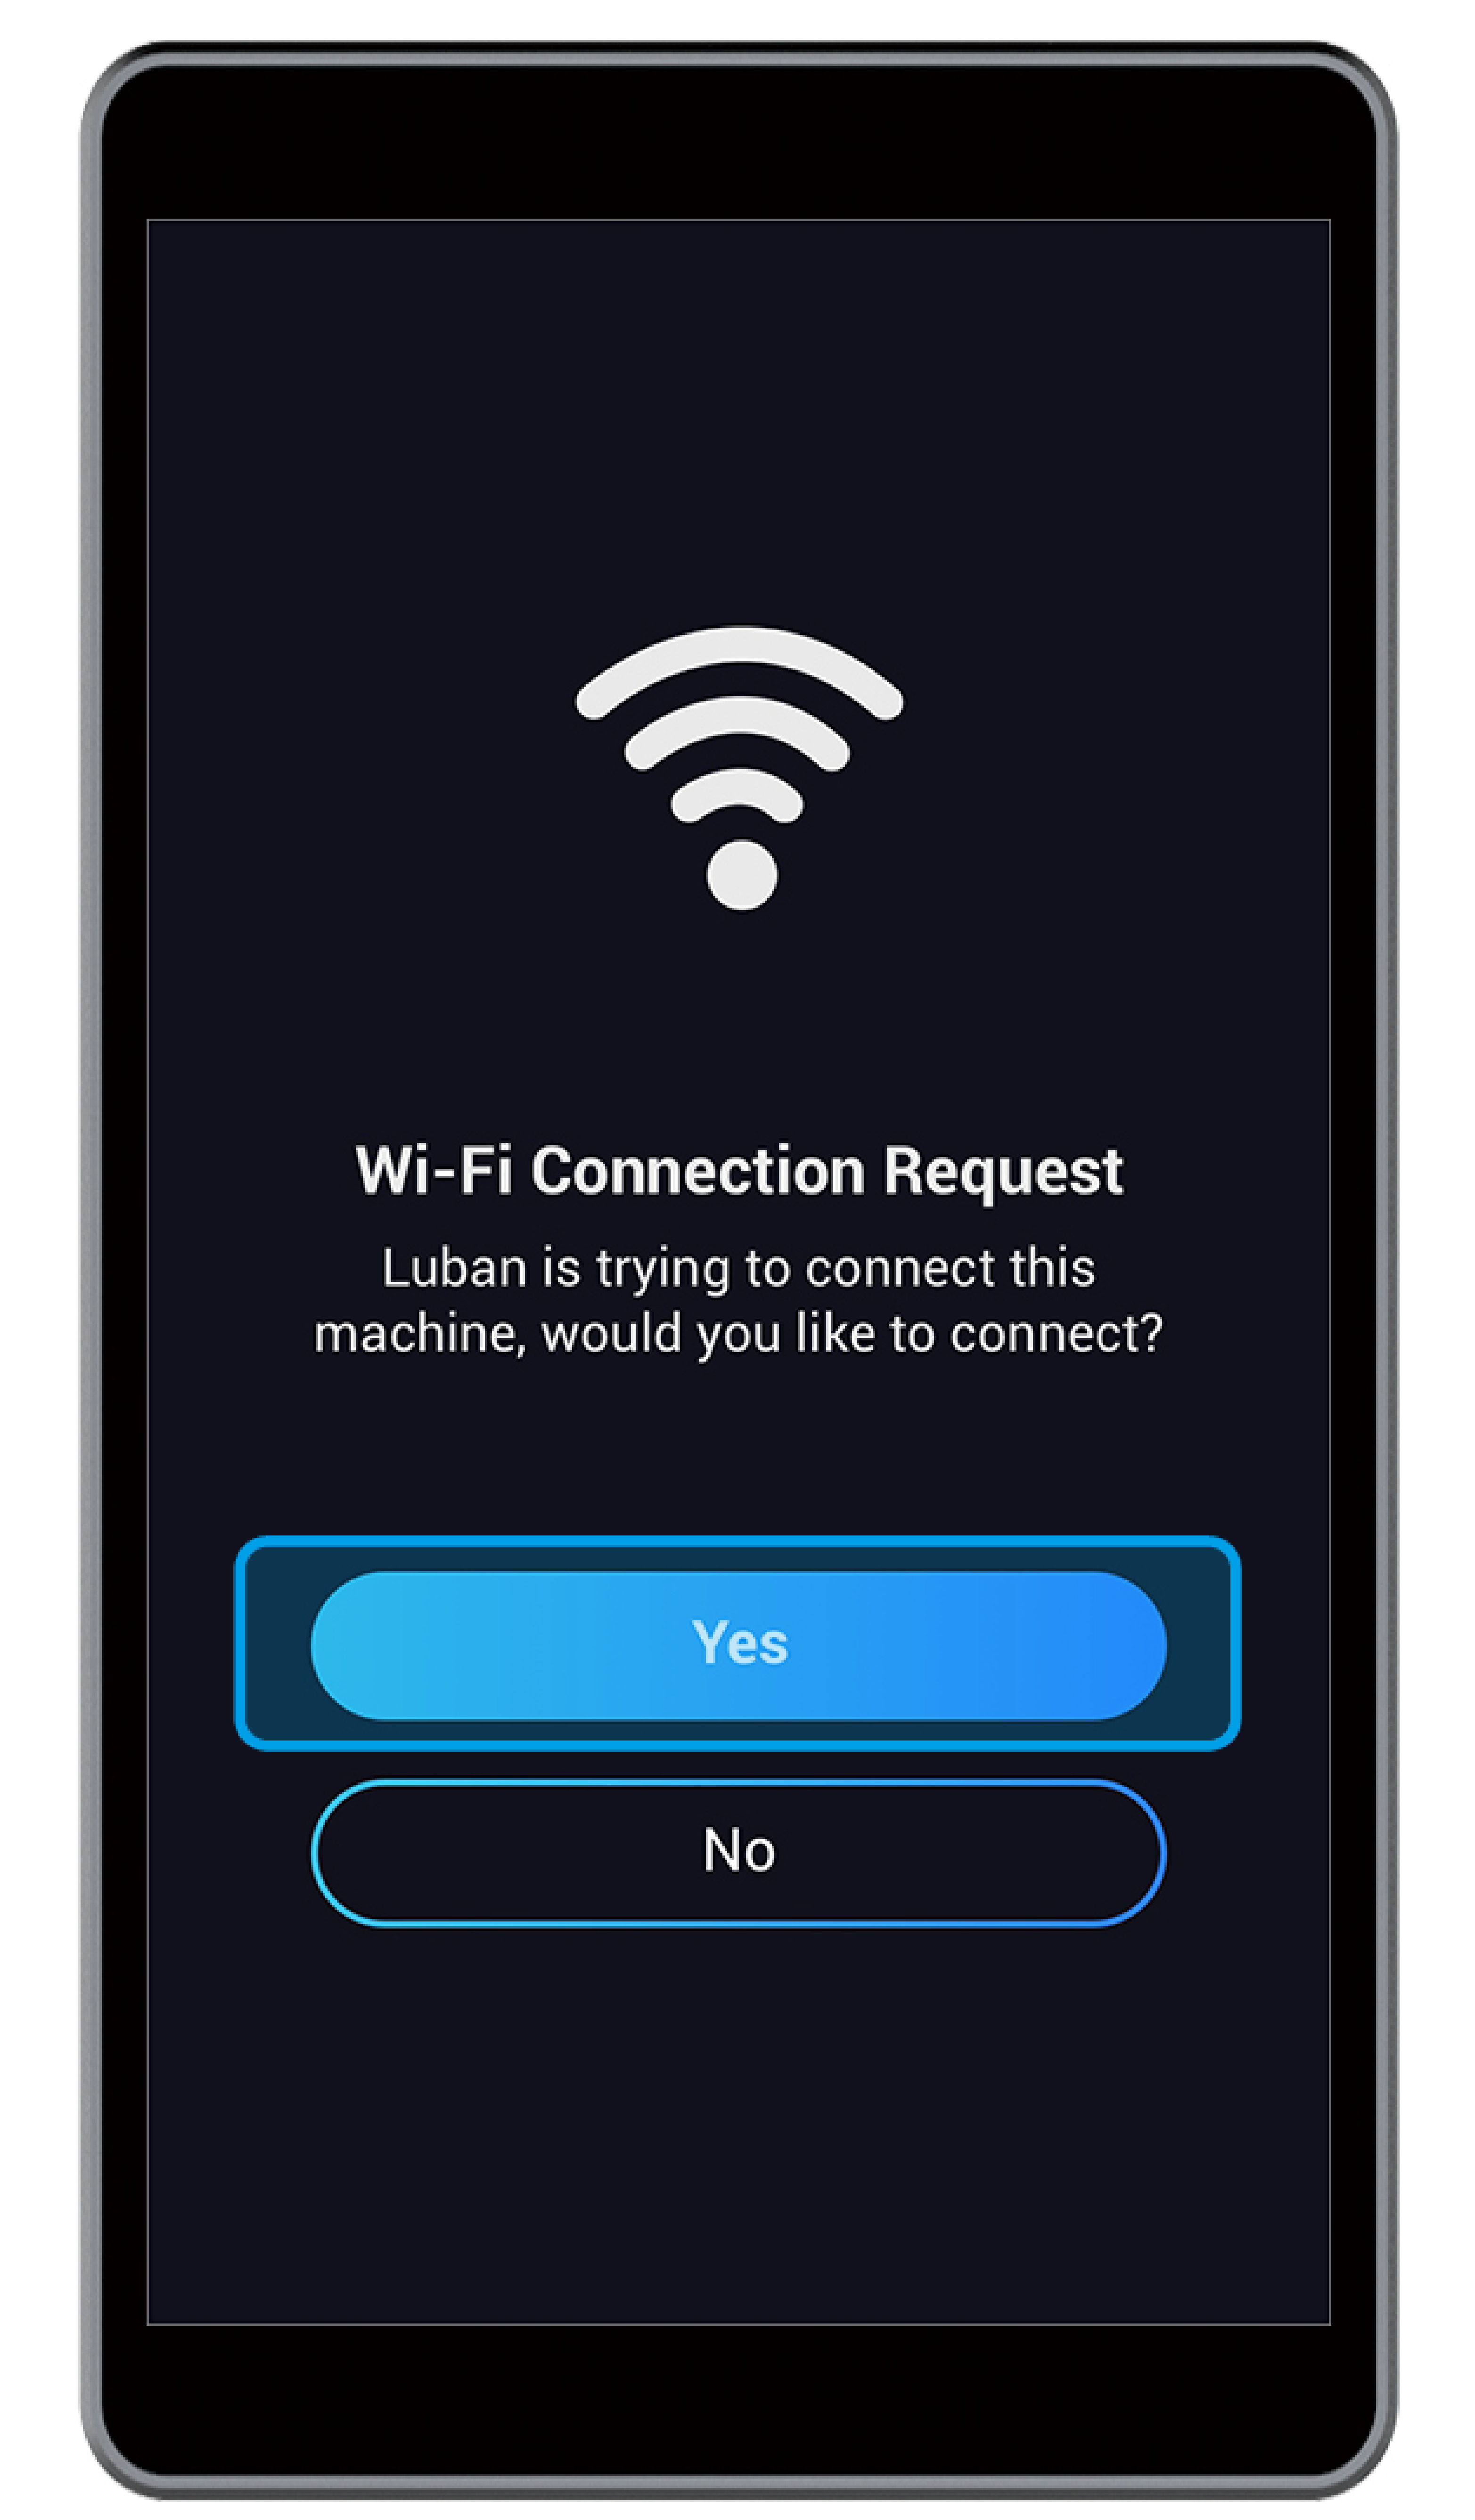
(2) On the Touchscreen, tap Yes to grant Wi-Fi connection.
(3) In Workspace, click Send to Device via Wi-Fi.
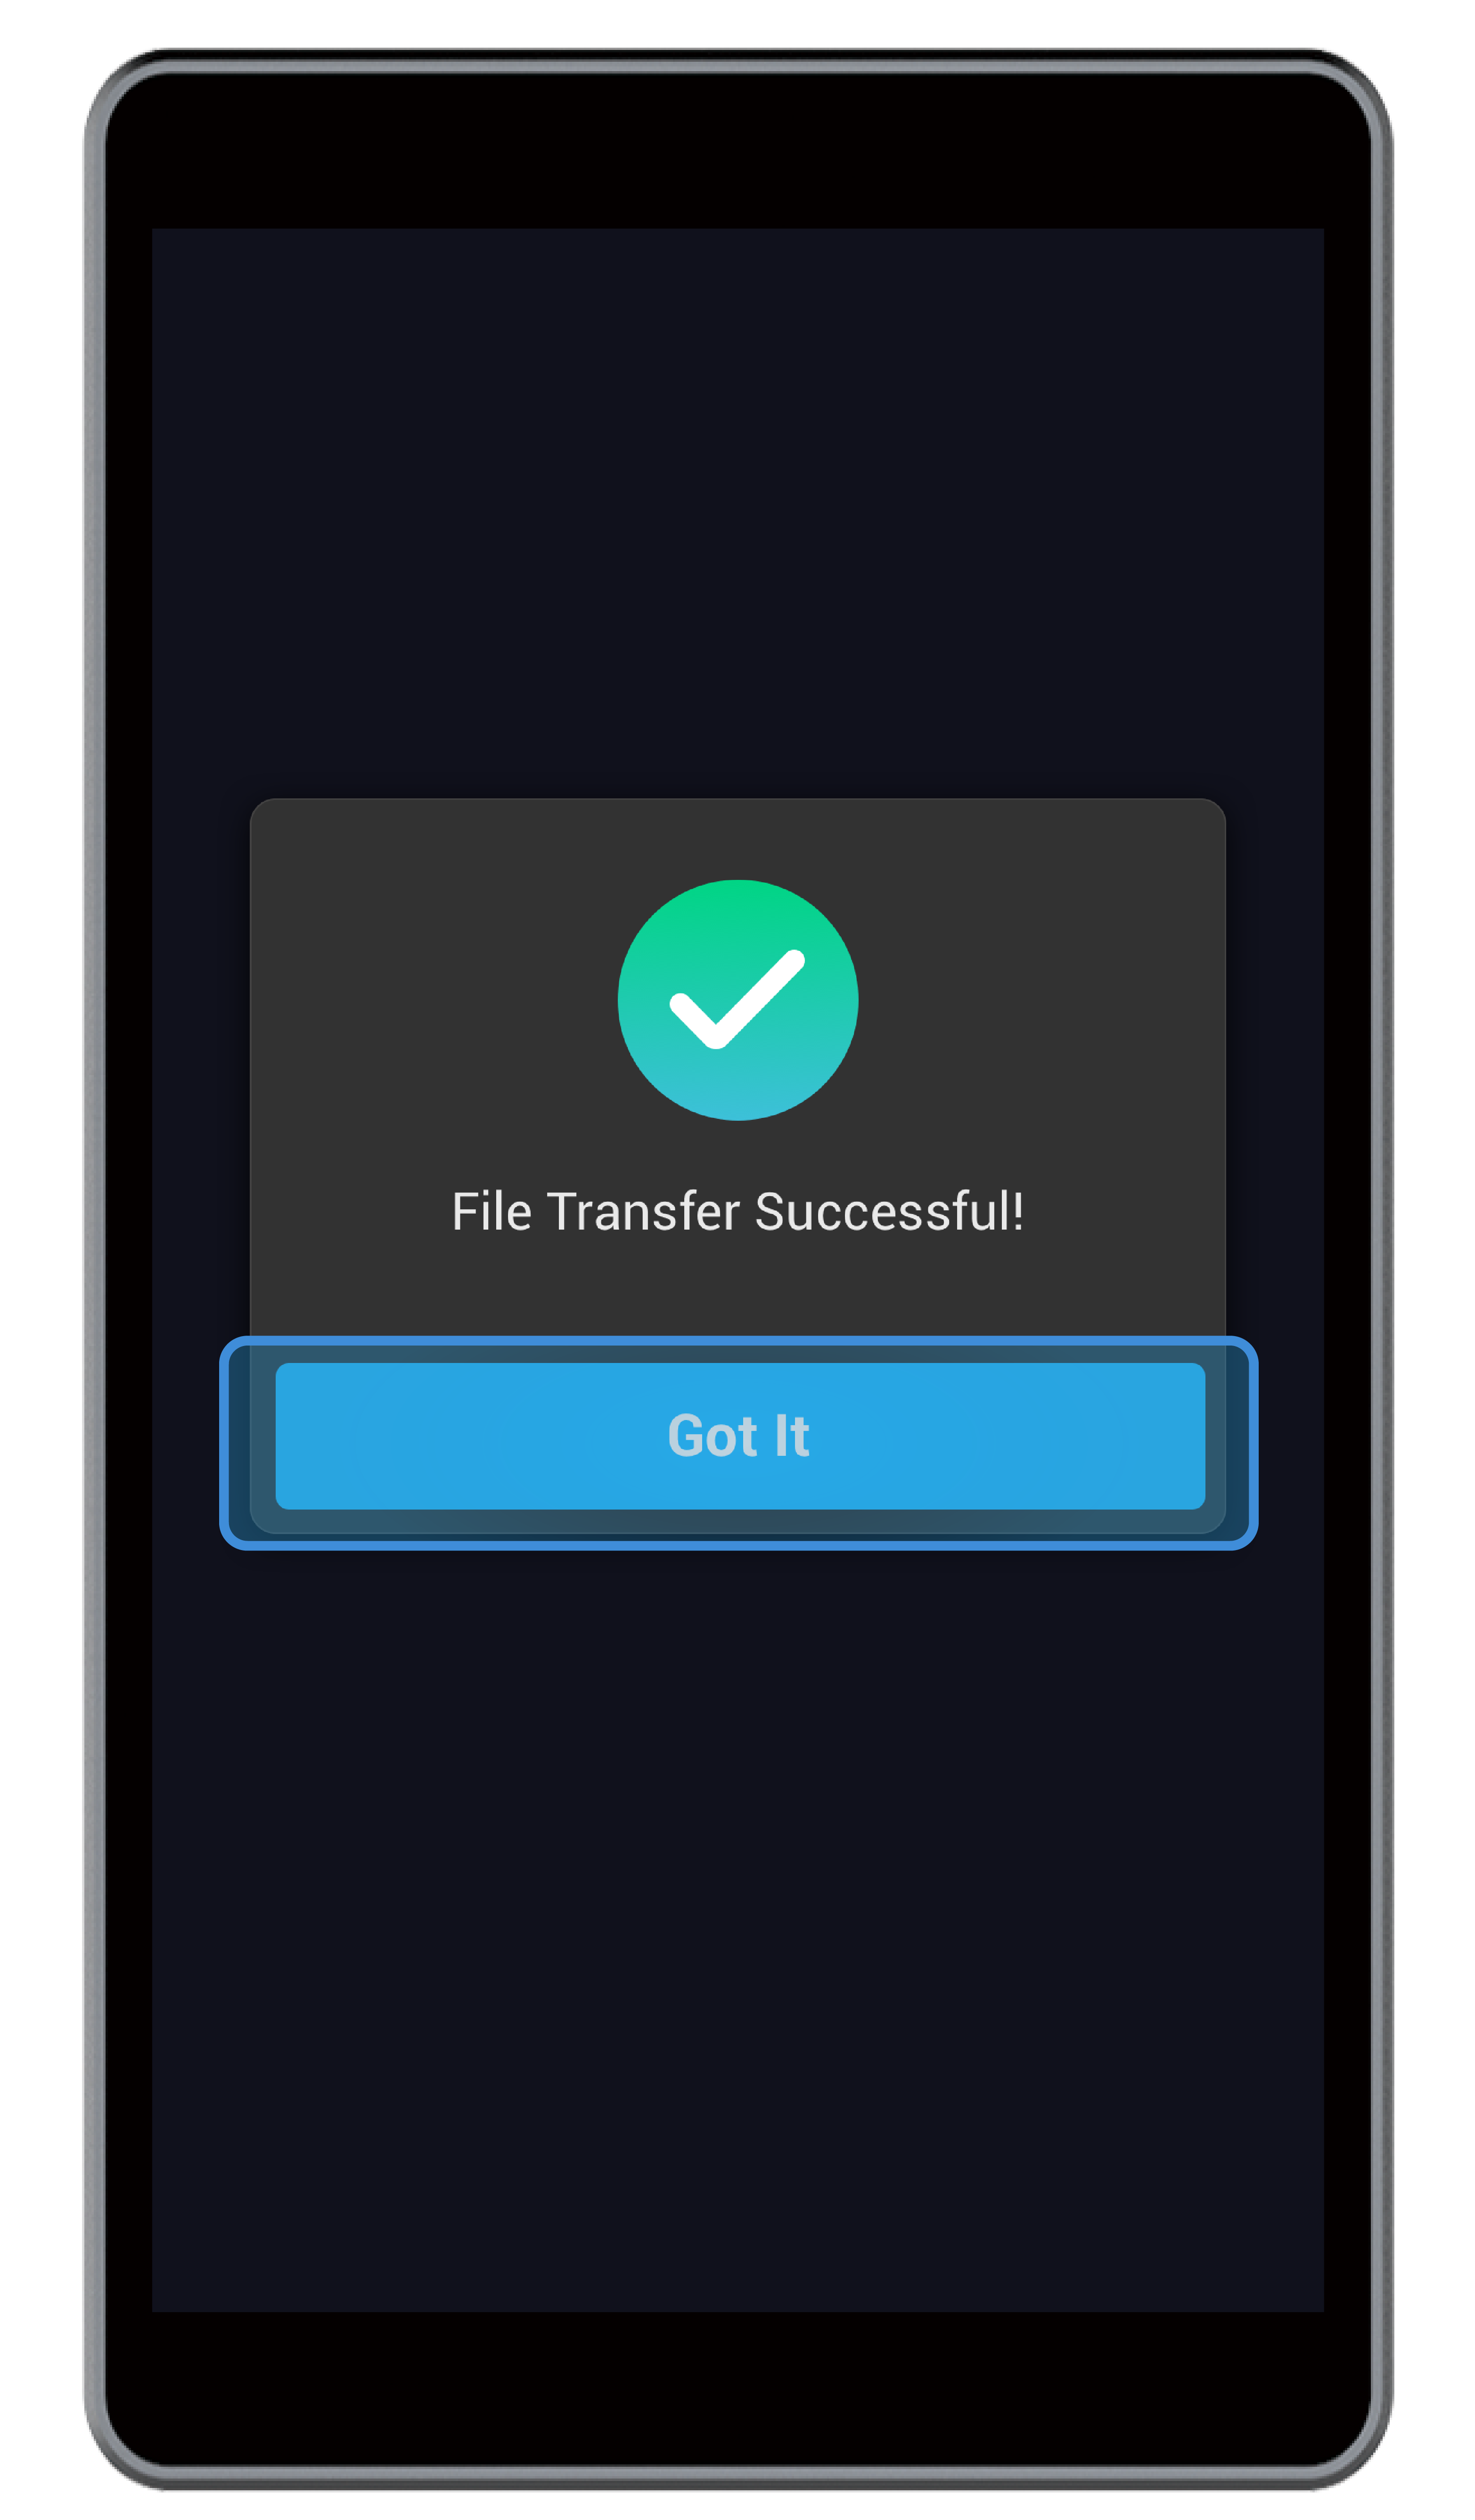
(4) On the Touchscreen, tap Got It to receive the G-code file.
(5) On the Touchscreen, find the G-code file by tapping Files > Local. Preview the file, check the printing settings, and tap Start to start printing.
![]() Should the first layer fail to stick to the Print Sheet, Stop printing and see 7.1 First Layer Does Not Stick. During printing, you can readjust settings by swiping left on the printing screen.
Should the first layer fail to stick to the Print Sheet, Stop printing and see 7.1 First Layer Does Not Stick. During printing, you can readjust settings by swiping left on the printing screen.
Start Printing on the Touchscreen via USB Flash Drive
(1) In the 3D Printing G-code Generator, click Export G-code to File (in .gcode format) and save it to the USB flash drive.
(2) Insert the USB flash drive into the Controller of the 3D printer.
(3) On the Touchscreen, find the G-code file by tapping Files > USB. Preview the file, check the printing settings, and tap Start to start printing.
![]() Should the first layer fail to stick to the Print Sheet, Stop printing and see 7.1 First Layer Does Not Stick. During printing, you can readjust settings by swiping left on the printing screen.
Should the first layer fail to stick to the Print Sheet, Stop printing and see 7.1 First Layer Does Not Stick. During printing, you can readjust settings by swiping left on the printing screen.
Start Printing on Luban via Workspace
(1) In the 3D Printing G-code Generator, load the generated G-code file to Workspace by clicking Load G-code to Workspace.
(2) In the Workspace, go to the Connection panel. Click Wi-Fi > Refresh ![]() > Select your 3D printer in the drop-down list > Connect Luban to your 3D printer.
> Select your 3D printer in the drop-down list > Connect Luban to your 3D printer.
(3) After connection, click the Run ![]() button in Workspace to start printing.
button in Workspace to start printing.
![]() Should Wi-Fi be disconnected during printing, the Touchscreen will prompt you to keep or stop printing. To keep printing, ignore the prompt; to stop printing, tap Confirm.
Should Wi-Fi be disconnected during printing, the Touchscreen will prompt you to keep or stop printing. To keep printing, ignore the prompt; to stop printing, tap Confirm.
Start Printing on Luban via USB Cable
(1) In the 3D Printing G-code Generator, load the generated G-code file to Workspace by clicking Load G-code to Workspace.
(2) Insert one end of the USB cable into the computer, and the other end into the Controller of the 3D printer.
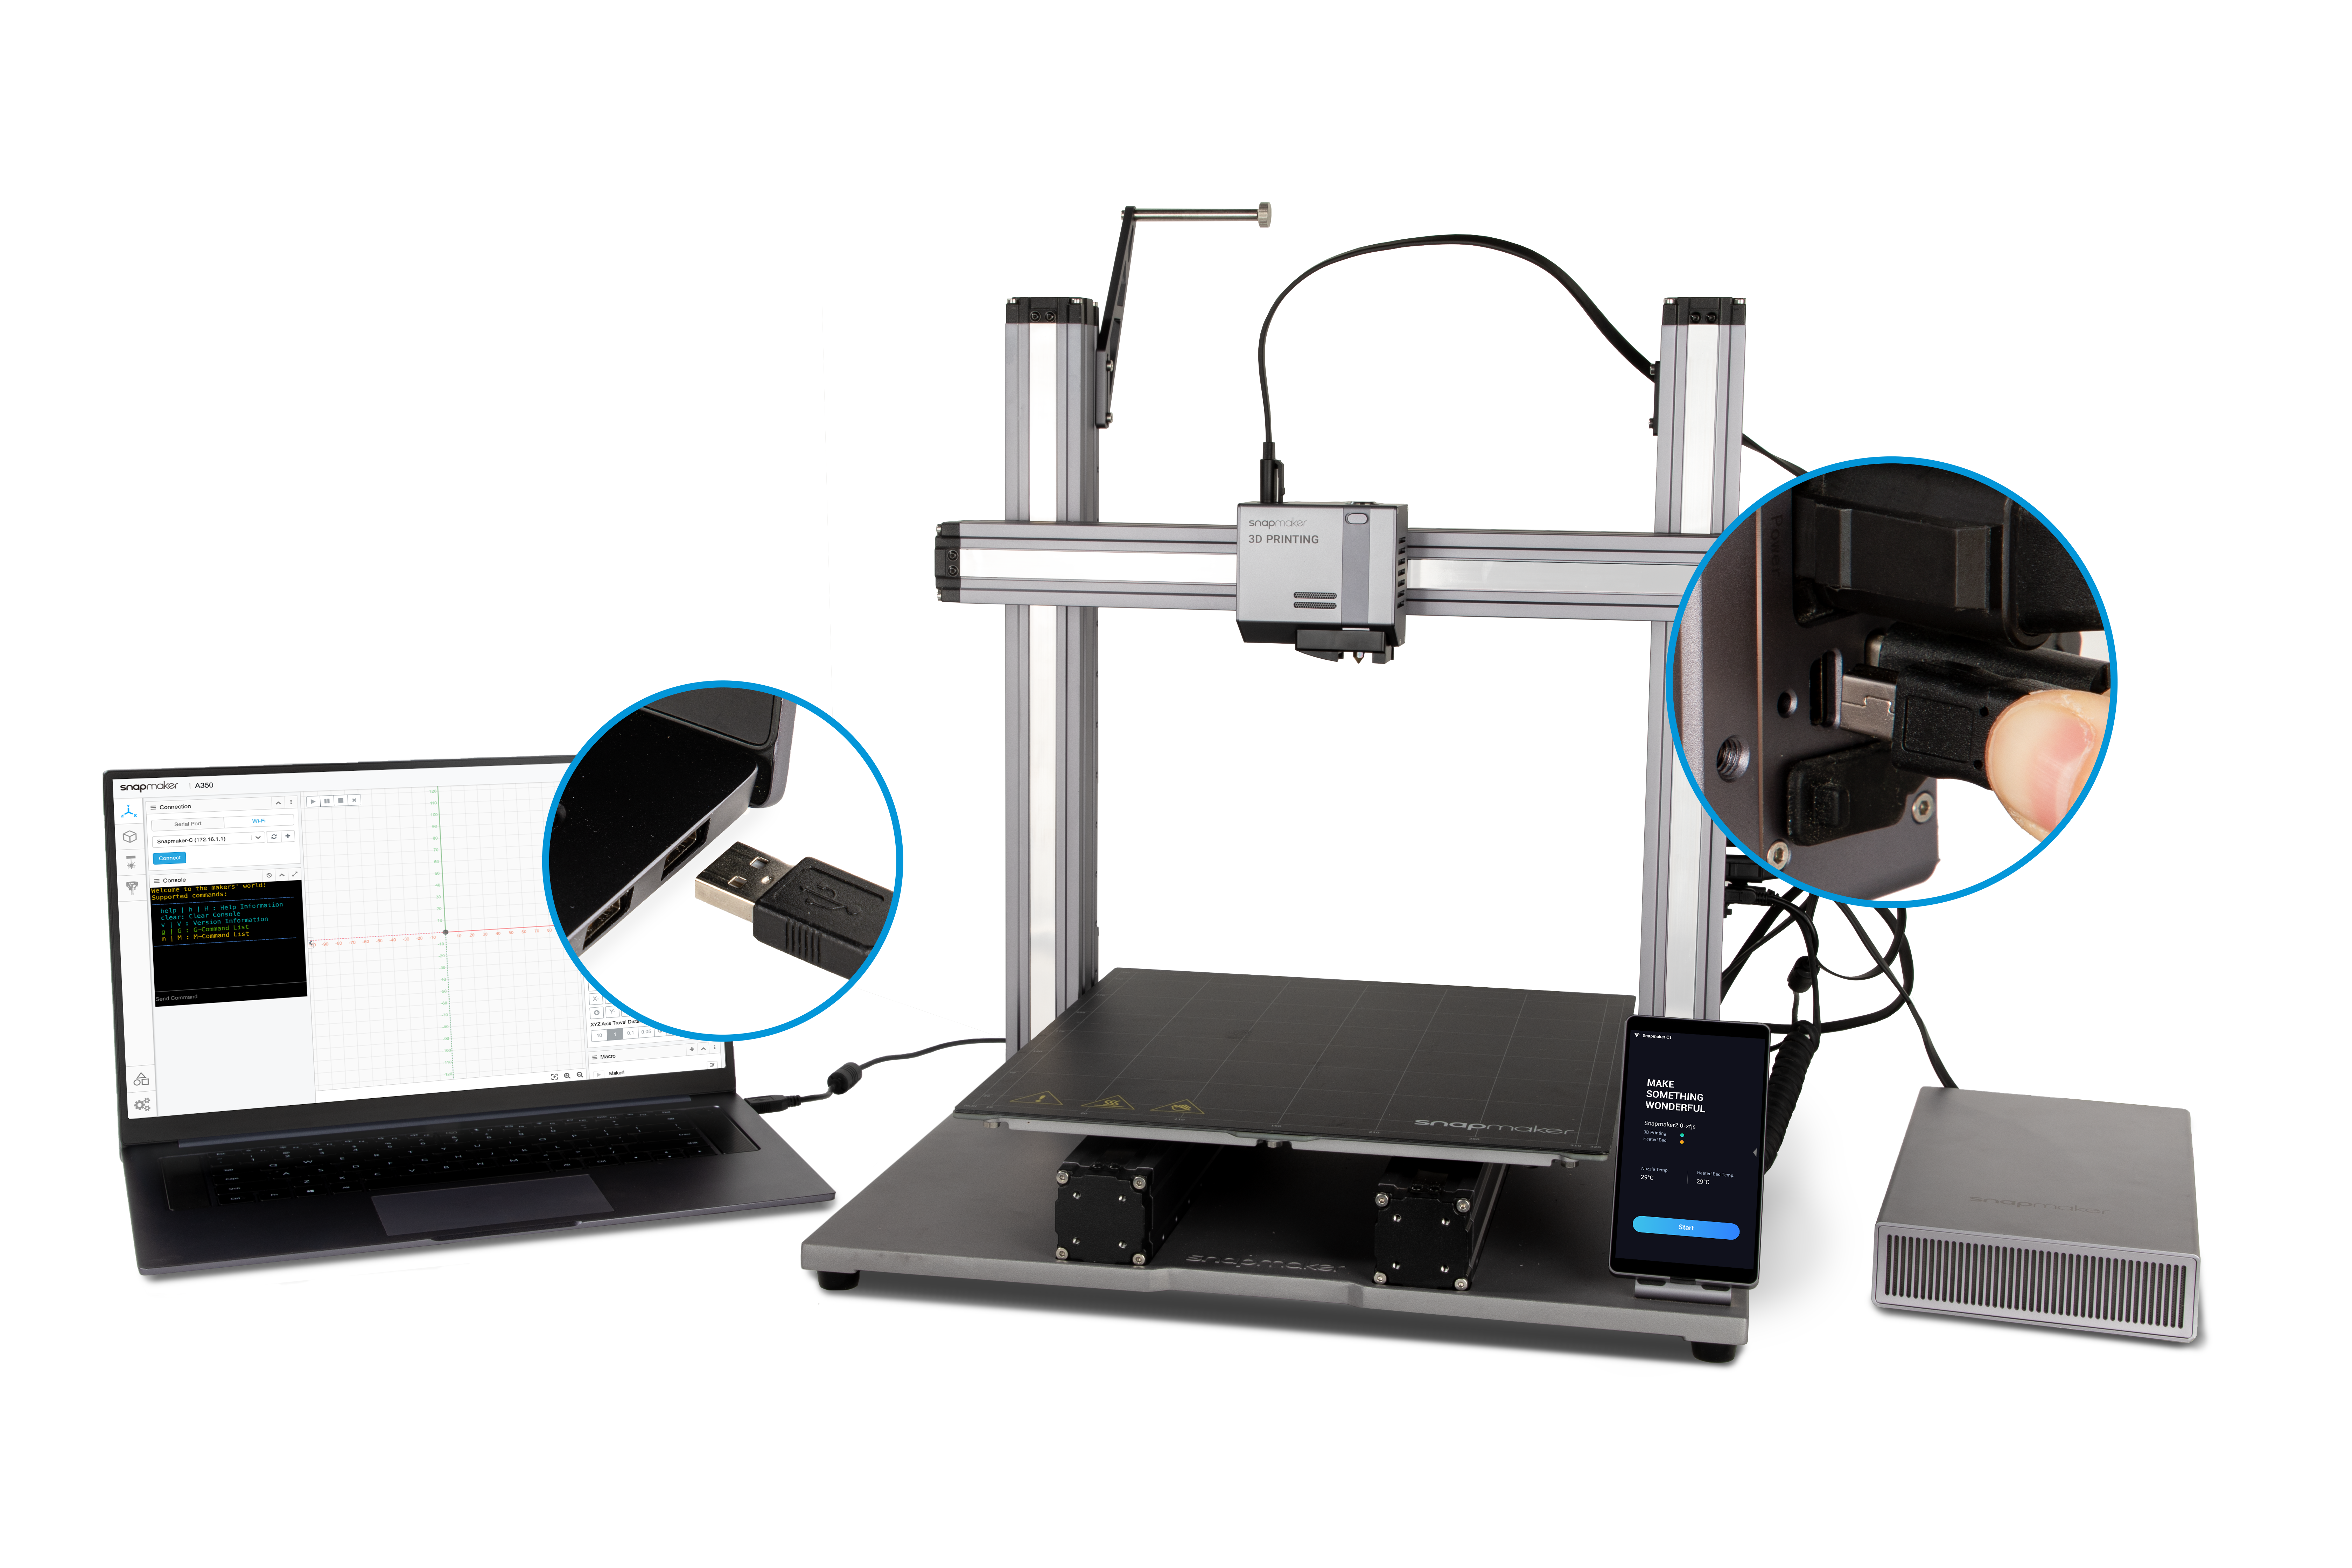
(3) On Luban, click Workspace. In the Connection panel, click Serial Port > Refresh ![]() > Select the port of your 3D printer in the drop-down list > Connect Luban to your 3D printer.
> Select the port of your 3D printer in the drop-down list > Connect Luban to your 3D printer.
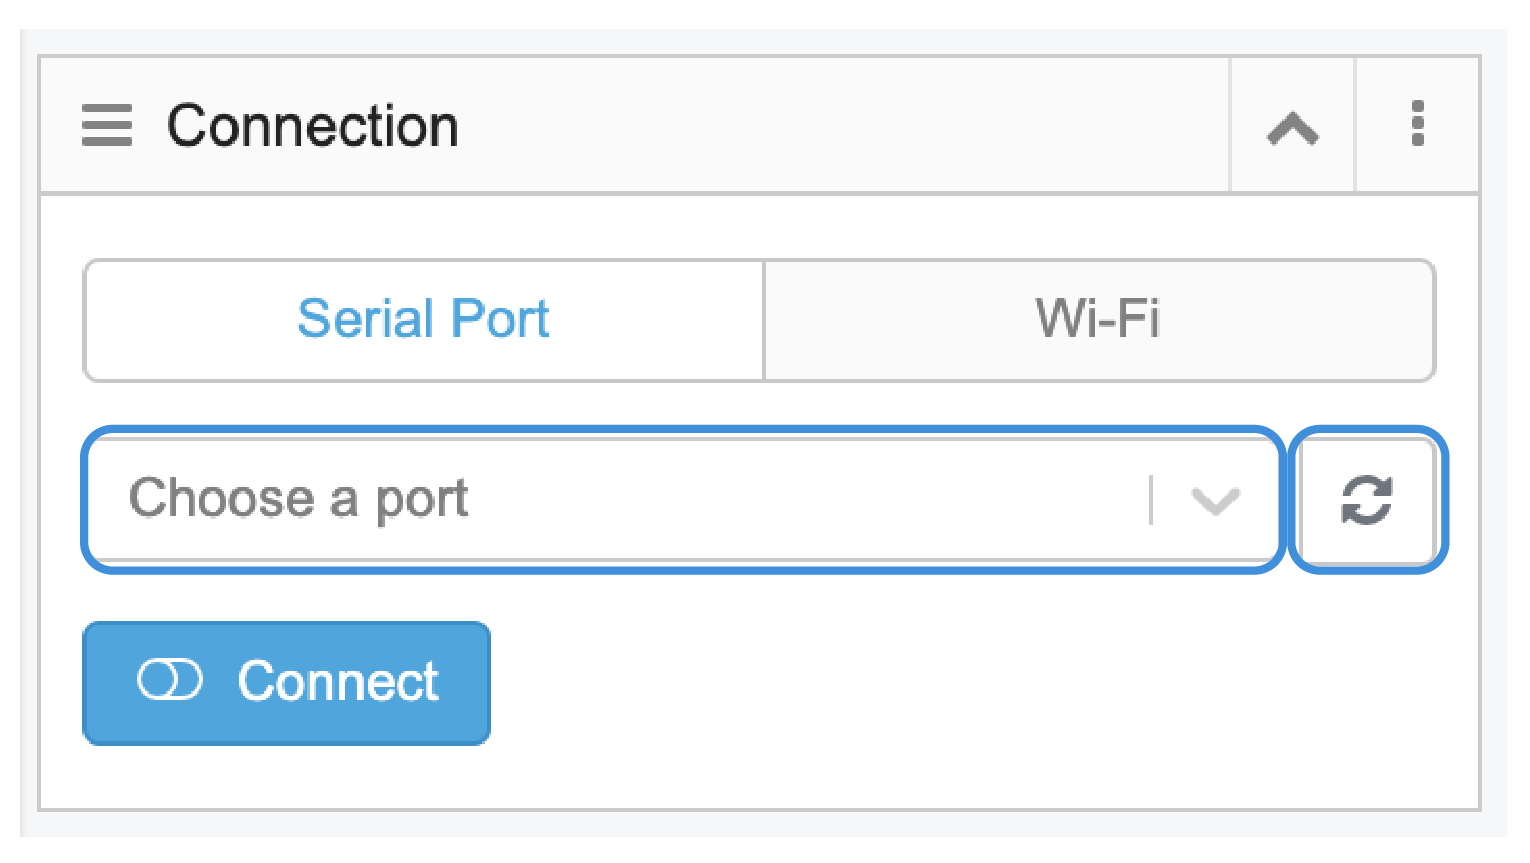
![]() If you can’t find the port, unplug the USB cable and try again. For initial use, you need to download and install the driver.
If you can’t find the port, unplug the USB cable and try again. For initial use, you need to download and install the driver.
(4) After connection, Luban will prompt you to select your machine model and toolhead. Select and click Choose to save the settings.
(5) Now you can start printing by clicking the Run ![]() button .
button .
![]() Keep the cable connected until the printing job completes; otherwise, the printing job will be stopped.
Keep the cable connected until the printing job completes; otherwise, the printing job will be stopped.
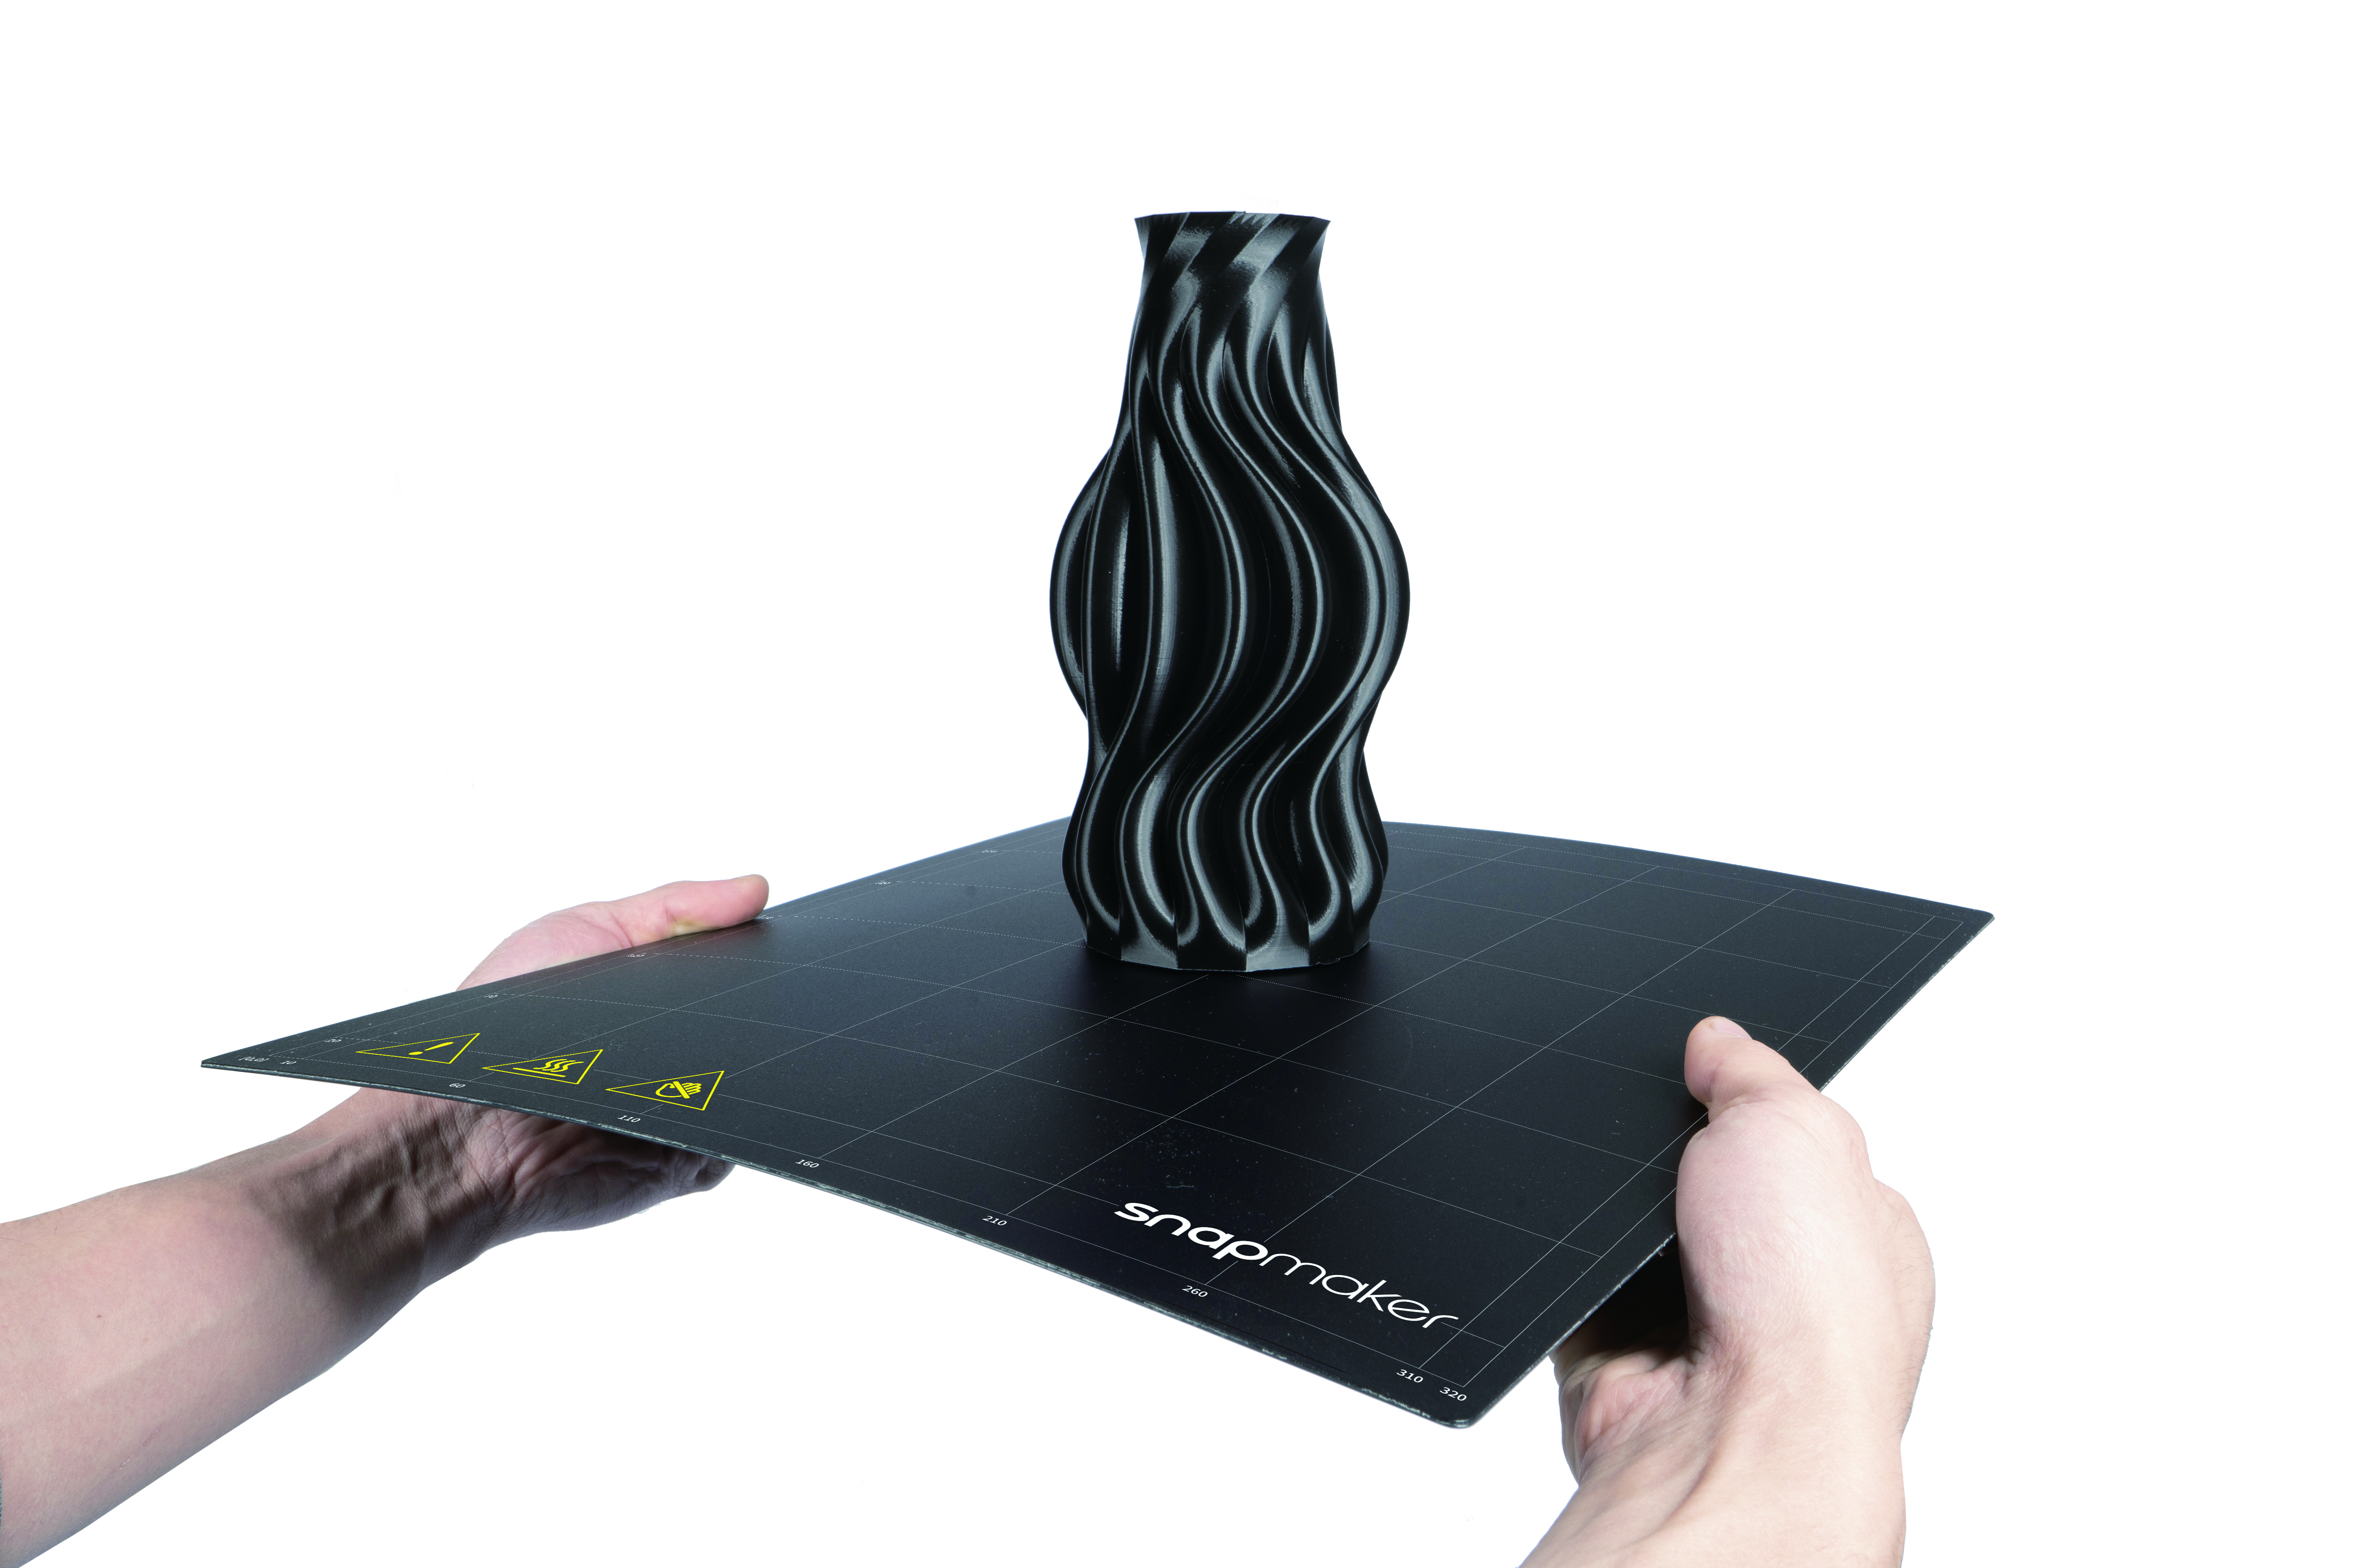
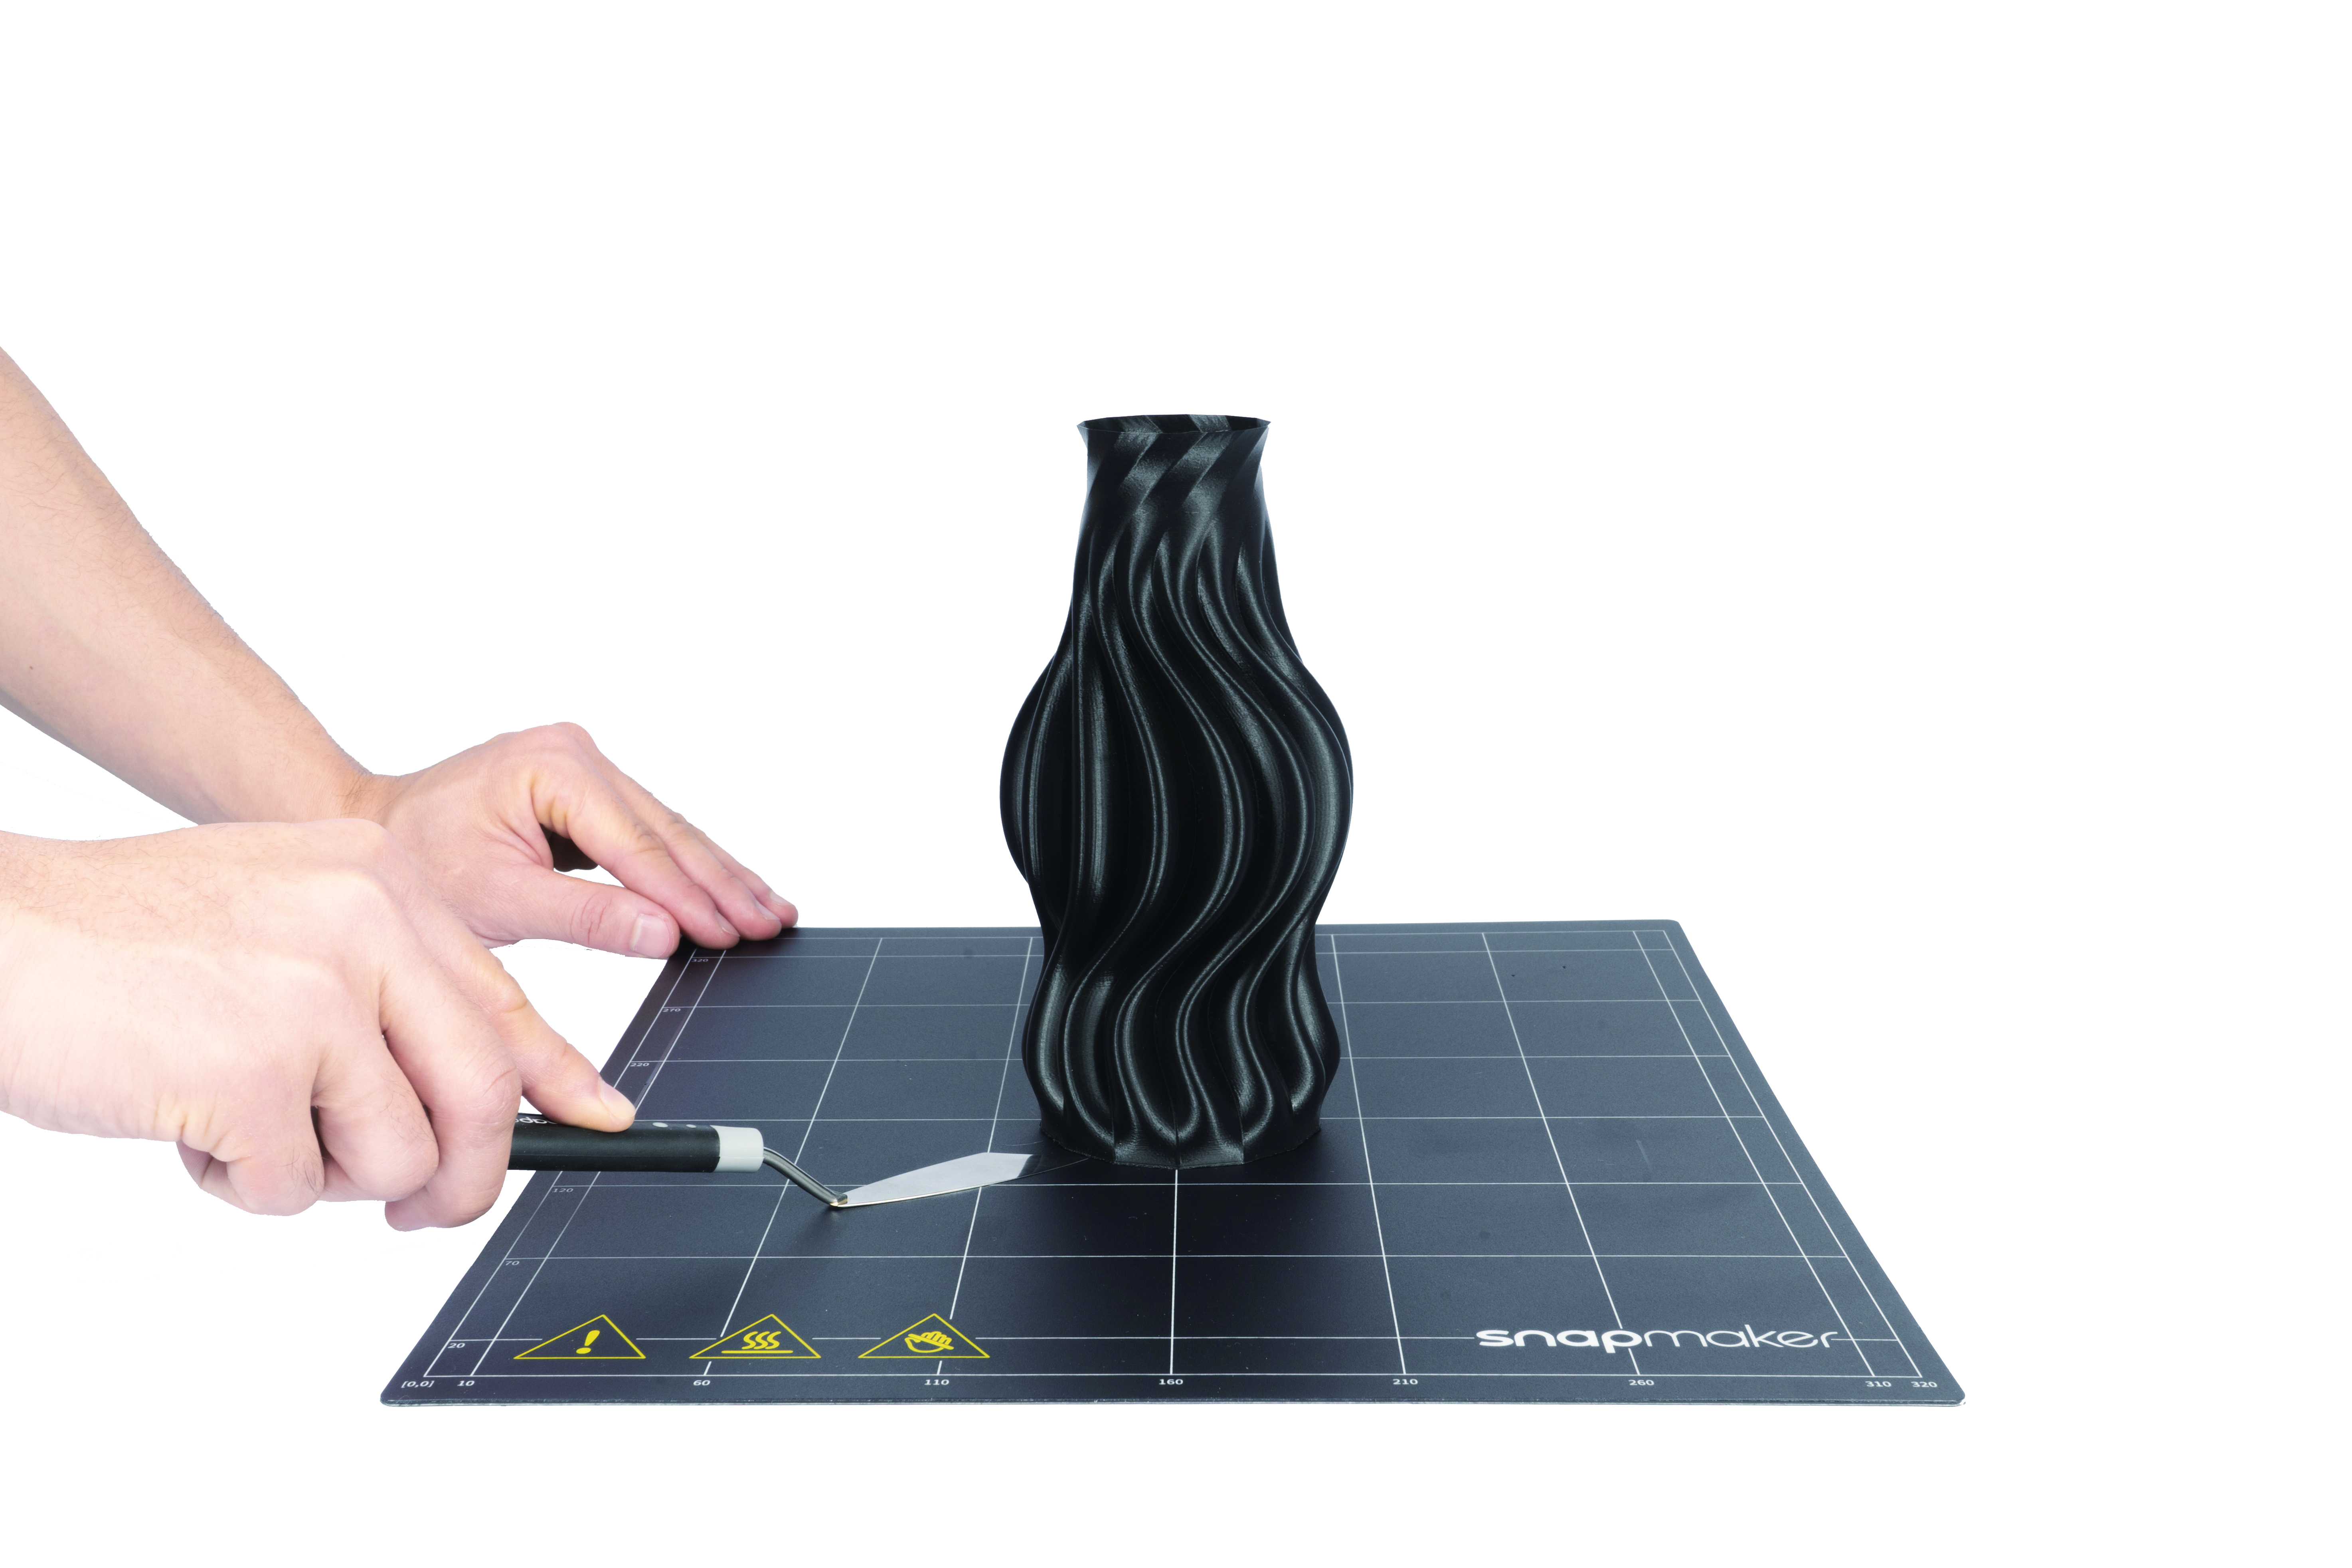
4.6 Remove Prints
Bend the Print Sheet
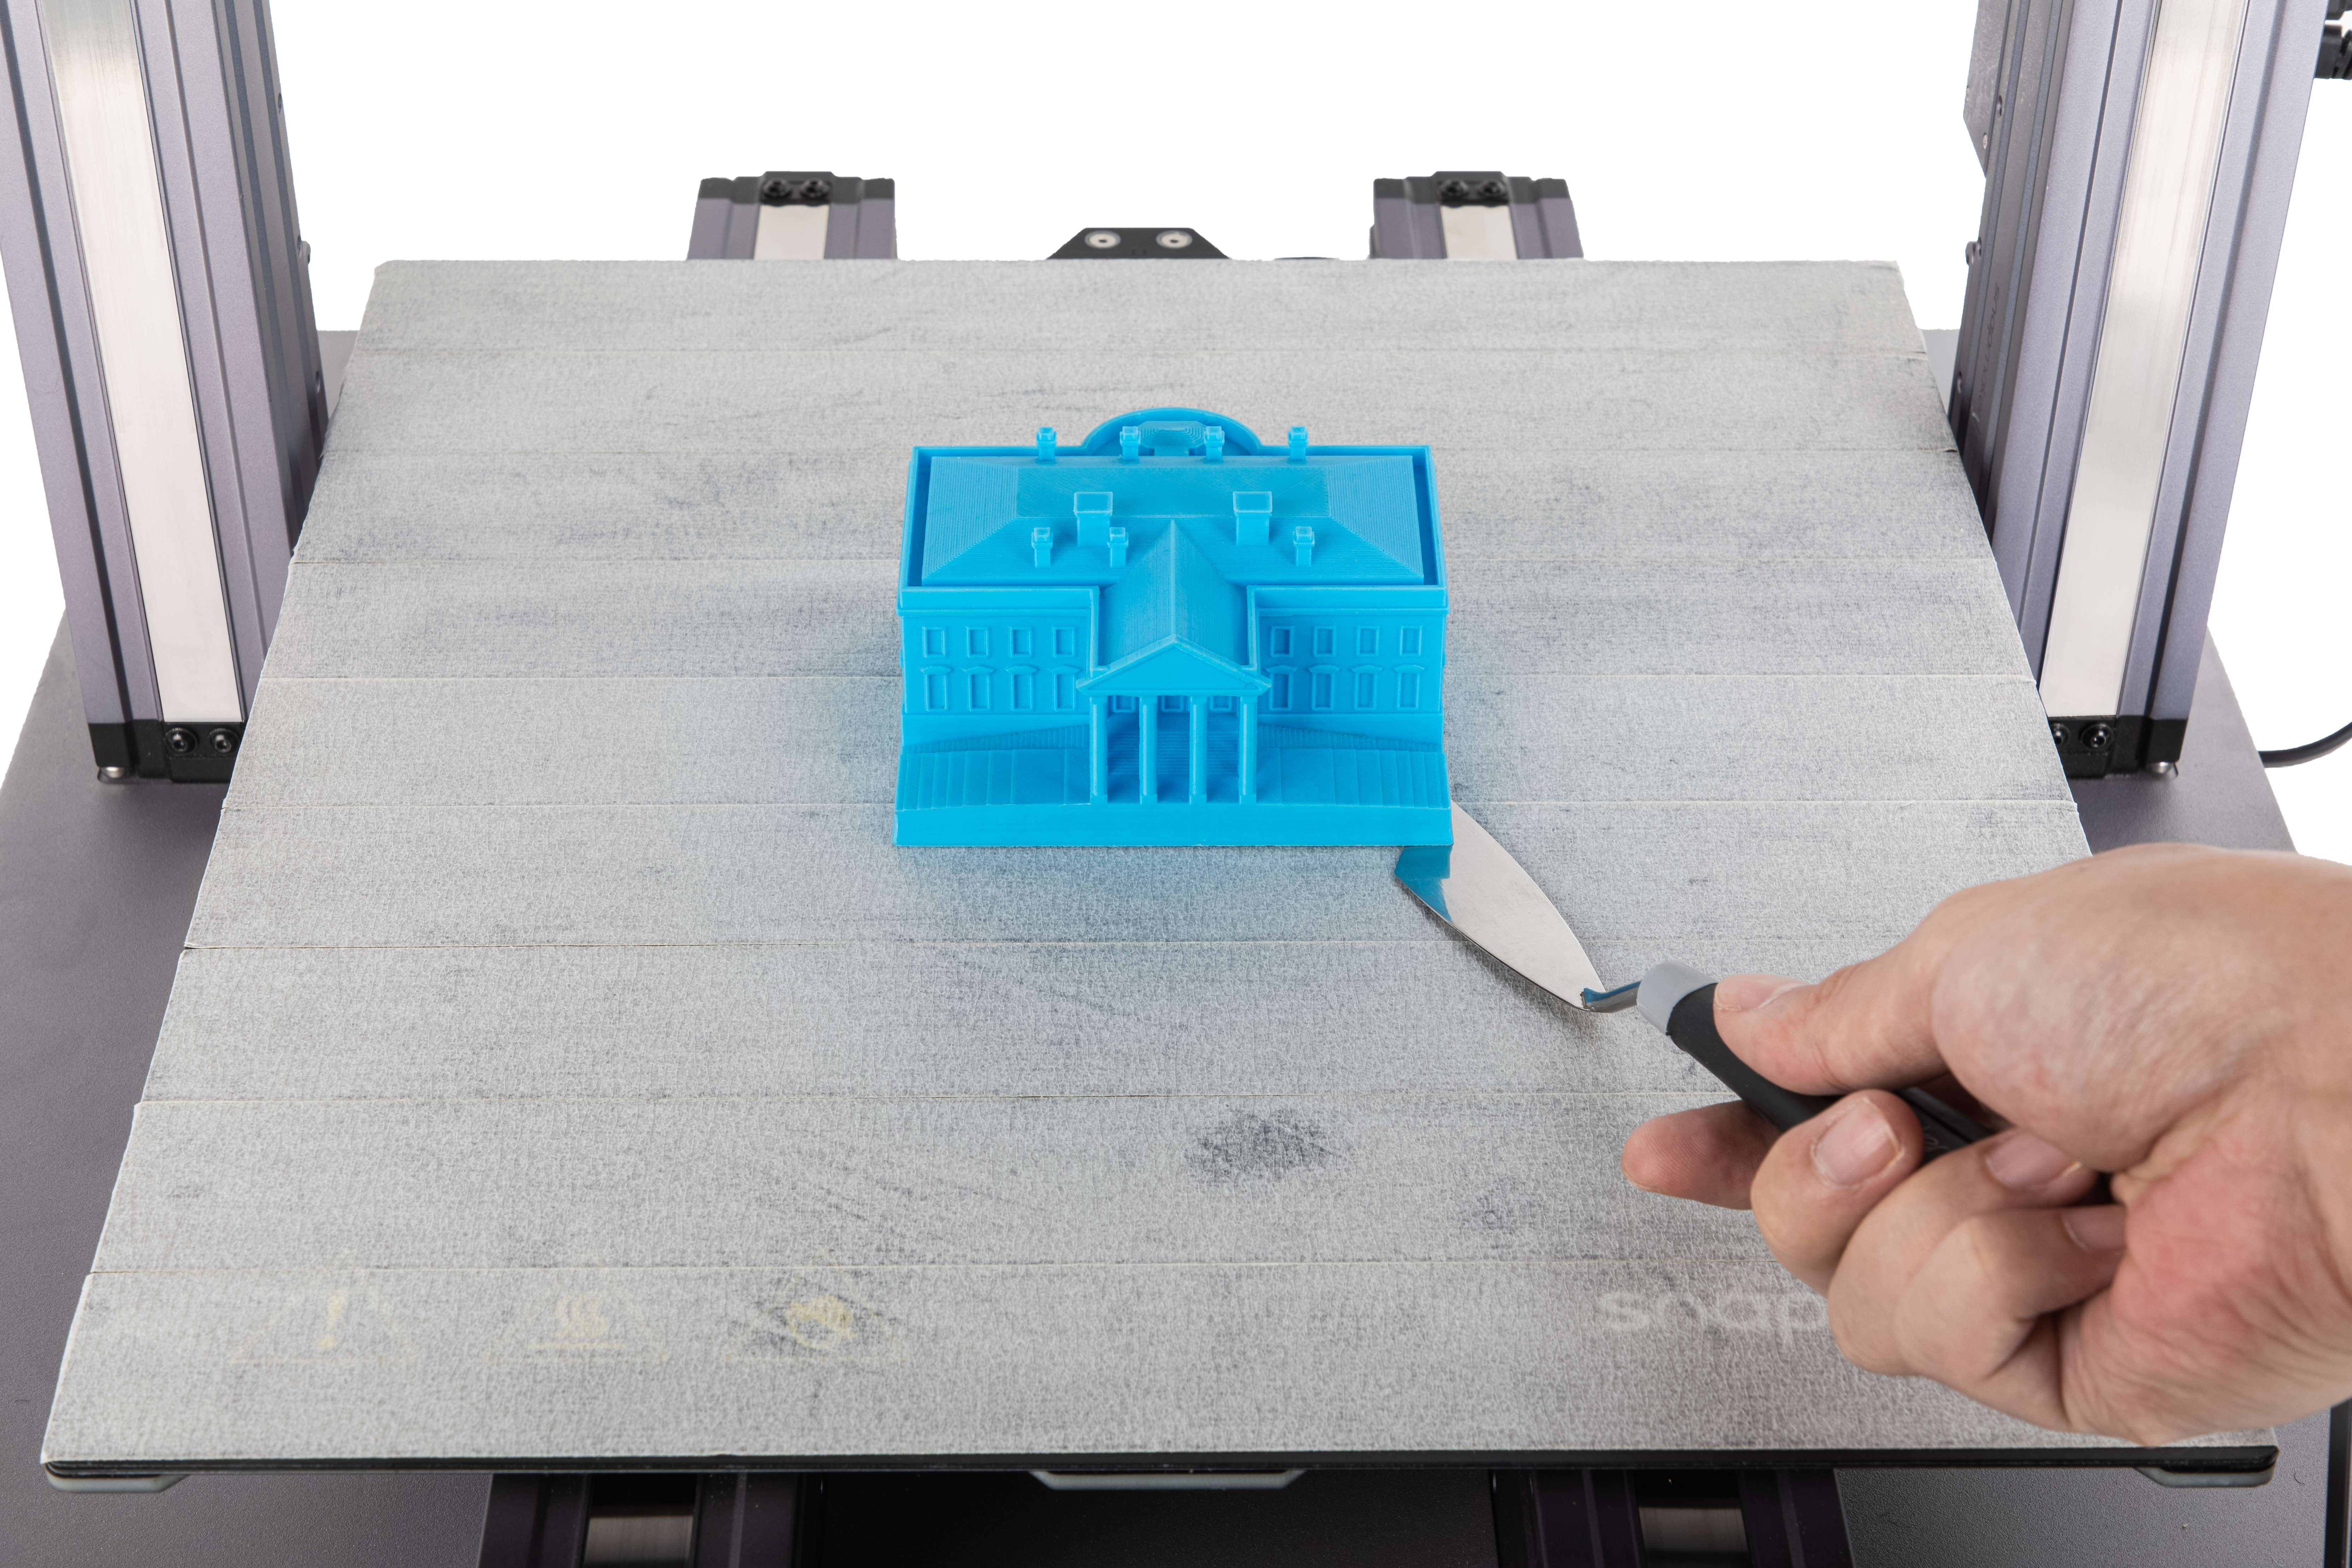
(1) Wait several minutes until the nozzle and Heated Bed cool down to the ambient temperature as indicated by the Touchscreen. Remove the Print Sheet from the Heated Bed, and slightly bend the Print Sheet to detach the print edge from the Print Sheet.
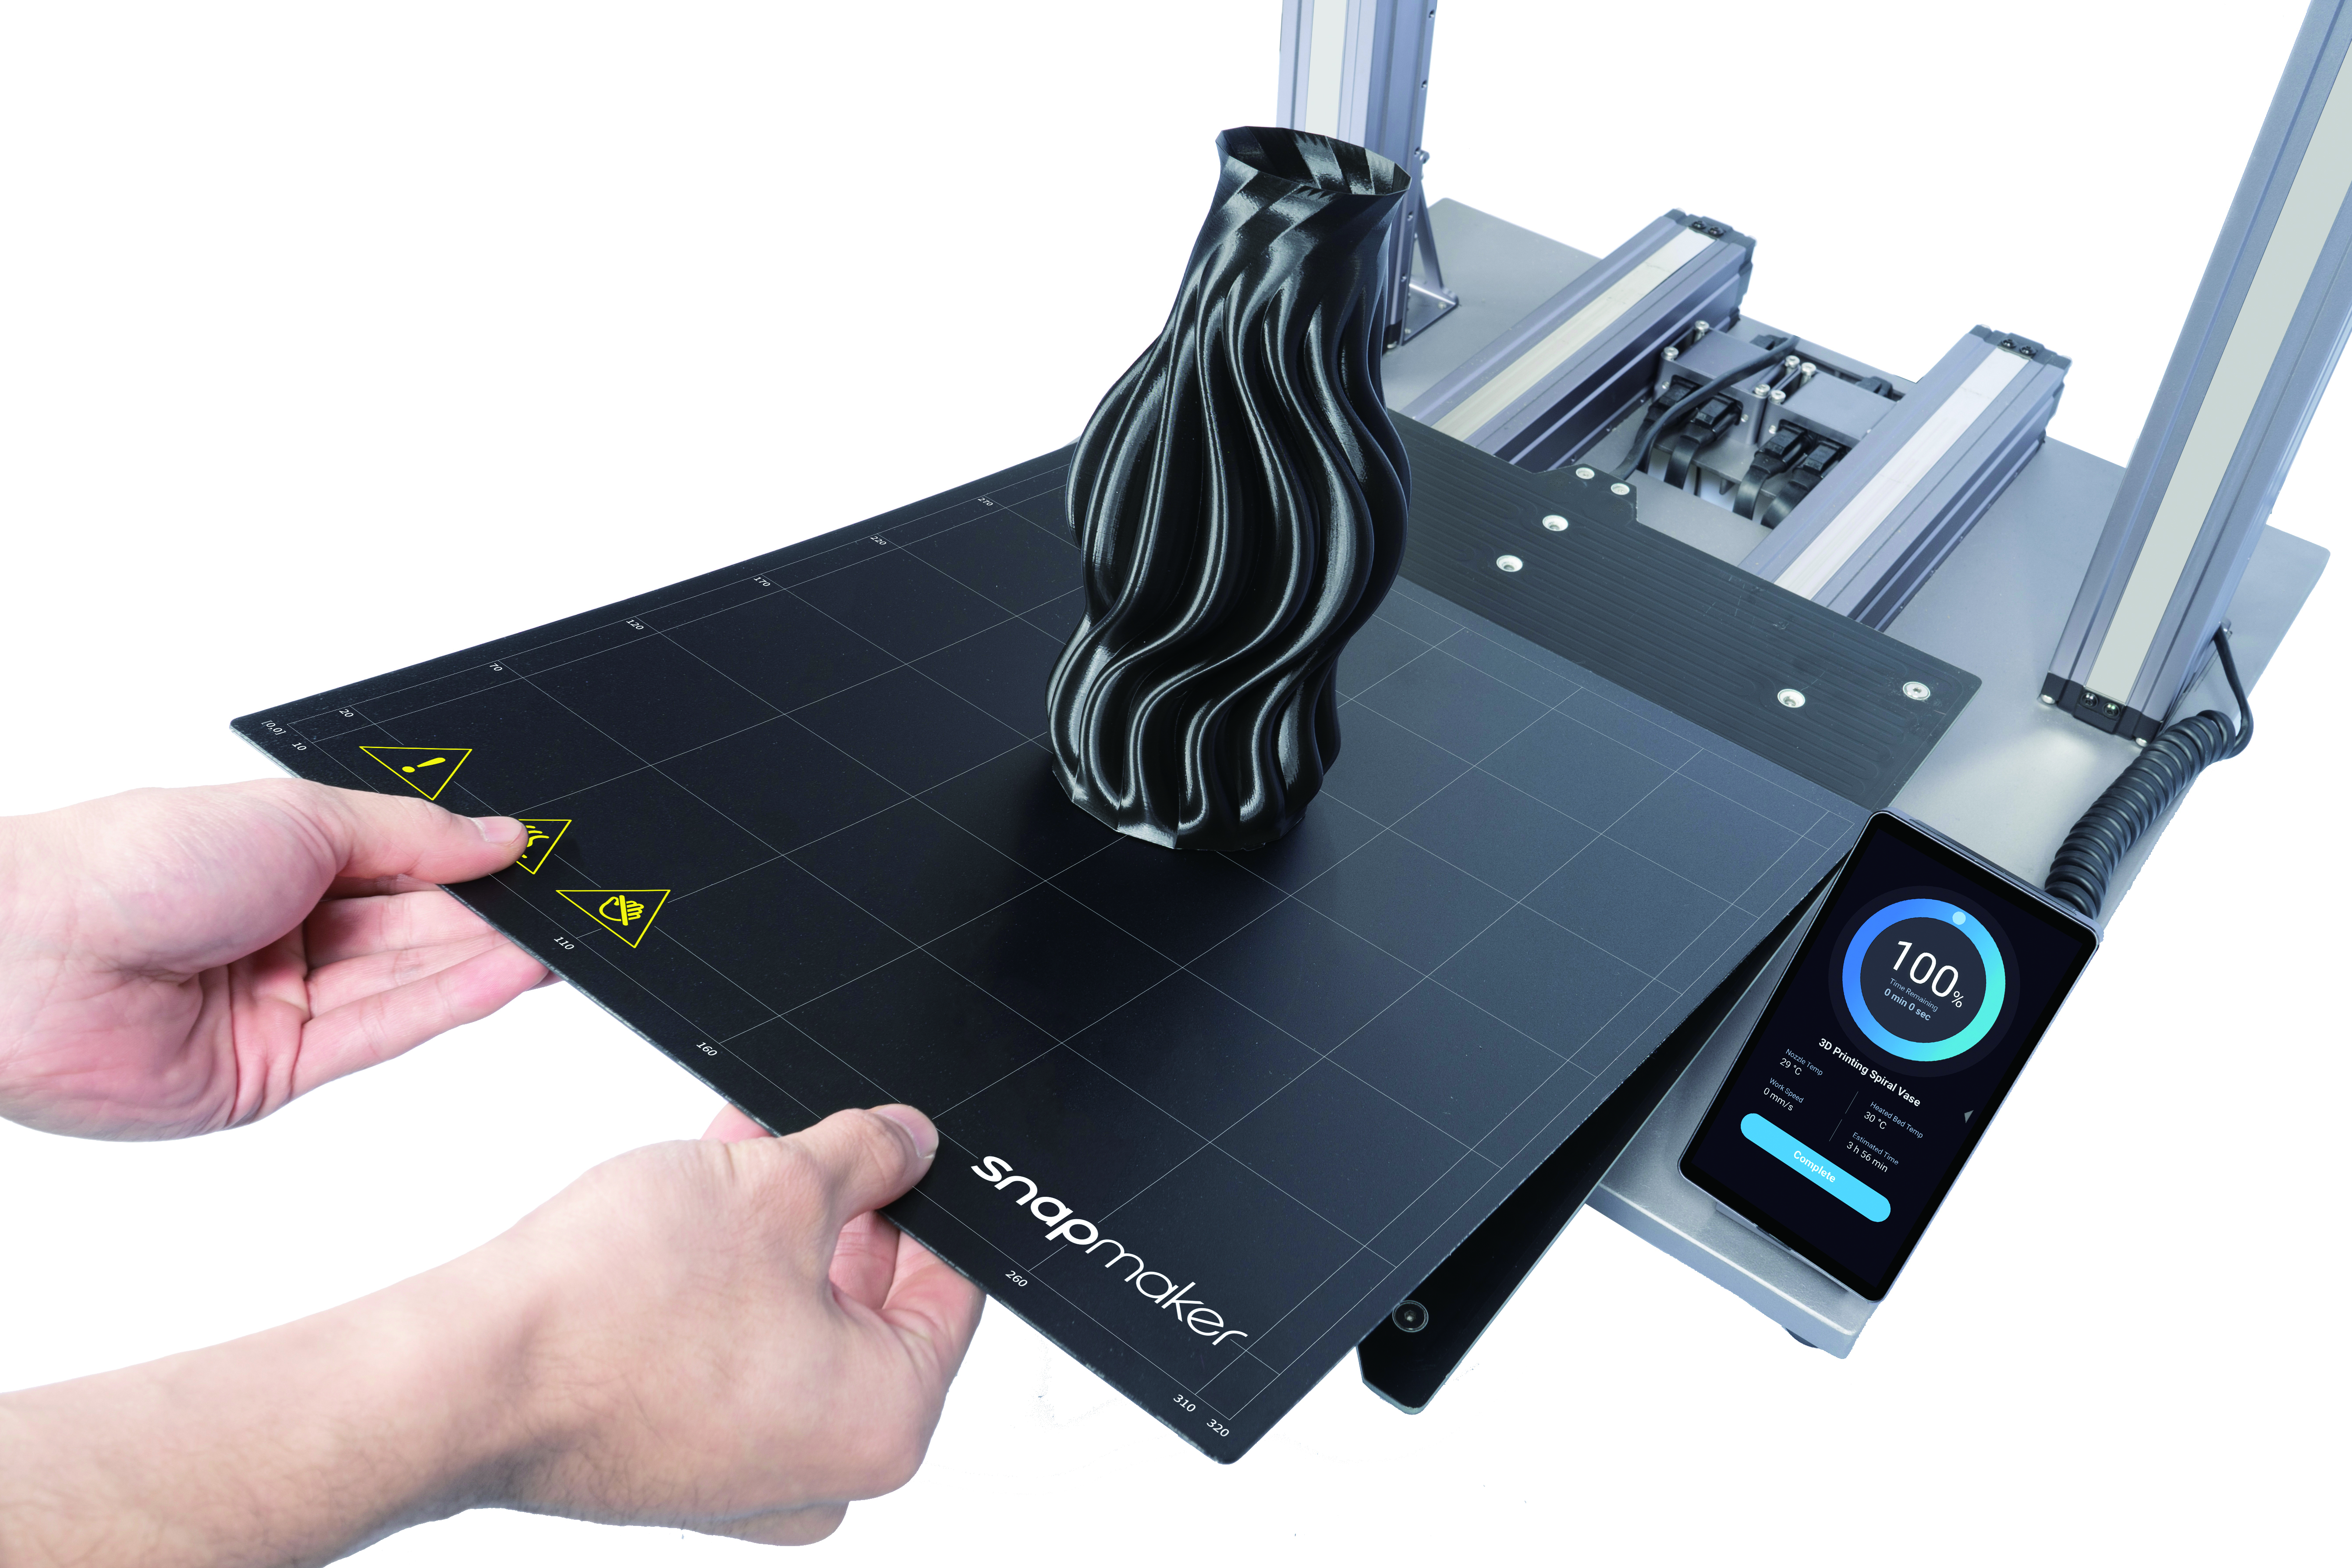
![]() Do not overbend the Print Sheet; otherwise, it may compromise the first layer adhesion.
Do not overbend the Print Sheet; otherwise, it may compromise the first layer adhesion.
(2) Place the Print Sheet on a stable and flat workbench. Gently scrape the print using its sharp edge.
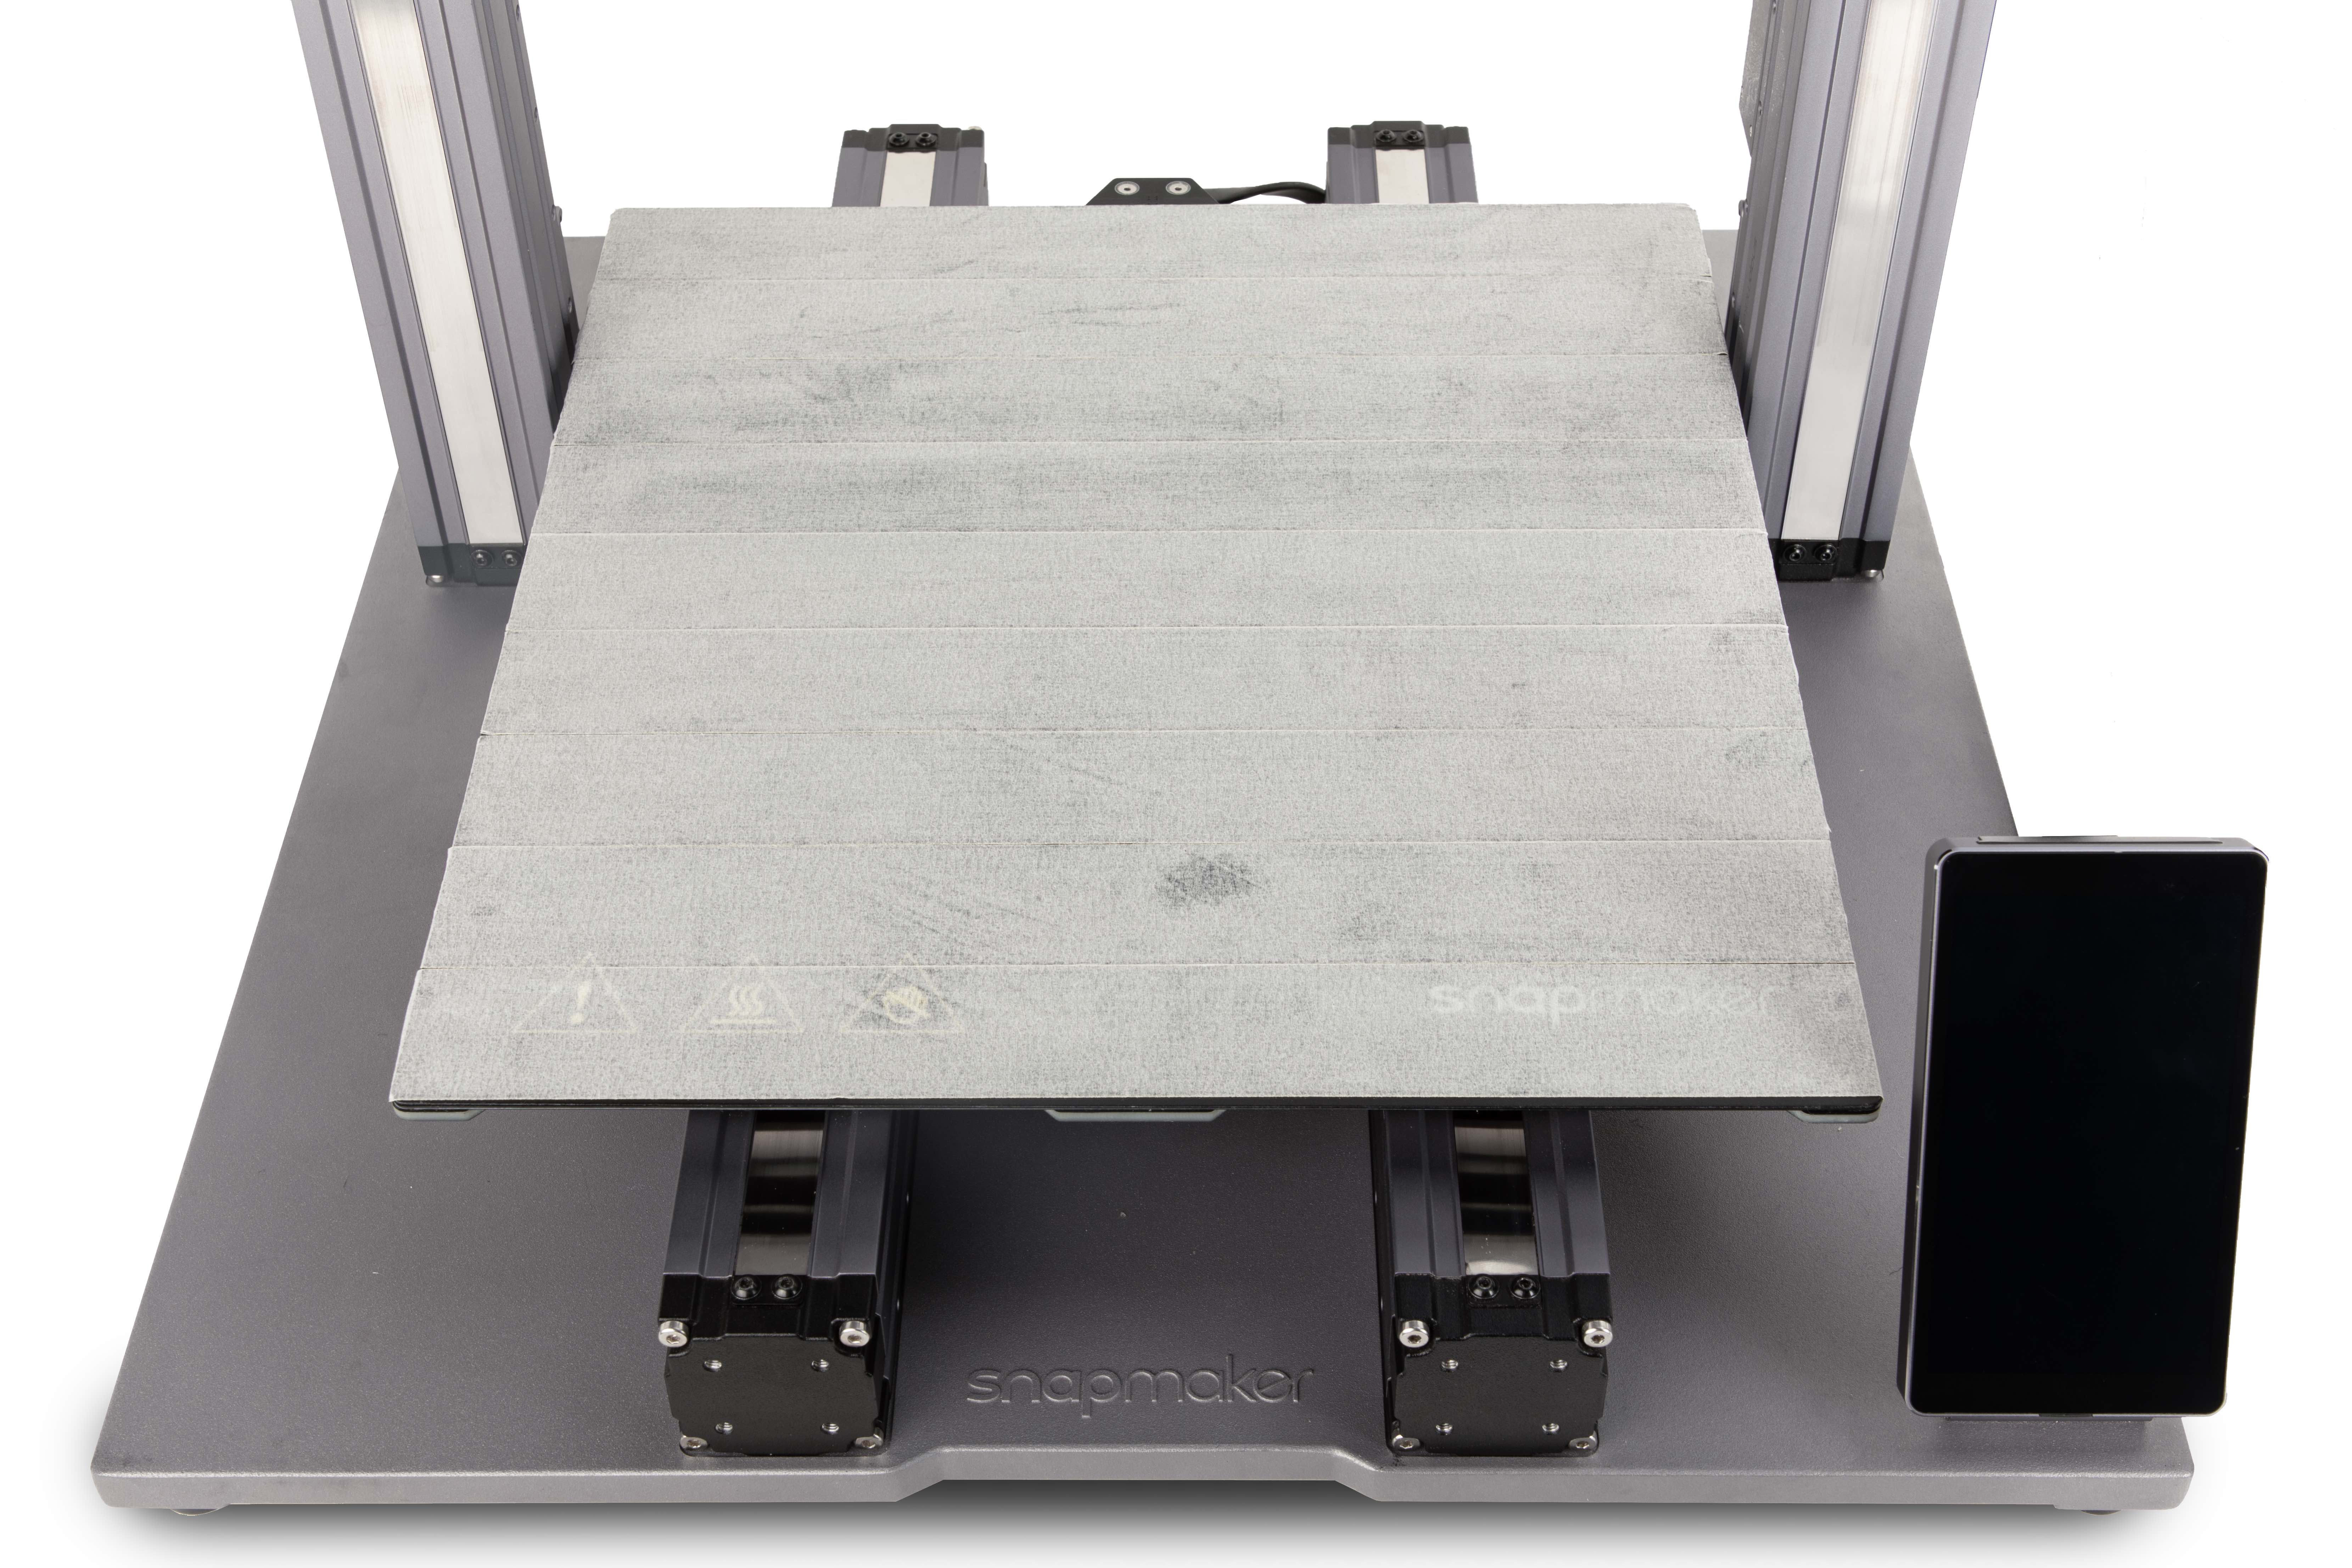
Tape the Print Sheet
To remove the print with ease, you can tape the Print Sheet before printing.
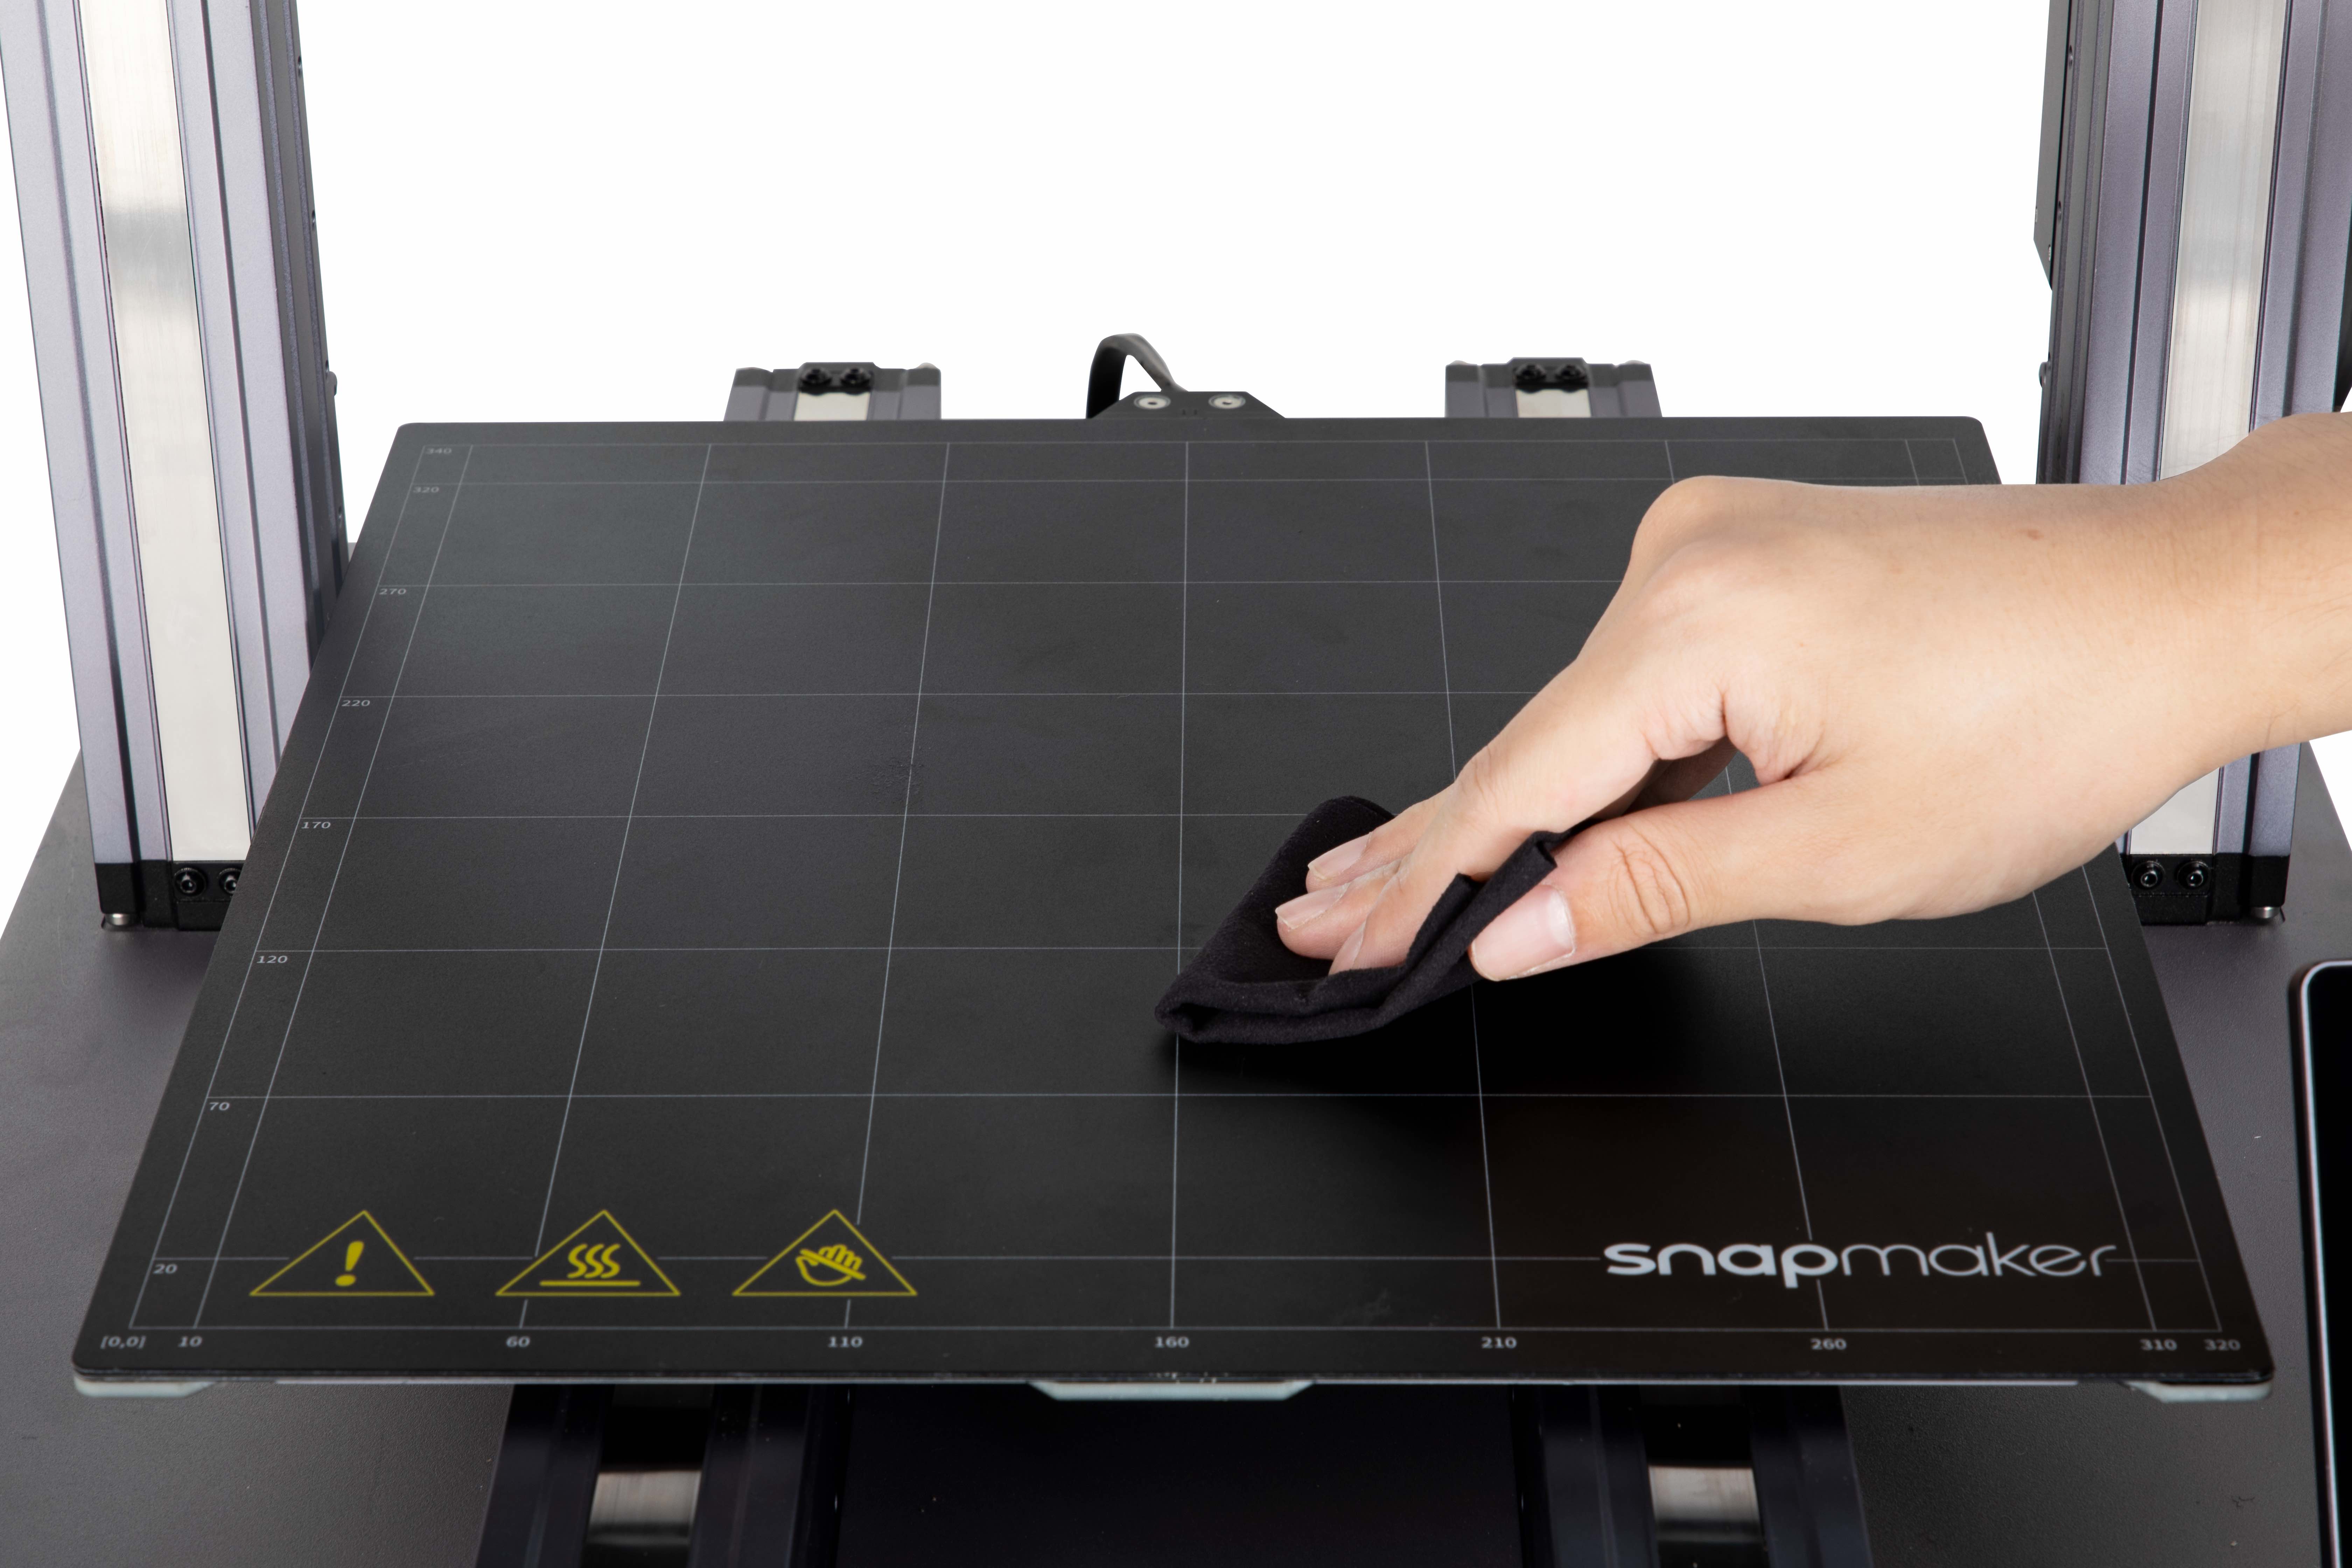
(1) Clean the Print Sheet surface with alcohol.
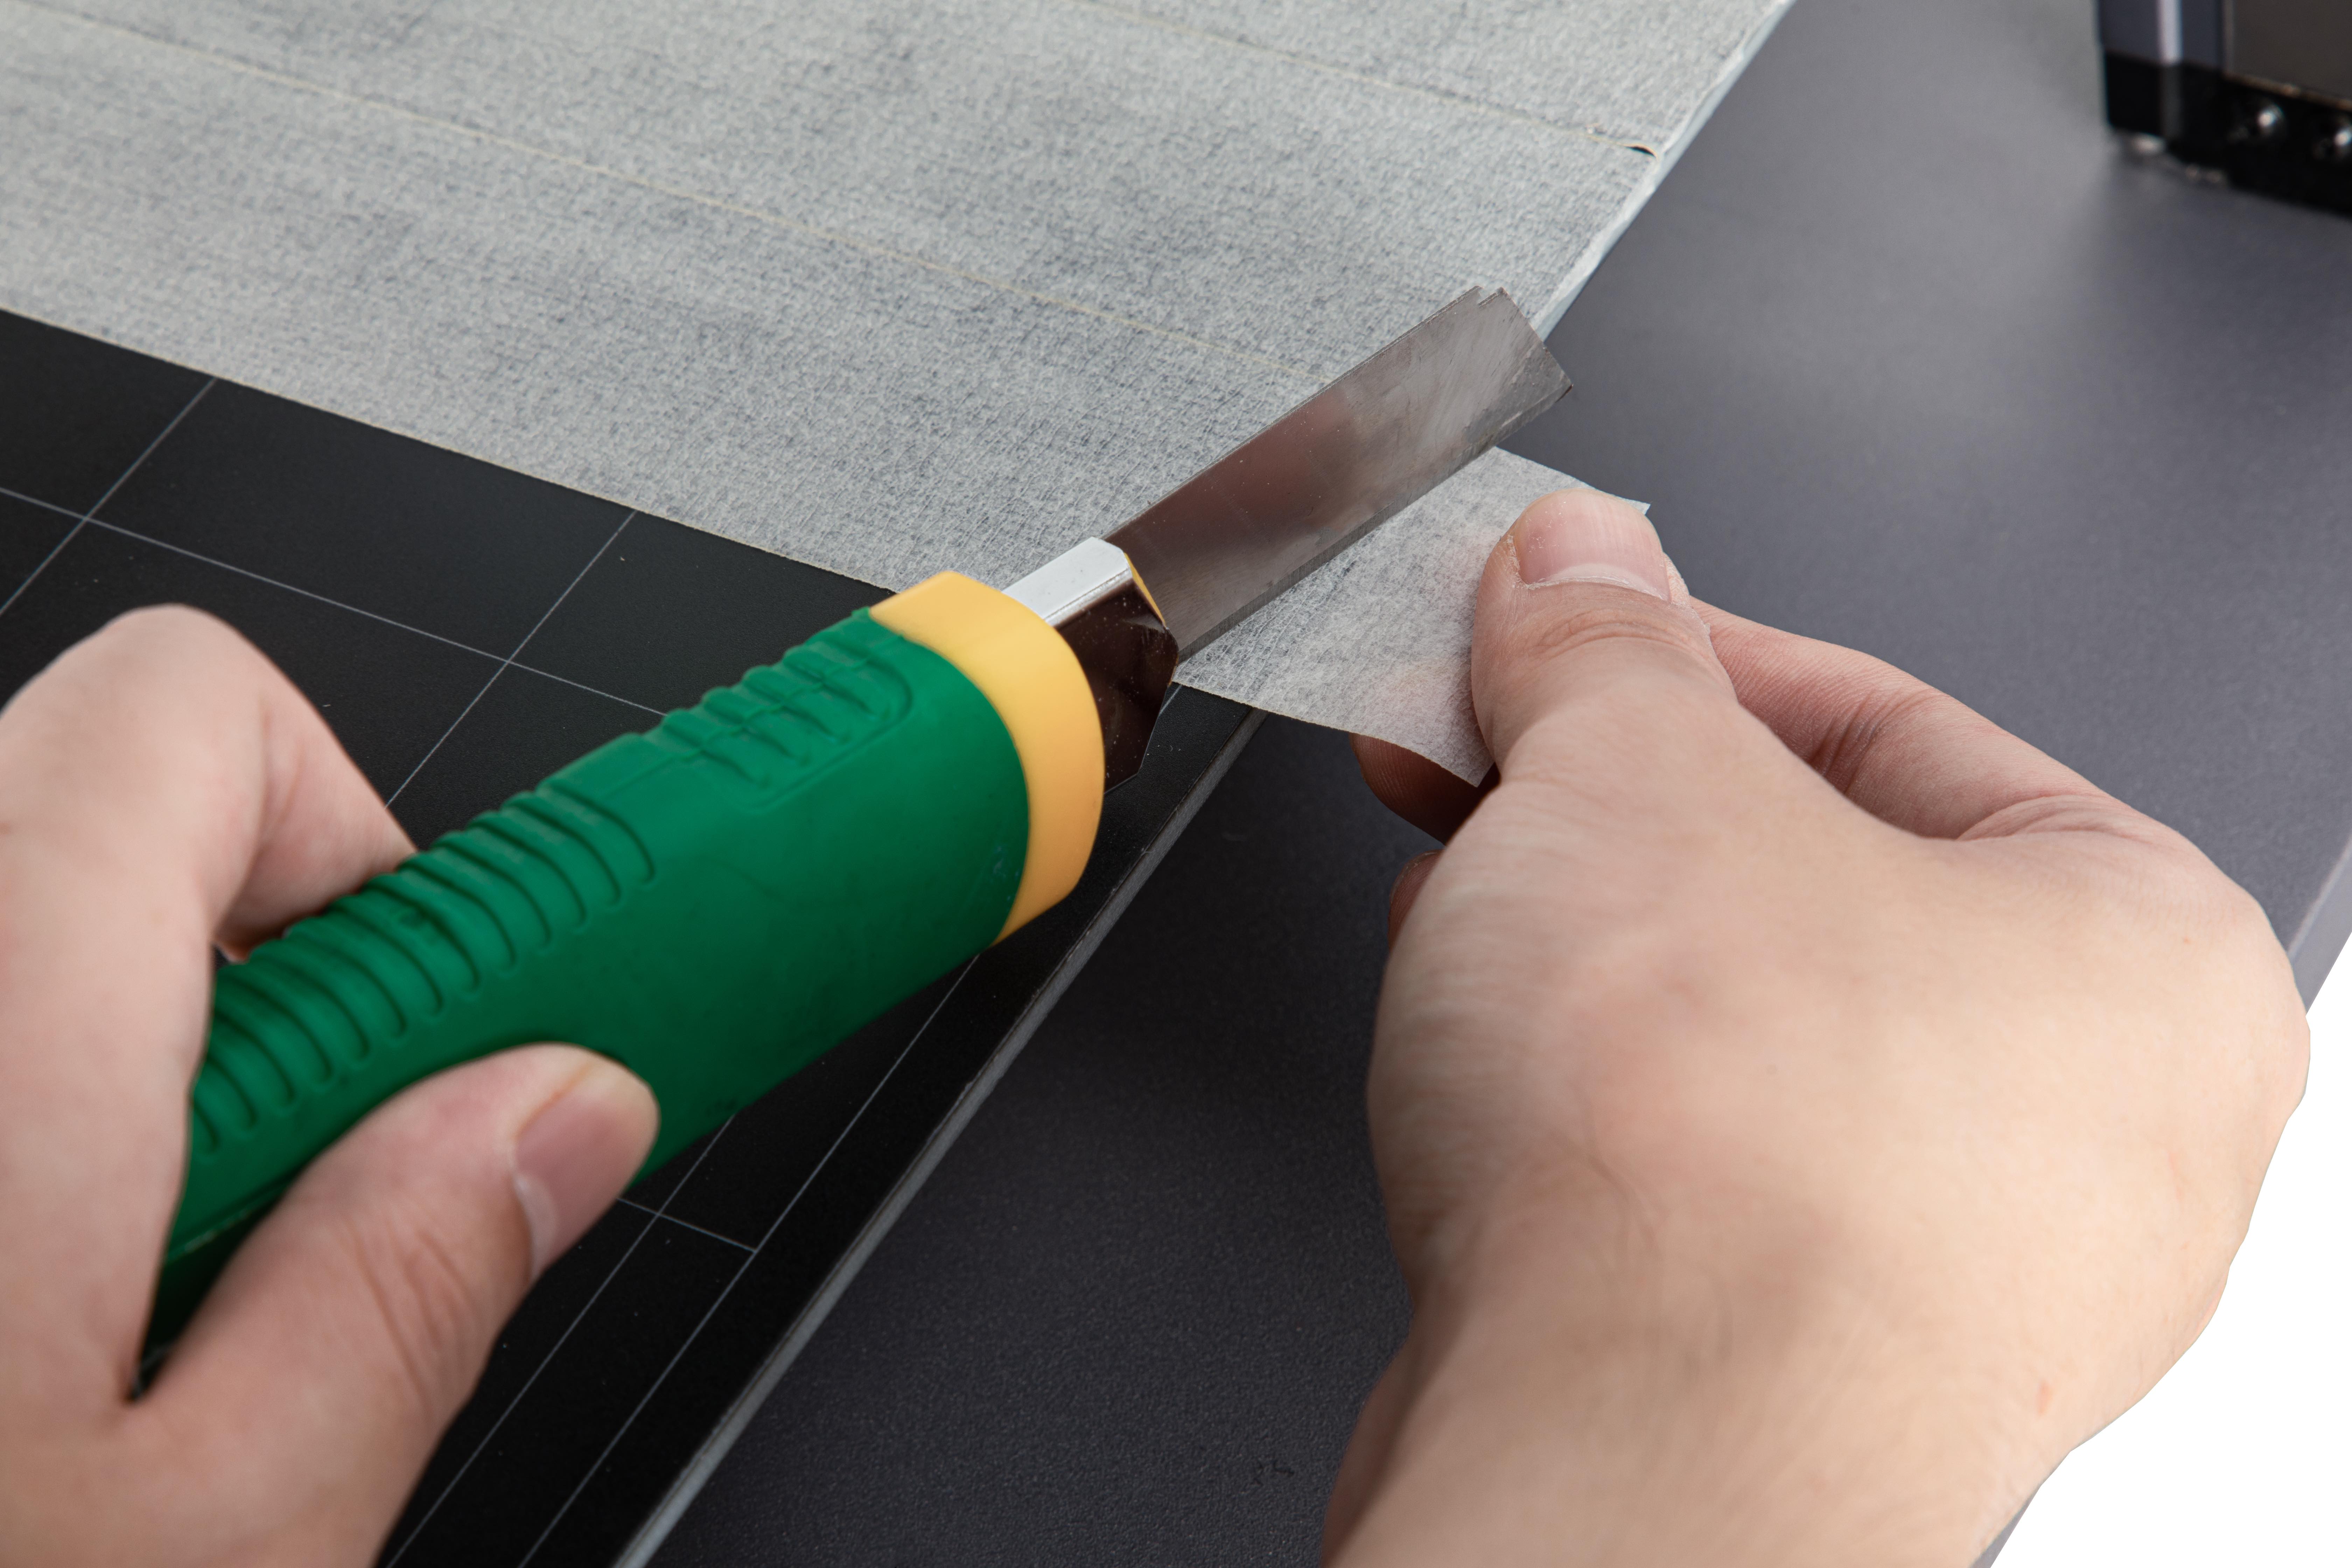
(2) Tape the Print Sheet using adhesive tapes (≥ 1 mm) that are resistant to high temperature. Apply pressure to the tapes to smooth out air bubbles underneath using the flat blade.
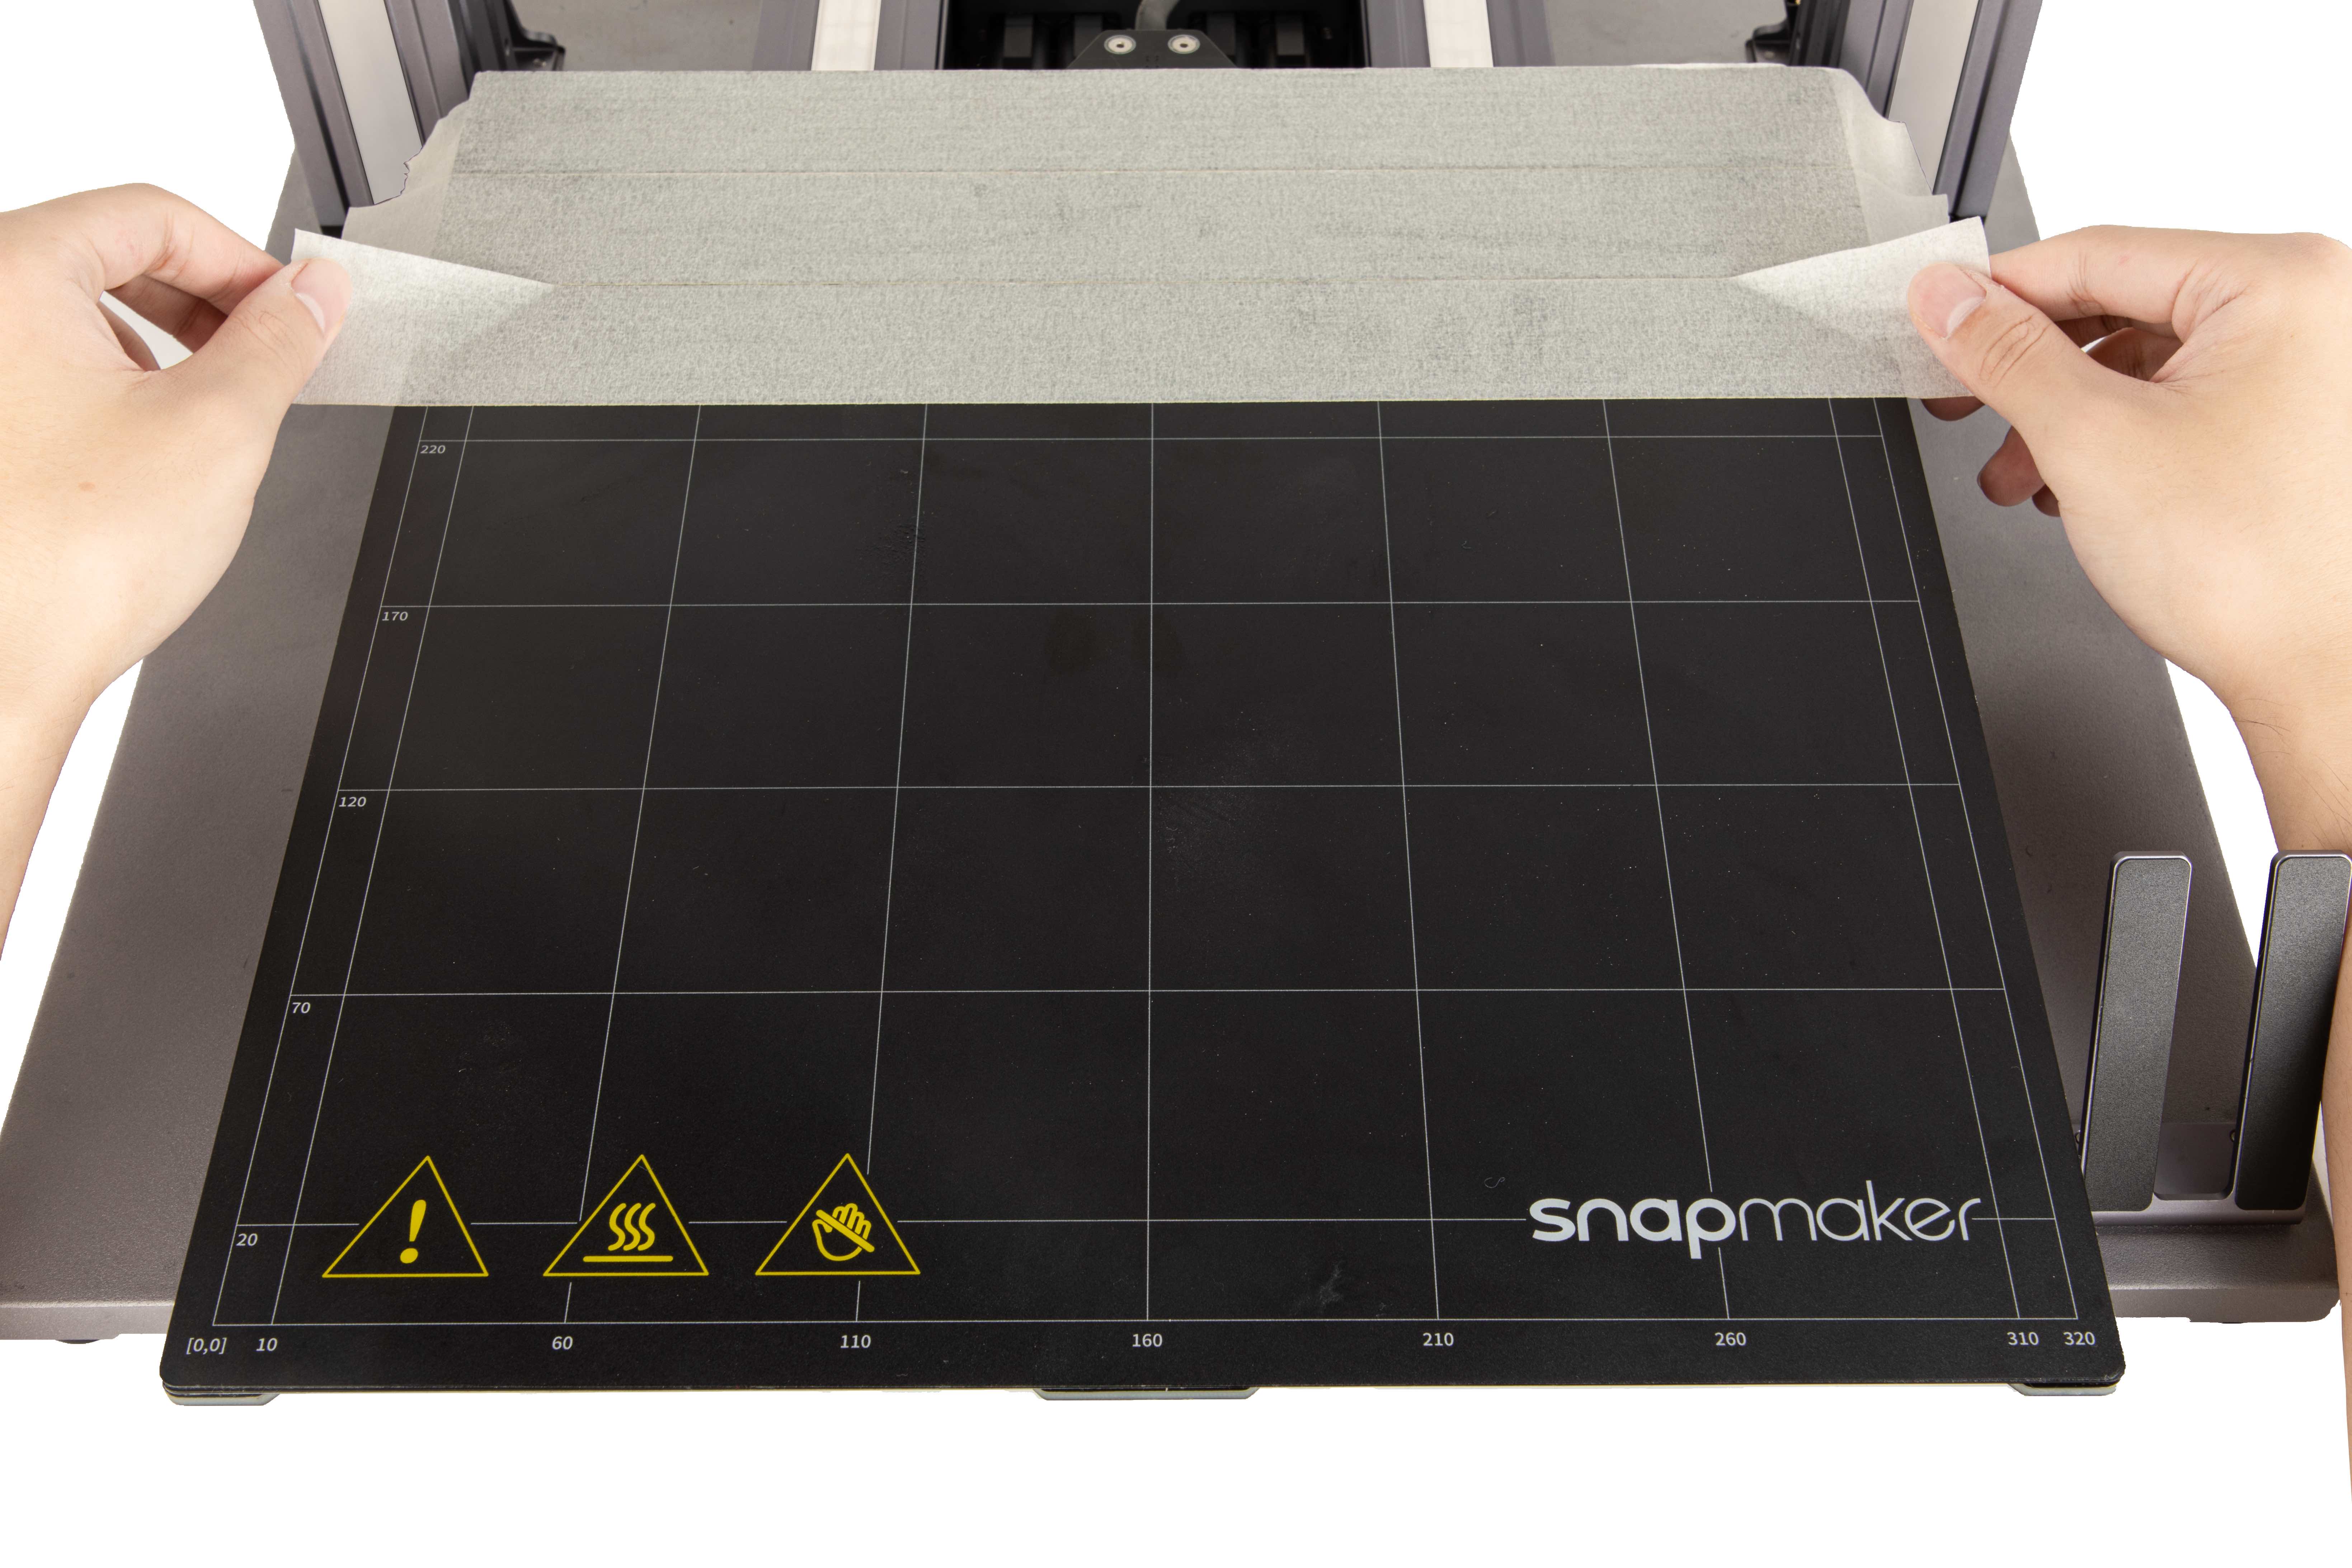
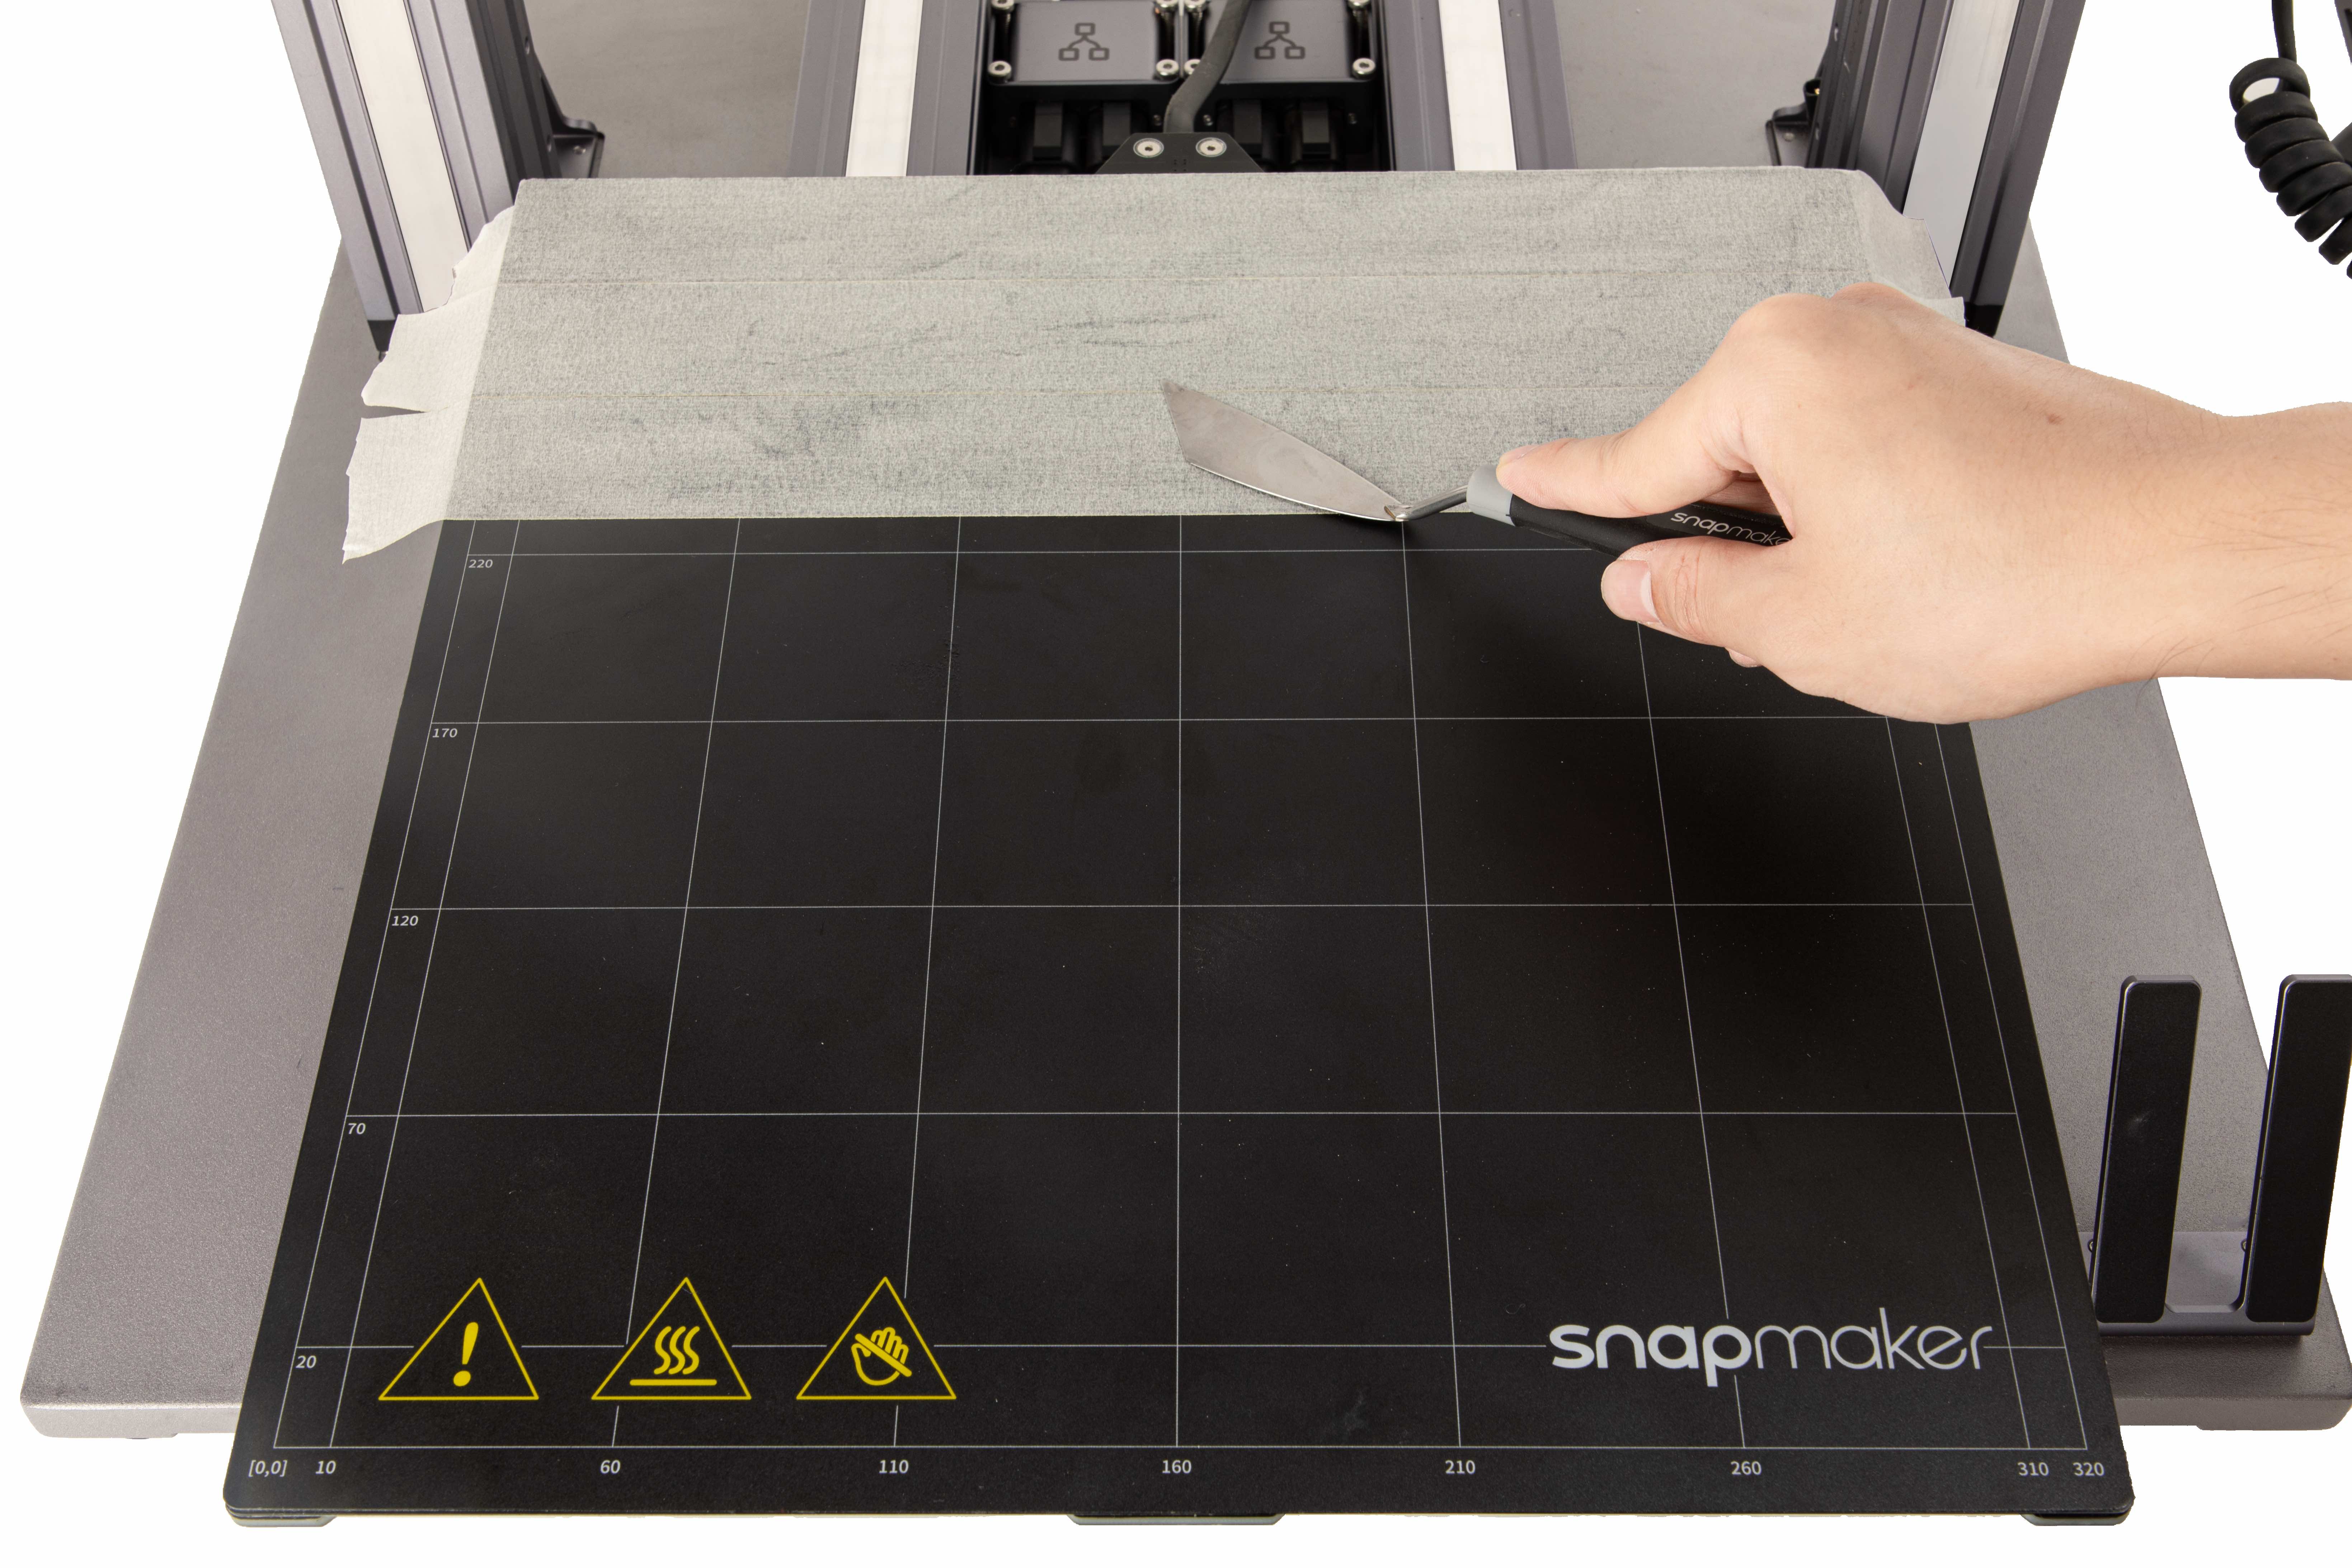
(3) Trim the tape to fit the Print Sheet edge.
(4) Tape the entire Print Sheet. Ensure that the two sides of all tapes fit tightly, without any gaps.
(5) Since the printing will be performed on the tape, you should recalibrate the Heated Bed before printing.
(6) After the printing job completes, wait for the Heated Bed to cool down. Gently scrape your print from the tape using the palette knife. Adhesive tapes on the Print Sheet can be used for next printing job.
Remove Support Structures
Some 3D prints work well without support structures, whereas some do need them. Should you add support structures in your G-code files, the following tips may be helpful.
Set Proper Support Structures
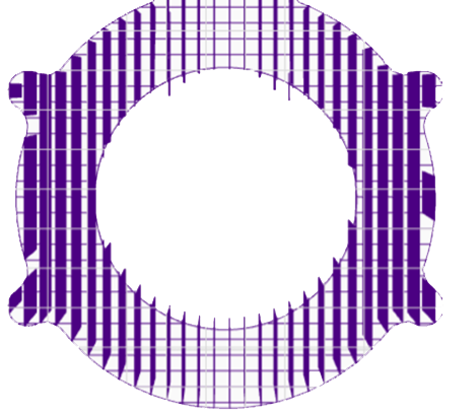
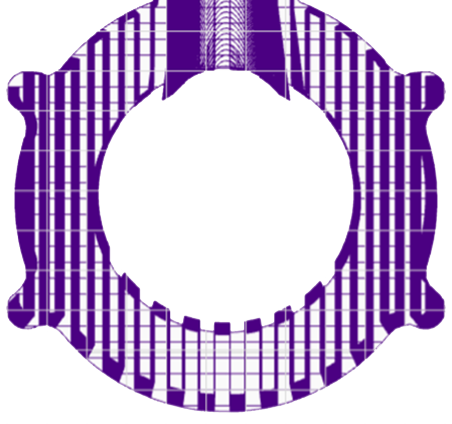
Luban has three types of support structures—Line, Zig Zag, and Grid. Generating support structures can prevent the overhung model parts from collapsing during printing. Setting a proper support pattern and its pertaining parameters will ease the removal of the support structures.
Generally, Line is the easiest pattern to remove, and Grid the most difficult. Line is often used for prints with few overhangs, requiring only slight support. Grid is suitable for prints with more overhangs which, if without any support from the base, will collapse the moment the uncured filament is extruded.
Use Tools
As a general rule, you should always remove support structures slowly and cautiously.
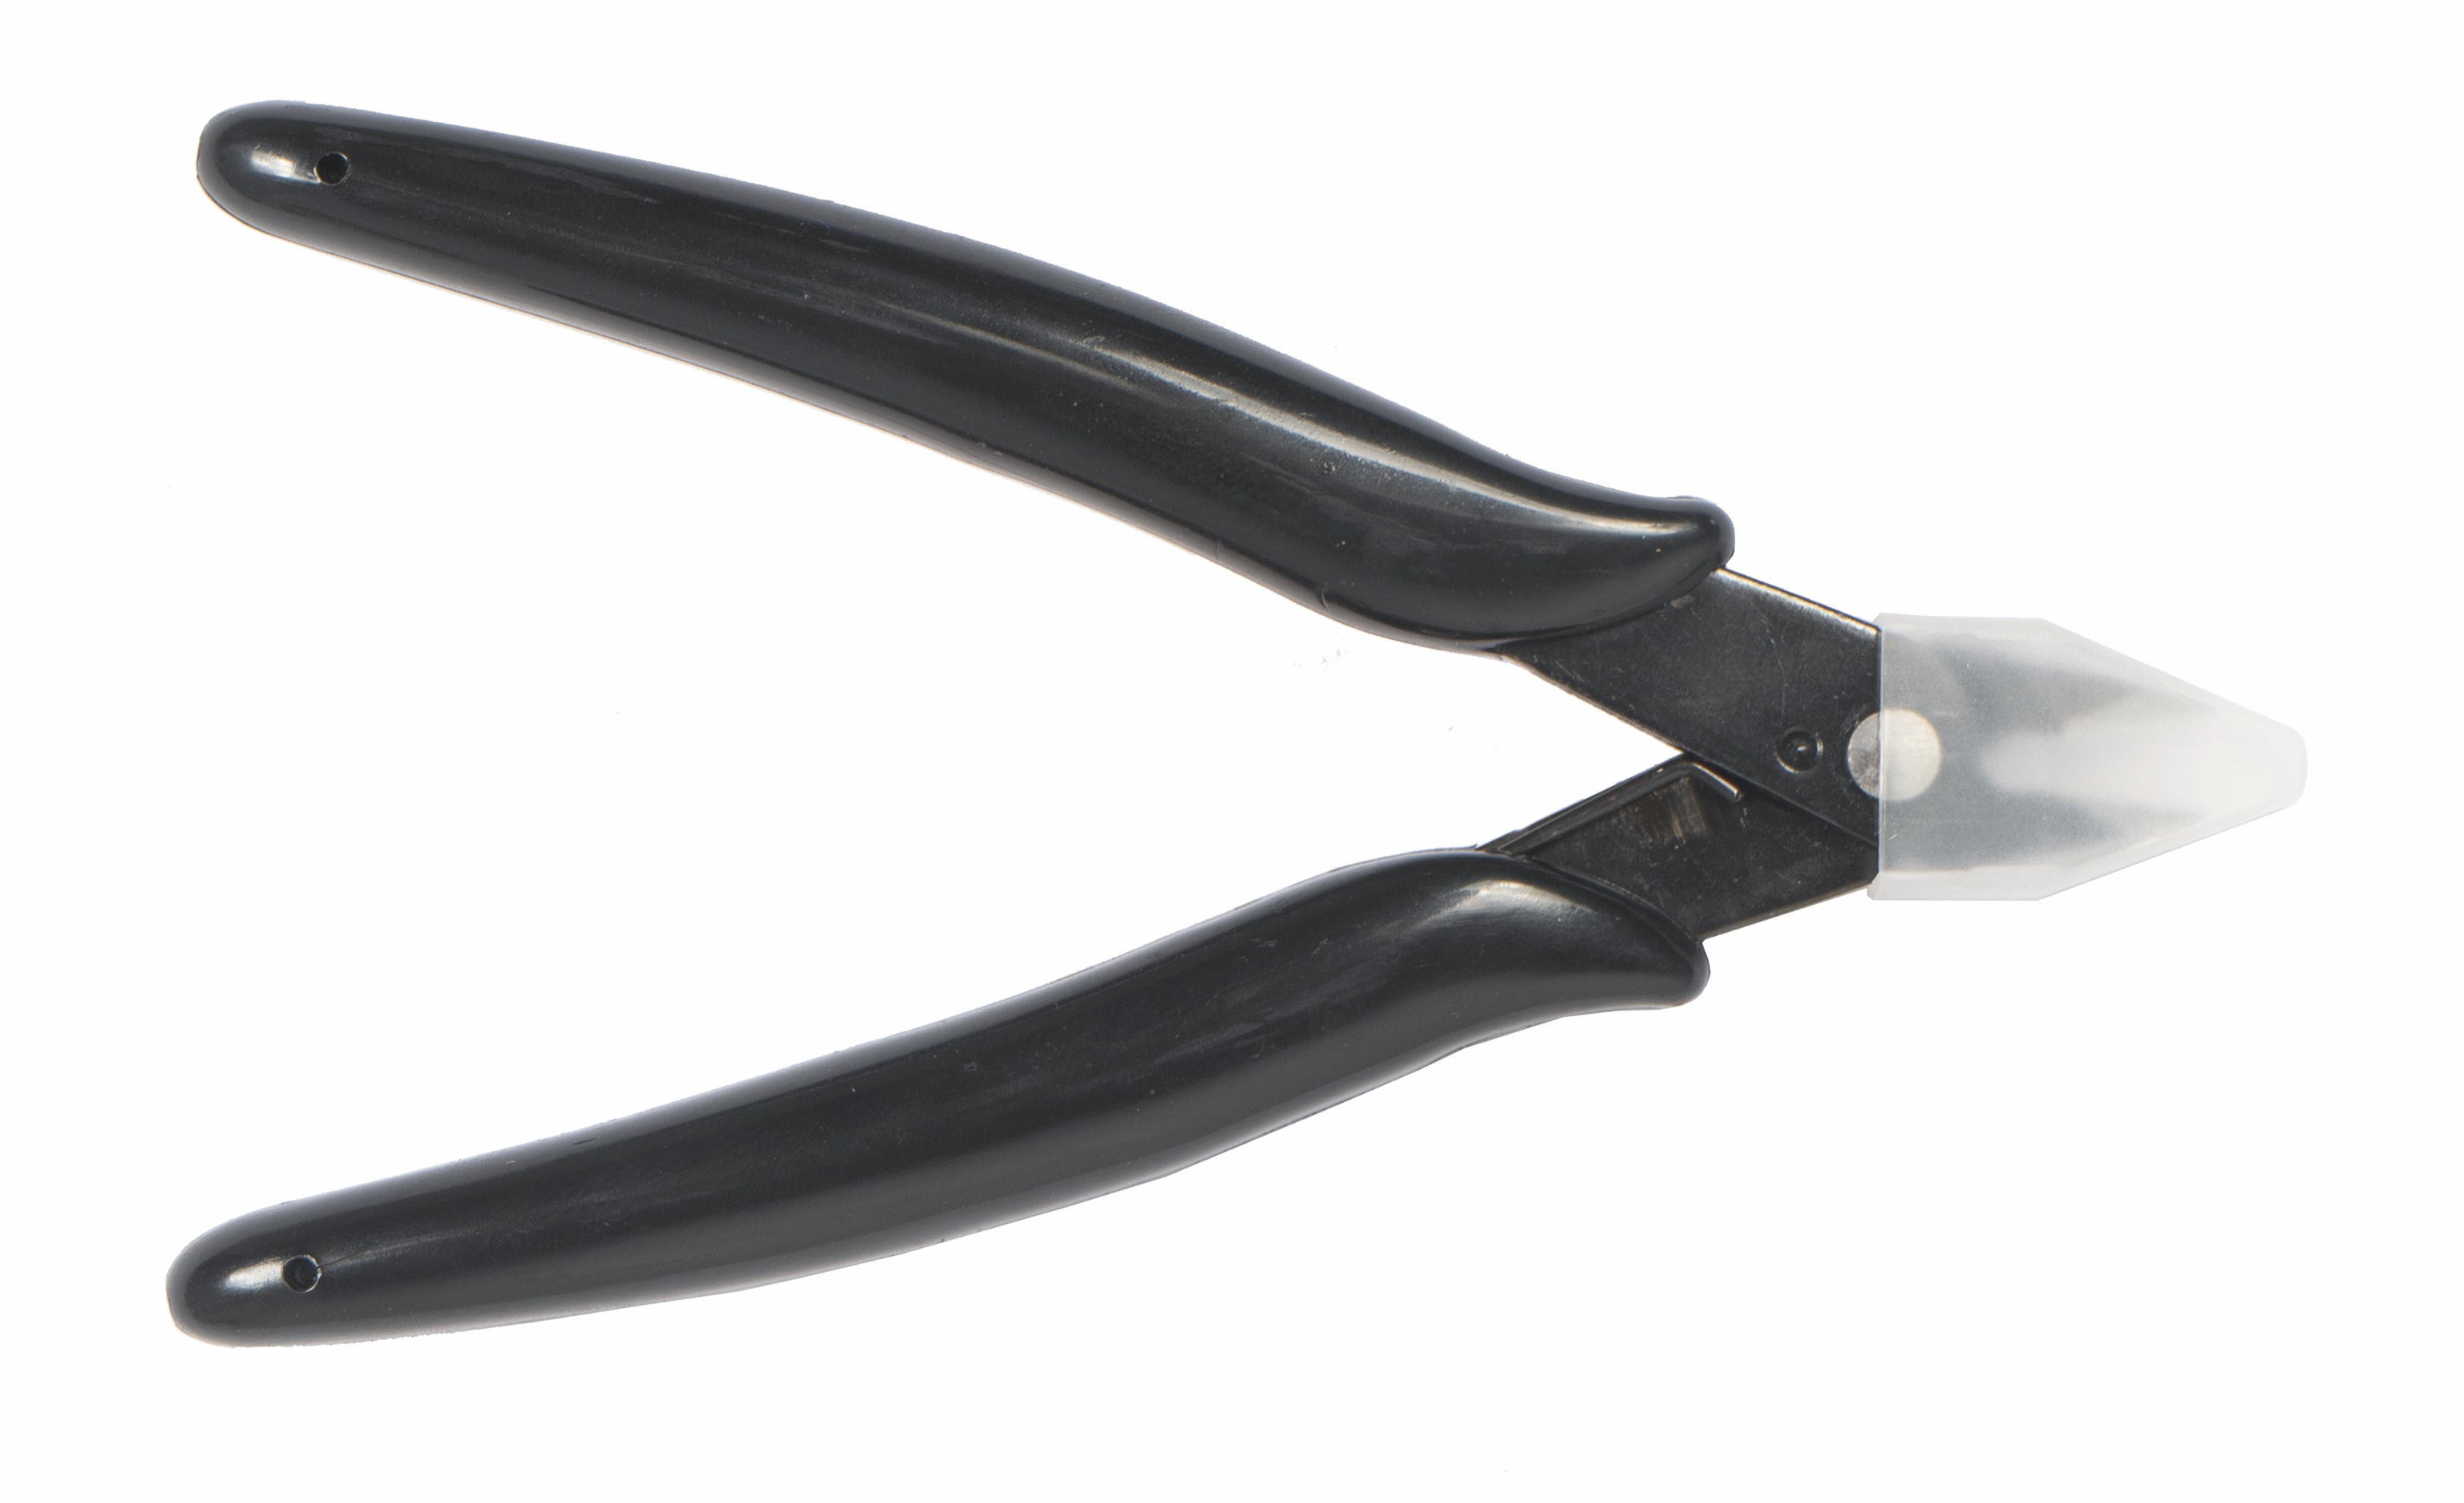
- Diagonal Pliers
Provided by Snapmaker. Diagonal pliers with wide jaws are typically used for cutting off outer parts, but less ideal for parts embedded deep inside the model.
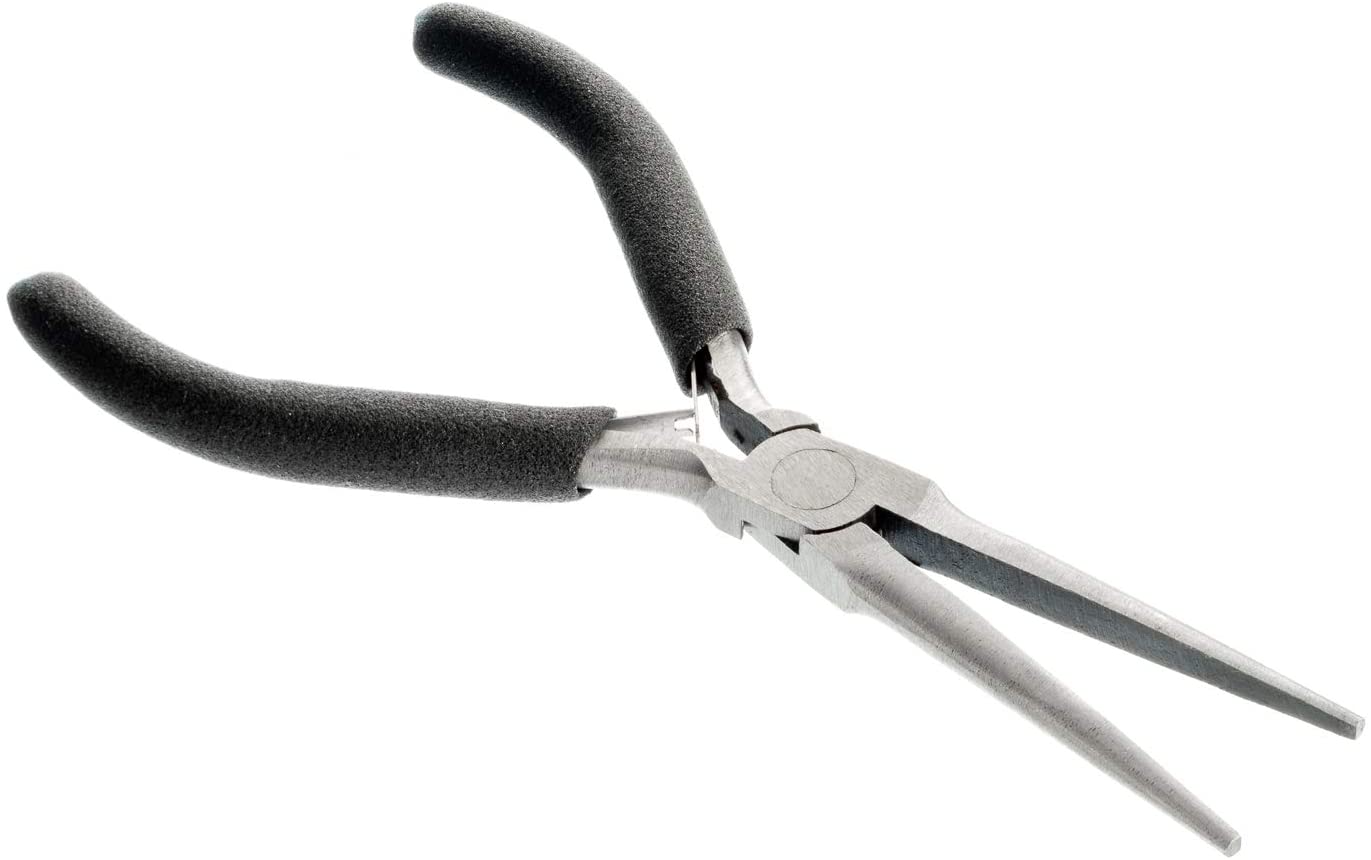
- Needle Nose Pliers
Not provided. Needle nose pliers with long and narrow noses are typically used for grabbing away parts quickly, but less suitable for parts that need precise control.
- Precision Knives
Not provided. Precision Knives are typically used for cutting off delicate parts which requires precision control.

Remove Residual Filaments
Heat the Bed Before Scraping
To ease the removal of cured filaments, heat the Heated Bed up to 70°C (158°F). Wait for the Heated Bed to cure the filament, and then scrape the residual filament using the sharp edge of the palette knife.
![]() Do not touch the Heated Bed with bare hands.
Do not touch the Heated Bed with bare hands.
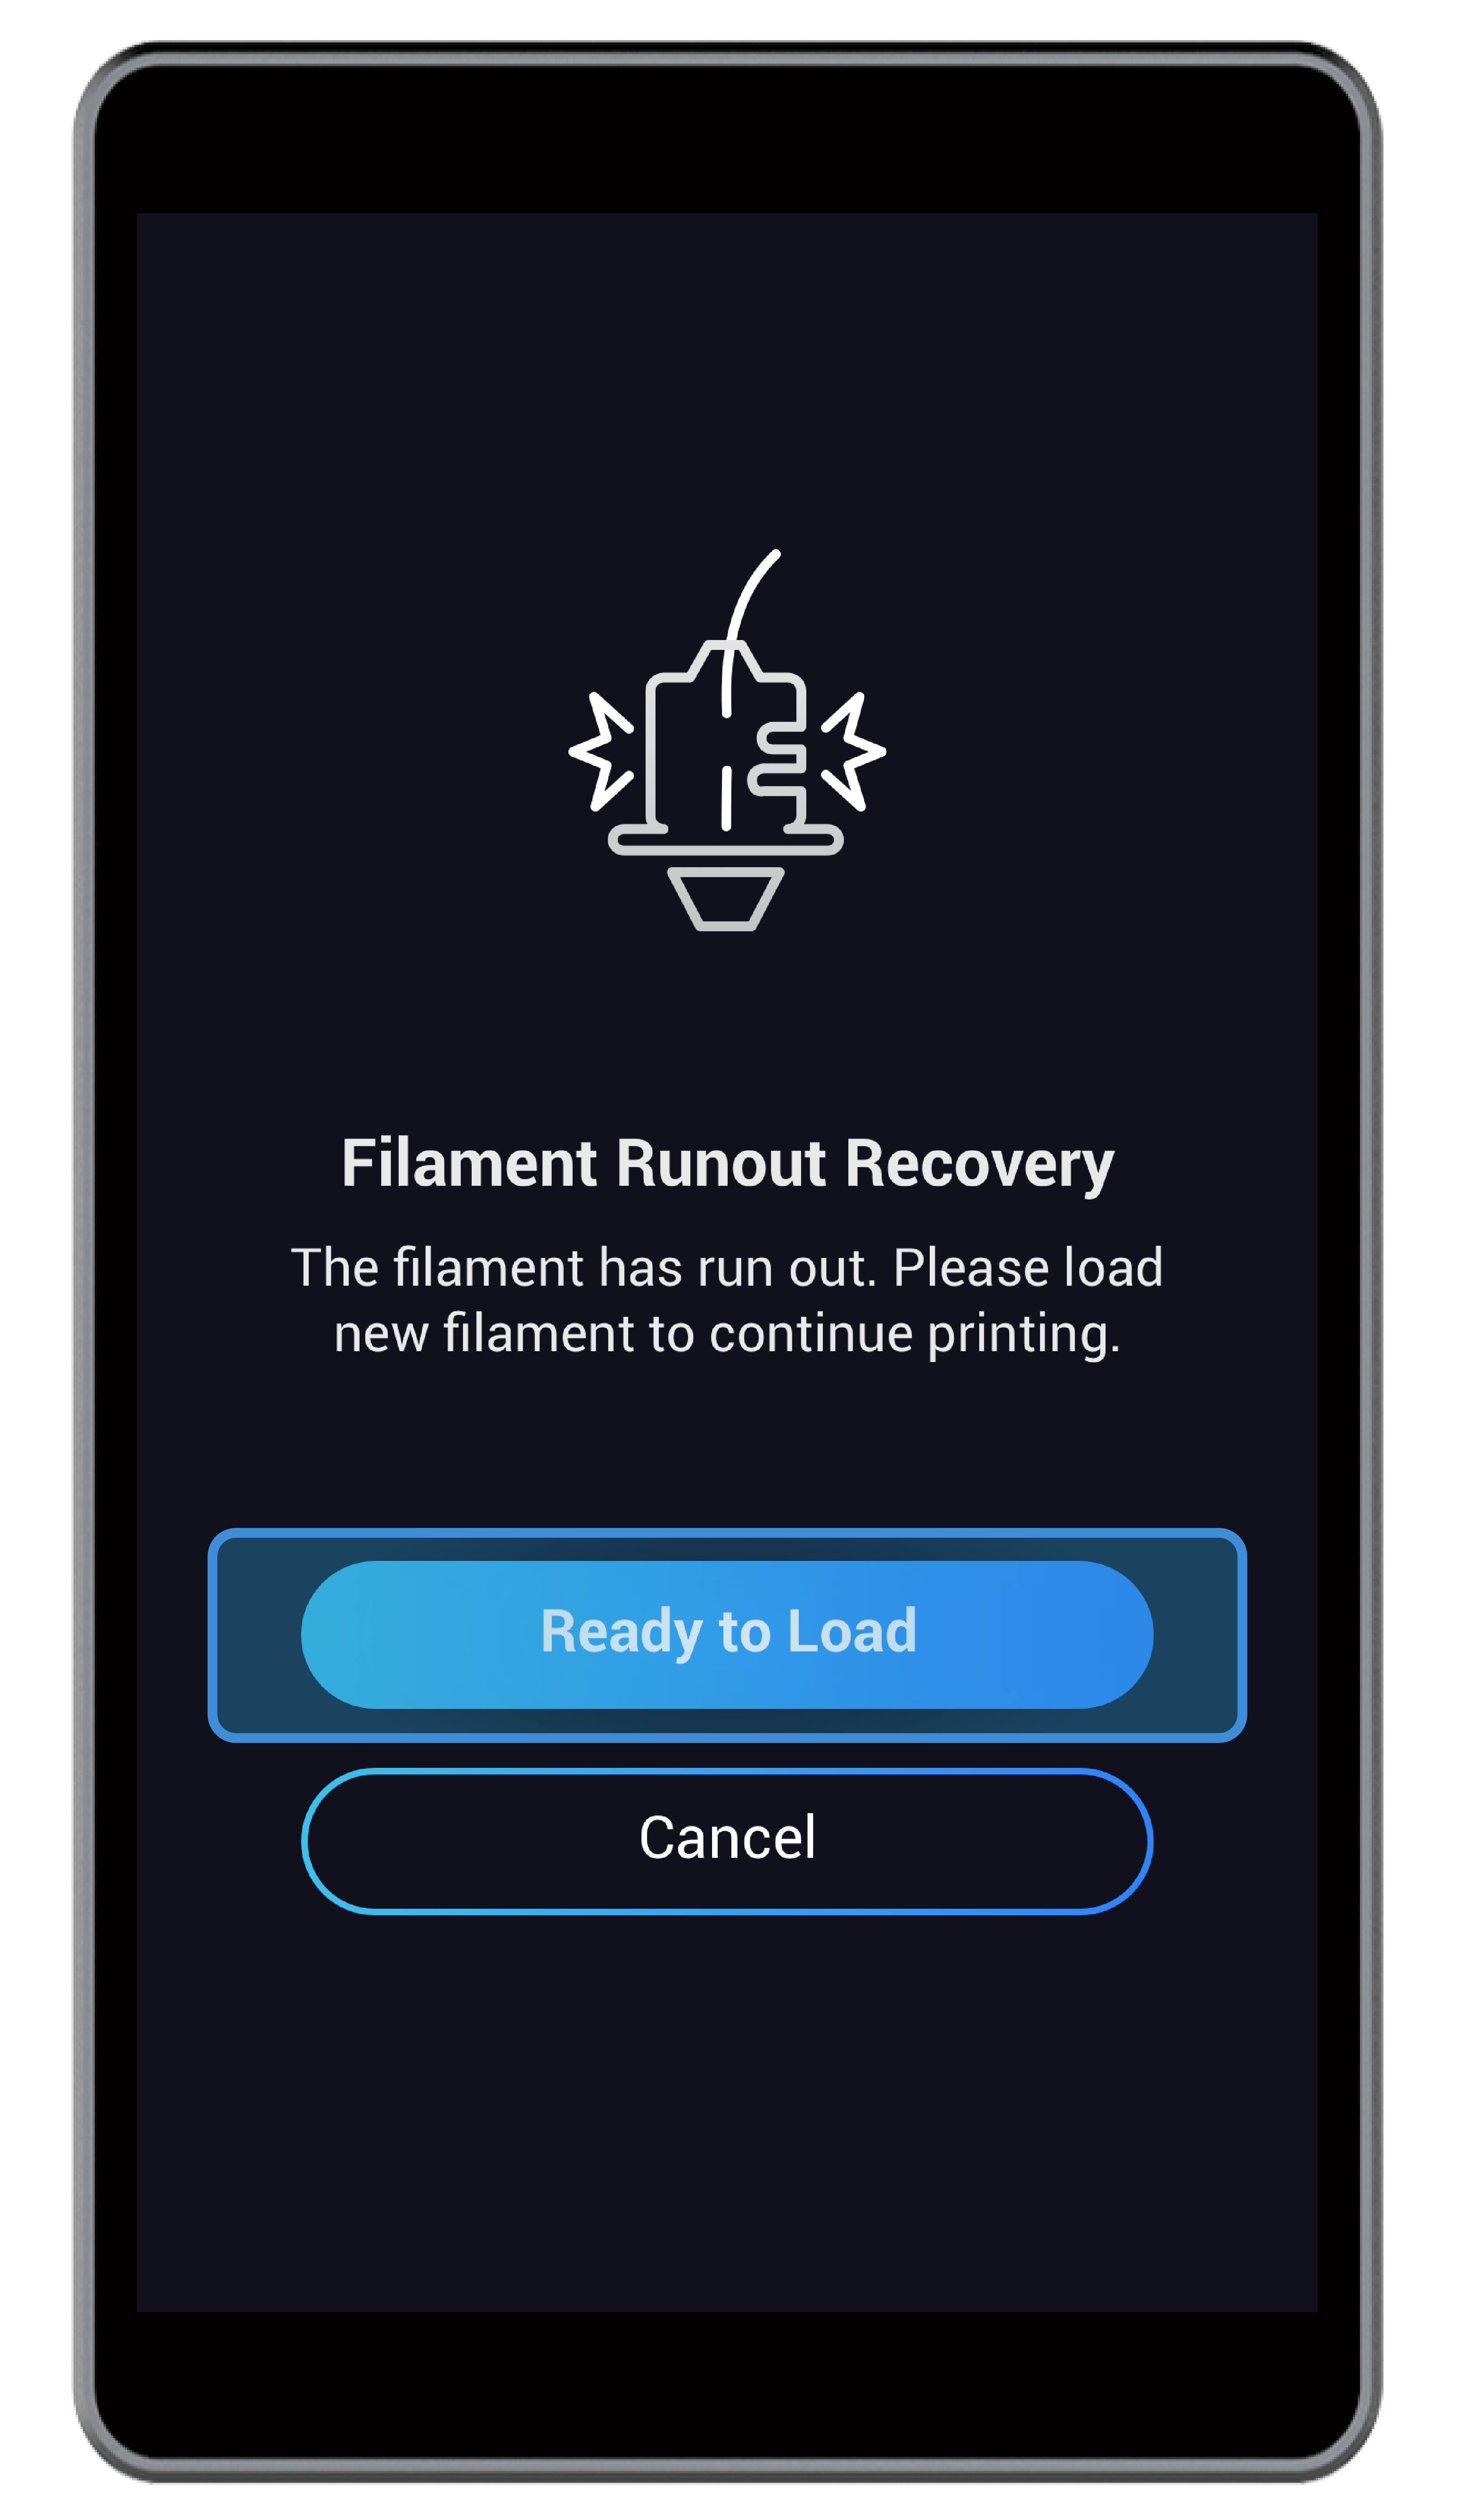
4.7 Filament Runout Recovery
During printing, if the filament runs out, the 3D printer will pause printing and prompt you to replace the filament. In this case, tap Ready to Load and Load to change a filament (see 4.3 Load the Filament). After the filament is reloaded, tap Continue to resume printing.
4.8 Power Loss Recovery
If the Power Module is turned off, to resume the printing job:
(1) Turn on the power switch.
(2) After the 3D printer is restarted, tap Resume on the Touchscreen.
If the AC Power Cable is unplugged, to resume the printing job:
(1) Turn off the power switch.
(2) Plug in the AC Power Cable.
(3) Turn on the power switch.
(4) After the 3D printer is restarted, tap Resume on the Touchscreen.